1. Before You Start Package Contests ~TWG-431BR ~Quick Installation Guide «Power adapter {12V DC, 1.54) «JR-45 1o RS-232 consoles cable (1m /328 ft) ~Rack mount kit Minimum Requirements = Computer with an Hemstitch port and web browser «Outwork cabs Optional Equipment A standard 19" rack 2.
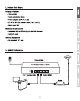
3. Hardware Installation and Configuration g 1. After you have the unit powered on and have connected your computer Into the Active LAN port, pan your wab browser and types the IP address of the router In the address bar, than preach Enter. The default IP address |s 192.168.10.1. 2. Enter the User mans and Password, and then click OK. By default: User name: admin Password: admin 3. Click System zt the top, then click Management.
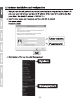
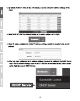
4. In the Admin Password section, enter and confirm your new Admin Password. Click Save at the bottom of the page. Note: After clicking Save, the changes you made to the router will not take effect until you reboot the unit. You can also make additional changes, then save and reboot after you have completed all configuration changes. To save all configuration changes and reboot, click. Reboot In the top right comer then click the Reboot bunion. 6, Click System at the top, then click CLAN Setup.
7. By default, CLAN #1 rafters to the LAN Interface and the default IP address settings of the router. 8. Unclog CLAN #1 click the Network button In the action column on the right. 9. Under IP setup, configure the router P address settings, match the requirements of your network. After you have configured the P address settings, you need to configure the CPD Pool to match the [P address settings. Under CLAN #1 click the mow button In the action column on the right then select CPD Server.
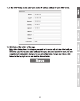
11. In the CPD Setup section enter your desired [P address settings for your CPD server. Site: Click Save at the bottom of the page. Mike: After clicking Save, the changes you made to the router will not take effect until you reboot the unit. You can also make additional changes, then save and reboot once you have completed all configuration changes. To save all configuration changes and reboot, click Reboot 2t the top right comer and click the Re boat button.
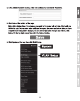
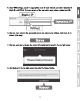
13, Gimmick the System tab at the top, then click WAN Setup. 14, The WAN 1 interface of the Router is set to Dynamic IP {also known s CPD) by default To
15. Under WAN settings, select the appropriate mode for your Interment connection Dynamic I State IP, and POE. Hf you are unsure of the connection mode, please contact your ISP. | Static IP | —— Dynamic 1P Poe | 16. After you have selected the appropriates mode and mentored your stings, click Sane at the bathroom of the page. 17. After you save your changes, the device will prompt you to reboot in the top right comer. Please Reboot Device! 18.
Declaration of Conformity TREND NET Manufacturer’s Name and Address Trended, Inc. 20675 Manhattan Place Torrance, CA 50501 USA c € Wollstonecraft 156 2587 WB The Hague The Netherlands Product Information: Model Number: TWG-4318R Product Name: Gigabit Multi-WAN VPN Business Router ‘Trade Name: Trend net Trend net hereby declare that the product Is In compliance with the essential requirements and other relevant provisions under our sole responsibility.