
User manual


7
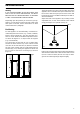
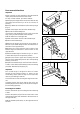
Door reversal directions
Important
Before carrying out the operations described below
unplug the mains lead from the wall socket.
To carry out this reversal, proceed as follows:
a)
Gently lay the fridge-freezer on its back with the top
held away from the floor by 5-8 cm (2-3 inches) of
packing.
b)
Using a PHILLIPS screwdriver remove the top hinge
(Fig. 4).
c)
Slide out the upper door from the middle hinge.
d)
Unscrew the left levelling foot.
Unscrew the right levelling foot (H), hinge (I) and the
stop (L) (Fig. 5) and refit them on the left side.
Refit the other foot on the right side.
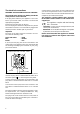
e)
Slide out the lower door from the middle hinge.
f)
Remove the middle hinge.
g)
Remove the plastic plugs from the screw holes of
the new top & middle hinge location and refit them in
the holes on the opposite side.
h)
Remove the screws from the new location of the
bottom hinge and refit them in the free holes on the
opposite side.
i)
Refit the middle hinge as shown in Fig. 6, i.e. upsid-
e-down with respect to the previous position.
j)
Replace the lower & upper door making sure that
the pins of the middle hinge fit into the corresponding
bushing on the door.
l)
Replace the bottom hinge on the left side of the low-
er base of the cabinet (the fastening holes are already
provided). Refit the top hinge (Fig. 4).
Important
The central hinge is designed to allow a certain
amount of side clearance (play), i.e. approx. 3 mm
horizontally, which makes it easy to line up the two
doors by proceeding as follows:
Loosen the two screws securing the hinge to the cabi-
net.
Carefully position the hinge until the two doors are
perfectly aligned, then firmly screw down the hinge in
its new setting (position).
Reversing door handles
Remove the handle by unscrewing the two fastening
screws.
Remove the plastic plugs from the screw holes of the
new handle location and refit them in the free holes on
the opposite side;
Refit the handle upside-down, on the opposite side of
the door.
Fig. 4
Fig. 5
Fig. 6
D185
H
I
D537
L
D121