
Installation Guide


3
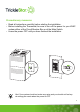
- Step 9: Disconnect and label old thermostat wires 36
- Step 10: Unscrew old Mounting Plate 37
- Step 11: Replace with new Thermostat Mounting Plate 38
- Step 12: If the Trim Plate is used (Optional) 39
- Step 13: Pull the labeled wires through the hole of the Mounting Plate 40
- Step 14: Attach the Mounting Plate on the wall 41
- Step 15: Connect the wires 42
- Step 16: Set the jumpers on the back of your Thermostat 43
- Step 17: Attach the Thermostat onto its Mounting Plate until it clicks 44
- Step 18: Turn on the power 45
- Installation done! 46
4 Start-UpConguration
-Option1:CongurationusingtheTrickleStarPortal 48
-Option2:CongurationwithoutusingtheTrickleStarPortal 49
5 Thermostat Features 54
6 Thermostat LCD Display 55
7 WiringDiagrams
- Conventional heating and cooling systems 56
- Heat pump with auxiliary heat 57
- Boiler and radiant system 58
- C-Wire Kit wiring 59
-Withoneaccessorywire(humidier/dehumidier/ventilator) 60
-Withtwoaccessorywire(humidier/dehumidier/ventilator) 61
8 Troubleshooting 62
9 Legal 63
10 Warranty 65