Barn Door & Hardware Installation Guide
Contents INTRODUCTION Thank you for purchasing our hardware. Our barn door and hardware will add a stunning accent to your living environment and maximize its space. This manual covers the installation of our barn door and hardware. Safety. . . . . . . . . . . . . . . . . . . . . . . . . . . . . . . . . . . . . . . . . . . . . . . . . . 1 Parts . . . . . . . . . . . . . . . . . . . . . . . . . . . . . . . . . . . . . . . . . . . . . . . . . . 2 Hardware. . . . . . . . . . . . . . . . . . . . . . . . . . .
• Failure to wear proper safety gear (i.e., eye protection) may result in serious injury or death. Always wear proper safety gear before using power tools. • Improper operation of power tools may result in loss of control, serious injury or death.
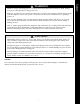
Parts HARDWARE Before you begin, check that you have the parts you need in your kit. The list below will provide everything you will need for your hardware.
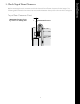
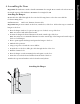
Before mounting the track, measure and check there will be sufficient clearance for the hanger. The following table shows the minimum clearance needed between the top of the door and the ceiling line. Top of Door Clearance Chart Minimum Clearance from top of Door to Ceiling Line 6” Minimum Clearance 3 Installation 1.
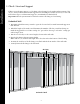
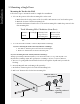
Installation 2. Check Structural Support If there is not adequate support (i.e., blocking or head casing) for the weight and movement of the door(s), then you must add structural support before attaching the track(s) and door(s) to the wall. Follow these steps to add structural support to an unfinished or finished wall. Important! All track systems must be attached to interior blocking or a head casing. Unfinished Wall 1.
Important! The maximum door weight rating for attaching a door to head casings alone with no wall blocking, is 75 lb. (see unfinished wall section for installing structural support for heavier doors). The head casing must be a minimum of 1” thick and it is recommended it be a hardwood. We also recommend that you paint or stain the head casing before attaching it to the wall. 1. Determine which direction you wish to open the door and open the door and follow directions below accordingly. 2.
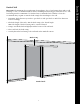
Installation 3. Check Door to Wall Clearance Important! Our hardware requires at least 3/8" between the door and wall / existing molding. See the table below for typical standoff arrangements. Recess the bolt heads, or use standoff extensions to achieve the necessary clearance. Door to Wall Clearance Door Thickness Standoff Arrangement * Up to 1 3/4” 1 1/8” standoff base * Note: Maximum total standoff depth of 1-7/8” to maintain door weight rating.
Important! The hardware is rated to handle a maximum door weight. Do not attach a door that exceeds the weight capacity of the hardware. Maximum door Weight (lb) 220 Attaching the Hangers Mount the holes drilled through the door. Use the following chart to select the correct drill bit for the mounting holes: Drill a 3/8” diameter clearance hole Drill Instructions Important! Hangers are mounted on the front (outside face) of the door. Follow these steps to attach the hangers to the door: 1.
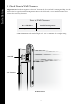
Installation 5. Mounting a Single Door Mounting the Track to the Wall Follow these steps to mount the track for a single door installation: 1. To locate the position of the first mounting hole on the track: a. Mark where the closed position of the door will be and measure 1 1/8” in from this point. b. Mark the location of the first mounting hole. c. Calculate the distance from the floor to the track mounting holes. Mark the position for the first mounting hole.
4. Level the track and mark the remaining mounting hole locations. Note: If multiple tracks are being installed for a single door, then you may use a Splice Plate to connect the tracks. 5. Repeat step 2 on the remaining mounting holes. 6. On the first mounting hole, remove the track. Place a Standoff (and extensions, if using) behind the track and place an End Stop on the track.
Attaching the Door Installation Follow these steps to attach the door: 1. Lift the door and place the track into the grooves on the hangar wheels 2. Move door from end to end to see how the door slides Door Guide Installation: Follow these steps to install the T-Guide: 1.. Plumb and block the door so it is square to the floor 2.. Determine how wide the door overlap is (min.
WARNING! Lack of, or improperly installed Anti-jump Disc may result in the door coming off the track and cause serious injury or death. Installation of Anti-jump Disks are required for safe operation of this hardware. Installed properly, these discs will keep the door securely attached to the track. Follow these steps to install the Anti-jump Disc on all models: 1. Locate the screw for the Anti-jump Disc 3/8” of an inch in from the front edge of the door, between the hanger and outside edge of the door. 2.
The steps to install double doors are the same as the installation of a single door except you will be mounting two separate tracks. One for the left-hand door and one for the right-hand door. Note: These tracks are not connected so the track splice is not needed. Follow these steps to mount two tracks: 1. Determine the center of the doorway. 2. Start with the left side door and follow the instructions for mounting a single door. 3.
TRIMLITE