
Owner Manual


9
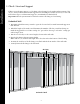
Installation
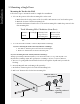
3. Hold the track to the wall. Loosely screw the track in place.
4. Level the track and mark the remaining mounting hole locations.
Note: If multiple tracks are being installed for a single door, then you may use a Splice Plate to connect
the tracks.
5. Repeat step 2 on the remaining mounting holes.
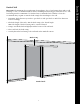
6. On the first mounting hole, remove the track. Place a Standoff (and extensions, if using) behind the track
and place an End Stop on the track.
Attaching End Stop:
Imp
ortant! They must be first be placed at their proper location on the track, before track is affixed to wall.
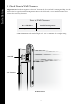
a. Loosen the set screws with Hex Wrench provided.
b. Slide the Adjustable End Stop on track (with the cushion pad facing the center of the track).
c. Place a Standoff behind each of the remaining mounting holes and screw the track securely to
the wall
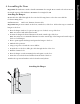
d. H
ang the door(s).
e. Adjust the End Stops to desired final position, and tighten securely with the Hex Wrench.
(X2)