
Installation Instructions

4
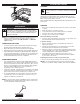
ASSEMBLY
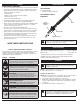
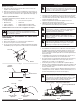
Removing the Attachment
1. Turn the knob counterclockwise to loosen (Fig. 1).
2. Press and hold the release button (Fig. 2).
3. While firmly holding the upper shaft housing, pull the attachment
s
traight out of the EZ-Link™ coupler (Fig. 3).
The EZ-Link™ System
The EZ-Link™ system enables the use of these optional
attachments.
• Edger* • Pole Saw
• Cultivator • Hedge Trimmer*
• Turbo Blower • Straight-shaft trimmer
• Brushcutter* • Curved-shaft trimmer
*DO NOT use this attachment with an electric-powered unit.
WARNING:
Before you begin using any attachment,
read and understand the manual that came with the
attachment. Follow all safety information contained within.
CHECK FLEX SHAFT ENGAGEMENT PRIOR TO USING
1. Start the unit.
2. Briefly engage and release the trigger.
3. Ensure that the attachment is operating.
4. If the attachment is not operating, remove it and repeat the
installation procedure until the attachment operates correctly.
Fig. 1
90˚ Hole
Knob
Fig. 2
Release Button
EZ-Link™
Coupler
Fig. 3
90º Hole
Lower Shaft
Housing
Upper Shaft
Housing
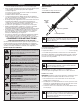
OPERATION
BEFORE OPERATING
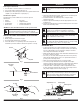
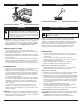
1. Grasp the adjustment lever (Fig. 4) and push to unseat the push
pin from the hole in the indexing ring.
2. Rotate the blade to the desired position using the angle
a
djustment handle.
3. Align the adjustment handle pin with the appropriate hole in the
indexing ring.
4. Release the adjustment lever into the indexing hole to secure the
blade at the desired position.
W
ARNING:
Always wear eye, hearing, hand, foot and
body protection to reduce the risk of injury when operating
this unit.
WARNING:
If operating the unit on a slope, stand below
the cutting attachment. DO NOT operate on a slope or hilly
incline if there is any chance of losing footing.
OPERATING TIPS
• To trim new growth, use a wide sweeping motion, feeding the
blade teeth through the hedge or twigs. Feed the stems directly
into the cutting blade. The most effective cutting is achieved
with a slight downward tilt of the blade.
• Older growth will have thicker stems and will be trimmed easiest
by using a sawing movement.
• Do not try to cut stems that are larger than 7/16 inches (11mm)
thick with the hedge trimmer. Use a non-powered hand saw or
pruning saw to trim large stems.
• Wear gloves when trimming thorny or prickly growth.
• Use a string to help determine the level height of the hedge.
Stretch a length of string along the top of the hedge at the desired
height and trim the hedge just above the level of the string.
• To trim the sides of the hedge, hold the hedge trimmer at the
bottom and sweep upward. Trim the sides of the hedge so that
they will be slightly narrower at the top (Fig. 5).
WARNING:
If any parts are missing, damaged or
broken, do not operate the unit until they have been
replaced. Failure to do so could result in serious injury.
WARNING:
Keep hands and fingers away from moving
parts. Any part of body coming in contact with moving
parts could result in serious injury.
WARNING:
Do not clear away any cut material with the
engine running or blade turning. To avoid serious personal
injury, turn off the engine. Allow the blade to stop before
removing materials wrapped around the blade shaft.
Fig. 4
Adjustment Lever
Indexing Ring
Indexing Holes
Angle Adjustment Handle