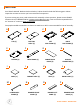
PARTS LIST Your TRINITY PRO 48” Bamboo Kitchen Island w/ Cabinet should include the following parts. Please inspect box contents to ensure you have received all components. If you are missing any parts, need assistance with assembly or have questions, please contact TRINITY Customer Service: 800.985.5506 or customerservice@trinityii.com. Parts can also be requested online via “Contact Us” section at www.trinityii.com. Two people needed to assemble.
PARTS LIST Q R DRAWER RIGHT PANEL (2) AA S DRAWER BOTTOM PANEL (2) BB DRAWER SCREW (12) + (1) extra EE II SHELF SUPPORT (9) SCREWDRIVER (1) © 2020 TRINITY - 800.985.
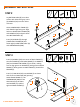
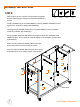
ASSEMBLY INSTRUCTIONS STEP 1 Note: To protect product from any scratches or possible damage, please make sure all bamboo parts are laid on a clean and soft cloth / surface during assembly process. A (1) C (1) D (1) F (1) FF (24) MM (1) Lay all below pieces on a clean surface with holes facing up.
ASSEMBLY INSTRUCTIONS STEP 2 Lay BOTTOM SHELF (B) on a clean surface with holes facing up. Insert (4) DOWELS (HH) into inner holes as shown. B (1) MM M (2) EE (6) HH (4) MM (1) M EE Orient LOWER SHELF FRAME (M) with TRINITY logo facing out. Align holes on LOWER SHELF FRAME (M) with DOWELS (HH) and push down onto BOTTOM SHELF (B). B Insert (6) SCREWS (EE) through LOWER SHELF FRAME (M) and fasten tightly to BOTTOM SHELF (B) with SCREWDRIVER (MM).
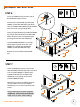
ASSEMBLY INSTRUCTIONS STEP 4 Insert (2) DOWELS (HH) into bottom of DIVIDER (E) as shown. Connect DIVIDER (E) with BOTTOM SHELF (B) via inserted (2) DOWELS (HH), making sure to align grooves on BOTTOM SHELF (B), DIVIDER (E) and BACK FRAME (F). EE (3) HH (2) MM (1) HH Tightly fasten (3) SCREWS (EE) into center of BOTTOM SHELF (B) with SCREWDRIVER (MM). E F B MM EE STEP 5 Insert (1) CABINET BACK PANEL (G) through both grooves on BOTTOM SHELF (B) and BACK FRAME (F).
ASSEMBLY INSTRUCTIONS STEP 6 Insert (2) DOWELS (HH) into each side of BOTTOM SHELF (B) as shown. GG (10) GG HH (4) MM (1) Connect LEFT SIDE FRAME (C) with BACK FRAME (F) and BOTTOM SHELF (B). Make sure all CONNECTOR SCREWS (FF) & DOWELS (HH) are inside corresponding holes. Insert (2) CAM LOCKS (GG) into BACK FRAME (F) and (3) CAM LOCKS (GG) into BOTTOM SHELF (B) with arrow on CAM LOCK (GG) pointing toward LEFT SIDE FRAME (C).
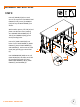
ASSEMBLY INSTRUCTIONS STEP 8 With another person, carefully stand partially assembled Kitchen Island upright, making sure LOCKING CASTERS are locked. BB (9) S (2) CC (4) II (7) Install (1) HANDLE (S) to LEFT SIDE FRAME (C) with (2) HANDLE SCREWS (CC) and tighten fully. Repeat for RIGHT SIDE FRAME (D). Hand tighten (5) HANGER STUDS (II) on LEFT SIDE FRAME (C) and (2) HANGER STUDS (II) on RIGHT SIDE FRAME (D). Insert (2) SHELF SUPPORT (BB) at desired heights on both LEFT and RIGHT SIDE FRAMES (C & D).
ASSEMBLY INSTRUCTIONS STEP 9 GG (13) Insert (4) DOWELS (HH) on each corner on top of LEFT and RIGHT SIDE FRAME (C & D). Insert (4) DOWELS (HH) into top of BACK FRAME (F) as shown. Use SCREWDRIVER (MM) to turn all CAM LOCKS (GG) clockwise until TOP (A) is pulled tight with LEFT and RIGHT SIDE FRAMES (C & D), BACK FRAME (F) and DIVIDER (E). © 2020 TRINITY - 800.985.
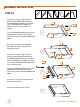
ASSEMBLY INSTRUCTIONS STEP 10 As shown in image 1, align and press dowels on DRAWER FRONT PANEL (N) and DRAWER BACK PANEL (P) into blind holes on DRAWER RIGHT PANEL (Q). Make sure grooves of all panels are aligned. Insert (3) DRAWER SCREWS (AA) through DRAWER RIGHT PANEL (Q) and tightly fasten them with provided SCREWDRIVER (MM). N (2) O (2) P (2) Q (2) R (2) AA (12) MM (1) P MM Q 1 AA N P As shown in image 2, slide DRAWER BOTTOM PANEL (R) into grooves of assembled panels.
ASSEMBLY INSTRUCTIONS STEP 11 I (1) As shown in image: J (1) K (1) Pull out slides on left side frame and divider and align them with slides on one assembled drawer. Push drawer fully into Kitchen Island. Repeat to assemble other drawer to Kitchen Island. Place SHELF (I) onto SHELF SUPPORTS (BB) that were inserted at STEP 8 on left hand side. Then place TRAY (K) onto SHELF (I). Place CABINET SHELF (J) onto SHELF SUPPORTS (BB) on right hand side. J K I © 2020 TRINITY - 800.985.
ASSEMBLY INSTRUCTIONS STEP 12 T (2) L (1) DD (12) MM (1) Place DOOR PANEL (L) on a clean surface with 2 circular pockets facing up. As shown in the image, take HINGE (T) and fit one side into circular pocket. T Screw (2) HINGE SCREWS (DD) through HINGE (T) into DOOR PANEL (L). Fasten screws with SCREWDRIVER (MM). Repeat to fasten remaining HINGE (T) to DOOR PANEL (L). L With one person holding DOOR PANEL (L), align HINGE (T) with screw holes in cabinet where hinges are to be installed.
USAGE INSTRUCTIONS Adjusting SHELF Position Reposition SHELF SUPPORTS (BB) at desired heights up and down along holes of LEFT SIDE FRAME (C), RIGHT SIDE FRAME (D) and DIVIDER (E). SHELF (I) and CABINET SHELF (J) can now move up and down accordingly. © 2020 TRINITY - 800.985.
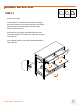
SERVICE PARTS LIST – TBFLNA-1408 TRINITY Customer Service provides the following replacement parts: Part Number Description Part Number Description 1) LNA-06-012-4720 Top 19) ZSV-99-007-3010 Non-locking Caster 2) XNA-01-006-0830 Dowel 20) XXX-97-002-0001 Wrench 3) XSV-02-018-0001 Hanger Stud 21) LNA-03-059-4420 Bottom Shelf 4) ZSV-01-028-1514 Cam Lock 22) LNA-14-028-2034 Divider 5) LNA-14-030-2037 Right Side Frame 23) LNA-14-029-2037 Left Side Frame 6) ZSV-01-004-0643 Han
SERVICE PARTS LIST – TBFLNA-1408 TRINITY Customer Service provides the following replacement parts: 36 1 35 34 2 3 33 32 31 4 5 6 30 29 7 28 8 27 9 26 10 25 11 24 12 23 13 22 14 21 20 19 15 16 17 18 © 2020 TRINITY - 800.985.