
12U Wall-Mounted SmartRack Enclosure Owner's Manual

5
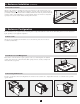
4. Enclosure Installation
(
continued
)
5. Enclosure Configuration
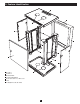
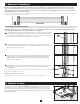
4.4 Ground Connection
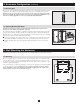
5.1 Door Locks
5.2 Cable Access and Management
5.3 Reversing the Enclosure
All parts of the enclosure are grounded to the frame of the enclosure. Use the enclosure’s front or rear
threaded grounding point
A
and an M6 screw (included) to connect the frame of the enclosure directly to
your facility’s earth ground connection with an 8 AWG (3.264 mm) wire. Route the ground wire under the
enclosure’s frame to ensure unhindered door operation. Warning: Attach each enclosure to earth ground
separately. Do not use the enclosure without an earth ground connection.
All enclosure doors (including front and back doors, as well as both side panels) have locks that are
accessible by included keys.
The back door of the enclosure has a square opening for cable access and management. An additonal
opening can be found on top of the main cabinet. Each opening can also be closed by screwing in the
removeable cable access panels.
In order to accommodate various rack configurations, the enclosure can be reversed. To do so, simply turn the enclosure over so that the doors open in the
opposite direction.
Before installation, be sure to plan the location and arrangement of components within the enclosure. Be sure all mounting rails are reversed or adjusted for
depth, depending on your equipment configuration.
EARTH
GROUND
A