
12U Wall-Mounted SmartRack Enclosure Owner's Manual

6
5. Enclosure Configuration
(
continued
)
6. Wall Mounting the Enclosure
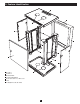
5.4 Mounting Rails
6.1 Mounting
5.5 Adjusting Mounting Rail Depth
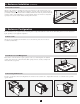
The enclosure comes with mounting rails that have square holes for mounting rack equipment. To install
equipment, use the included cage nuts and other hardware. (See page 7 for installation of cage nuts.)
Warning: Be sure to have the enclosure securely mounted to the wall, or in its final position on the
floor before mounting any equipment inside. Also be sure to have all the right adjustments on your
rails before mounting equipment. (See below for Adjusting Mounting Rail Depth.)
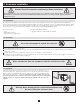
There are 12 keyhole cutouts on the back door of the enclosure. Each keyhole can accommodate an M5 or
3/16” bolt. The holes are on centers and beginning with the two innermost holes, the centers are 13 3/4”,
16” and 18 1/4” apart, respectively moving outward and horizontaly. Holes are then a standard 19” apart
vertically, as shown in the diagram.
Using a level, measure to position your mounting areas precisely. Use appropriate fasteners (not included)
to secure the enclosure to the wall. Warning: The area you plan to mount the enclosure to must be
able to withstand the weight of the enclosure and all mounted equipment. For the weight of the
enclosure and its capacity, see the specifications on page 8.
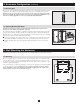
Warning: Do not attempt to adjust rails while equipment is installed in the enclosure. Do not
attempt to use rails without screws installed. (2 per rail.)
The 4 mounting rails are pre-installed to accommodate equipment with a mounting depth of 20.5 inches
(521 mm). Do not adjust the mounting rails unless your equipment requires a different mounting depth.
The front and rear sets of rails can be adjusted independently in 1/4-inch (6mm) increments for mounting
depths between 3 inches (76 mm) and 20.5 inches (521 mm).
1
Each rail is connected to the enclosure with 2 screws: 1 in the upper corner and another in the lower
corner. Using a Phillips-head screwdriver, remove the screws that fasten the rails to the enclosure.
2
Slide the mounting rails to the desired depth and reattach them using the screws you removed in
Step 1.
Warning: Do not attempt to mount the enclosure to the wall with equipment mounted in the enclosure.
19
”
18¾”
16”
16”
16”
16”
13¾”
1
2