Owner’s Manual Tablet Charge and Sync Station Models: CS16USB, CS32USB, CS48USB Table of Contents 1. 2. 3. 4. 5. 6. Important Safety Instructions Overview Feature Identification Enclosure Installation 4.1 Preparation 4.2 Unpacking 4.3 Placement 4.4 Ground Connection Wall Mounting the Enclosure 5.1 Mounting the CS16USB 5.2 Mounting the CS32USB and CS48USB Enclosure Configuration 6.1 Door Locks 6.2 Cable Access and Management 2 2 3 4 4 4 4 4 5 5 5 6 6 6 7.
1. Important Safety Instructions SAVE THESE INSTRUCTIONS This Manual contains instructions and warnings that must be followed during the installation and operation of the product described in this manual. Failure to comply may invalidate the warranty and cause property damage or personal injury. USB Charger/Hub Unit: • To remove the USB Charger/Hub from the supply mains, the appliance inlet serves as a disconnect device.
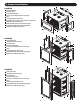
. Feature Identification 4 CS16USB 5 9 6 1 Locking Front Door Horizontal Rails 3 Vertical Mounting Rails 4 Secure Top and Bottom Cable Access Plates 5 Vents 6 Locking/Removable Side Panels 7 Mounting Notches (found on the enclosure’s back panel) 8 Mounting Plate (separate piece) 9 Mounting Hooks (found on the Mounting Plate) 10 1U Rack Mountable 16-Port USB Charger/Hub 11 Adjustable 16-tablet Storage Shelf 2 8 7 3 11 1 3 4 5 6 7 8 9 3 6 5 4 CS32USB 2 4 2 6 7 1
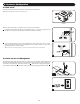
. Enclosure Installation Caution! Read All Instructions and Warnings Before Installation! Warning: Rack enclosures can be extremely heavy. Do not attempt to unpack, move or install the enclosure without assistance. Use extreme caution when handling the enclosure and be sure to follow all handling and installation instructions. Do not attempt to install equipment without first stabilizing the enclosure. 4.
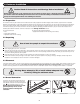
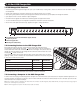
. Wall Mounting the Enclosure 5.1 Mounting the CS16USB Before mounting, use a level and tape measure to position your mounting area precisely. Be sure to use appropriate fasteners (not included) to secure the enclosure to the wall. Warning: The area you plan to mount the enclosure to must be able to withstand the weight of the enclosure and all mounted equipment. 1 sing user-supplied hardware, attach the mounting plate to a wall or other suitable mounting U surface.
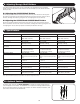
. Enclosure Configuration 6.1 Door Locks The front and back doors have locks that are accessible by the included keys. Note: Model CS16USB does not contain a locking back door. CS32USB Each side panel locks using an L-shaped lever on the inside of the enclosure. 1 To unlock and remove the side panels, lift the shorter leg of the “L” up and pull it away from the side panel. Pull the tab on the side panel and remove it from the enclosure.
. 16-Port USB Charger/Hub 7.1 USB Charger/Hub Features • Professional-grade USB charger/hub charges and syncs up to 16 USB devices, including iPads®, iPods® and iPhones® as well as Android™ tablets and smartphones. • Provides each USB port with an optimum charge level for a particular device (up to 2.4 amps). • Allows syncing to be performed with any device designed for USB data communications, per compatible file management software. • Syncs Apple® devices via iTunes® software or Apple Configurator.
. Adjusting Storage Shelf Dividers Your tablet charging station comes with one (CS16USB), two (CS32USB) or three (CS48USB) storage shelves with adjustable dividers that each can accommodate up to 16 personal electronic devices per shelf. 8.1 Adjusting the CS16USB Shelf Dividers Remove any personal electronic devices stored on the shelf tray. Then remove the shelf tray from the cabinet by unscrewing the four fasteners attached to the two front rack rails.
11. Storage and Service Storage The enclosure should be stored in a controlled indoor environment, away from moisture, temperature extremes, flammable liquids and gasses, conductive contaminants, dust and direct sunlight. Store the enclosure in its original shipping container if possible. Service The enclosure is covered by the limited warranty described in this manual. For more information, visit www.tripplite.com/support. 12.
Manual del propietario Estación para Carga de Tabletas y Sincronización Modelos: CS16USB, CS32USB, CS48USB Índice 1. Instrucciones de seguridad 11 importantes 2. Generalidades 11 3. Identificación de las características 12 4. Instalación del rack 13 4.1 Preparación 13 4.2 Desembalaje 13 4.3 Ubicación 13 4.4 Conexión a tierra 13 5. Montaje del rack a la pared 14 5.1 Instalación del CS16USB 5.2 Instalación del CS32USB y 14 CS48USB 6. Configuración del rack 15 6.
1. Instrucciones de seguridad importantes GUARDE ESTAS INSTRUCCIONES Este manual contiene instrucciones y advertencias que deben seguirse durante la instalación y operación del producto descrito en este manual. El incumplimiento invalidará la garantía, pudiendo causar serios daños a la propiedad o lesiones personales. Unidad de Cargador/Hub USB: • Para remover el Cargador/Hub USB de la alimentación del servicio público, la entrada de alimentación del aparato sirve como dispositivo de desconexión.
3.
4. Instalación del rack ¡Precaución! Lea todas las instrucciones y advertencias antes de la instalación. Advertencia: Los racks pueden ser extremadamente pesados. No intente desembalarlo, moverlo ni instalarlo sin ayuda. Use máxima precaución al manipularlo y asegúrese de seguir todas las instrucciones de manipulación e instalación. No intente instalar equipos sin estabilizar primero el rack. 4.
5. Montaje del rack a la pared 5.1 Instalación del CS16USB Antes del montaje, utilice un nivel y cinta de medir para posicionar el área de montaje en forma precisa. Asegúrese de utilizar pasadores adecuados (no incluidos) para asegurar el rack a la pared. Advertencia: El área en donde planea montar el rack debe poder soportar el peso del rack y de todos los equipos montados.
5. Configuración del rack 6.1 Cerraduras de las puertas Las puertas delanteras y traseras poseen cerraduras con llaves incluidas para acceder a ellas. Nota: El modelo CS16USB no contiene una puerta posterior con cerradura. CS32USB Cada panel lateral se cierra mediante una palanca en forma de L en el interior del rack. 1 Para desbloquear y extraer los paneles laterales, eleve la pata más corta de la “L” y tire de ella hacia fuera del panel lateral.
7. Cargador/Hub USB de 16 Puertos 7.1 Características del Cargador/Hub USB • El cargador/hub USB de grado profesional carga y sincroniza hasta 16 dispositivos con USB, incluyendo iPads®, iPods® y iPhones® y tabletas y smartphones Android™. • Proporciona a cada puerto USB un nivel de carga óptimo para un dispositivo en particular (hasta 2.4 Amperes).
8. Ajuste de los Divisores de Estante de Almacenamiento Su estación de carga para tabletas viene con uno (CS16USB), dos (CS32USB) o tres (CS48USB) entrepaños de almacenamiento con divisores ajustables que pueden acomodar cada uno hasta 16 dispositivos electrónicos personales por entrepaño. 8.1 Ajuste de los Divisores de Entrepaño CS16USB Retire cualquier dispositivo electrónico que se encuentre en el entrepaño.
10. Ruedas opcionales Se dispone de un kit de accesorios de ruedas (Modelo: SRCASTER) que puede adquirir por separado a través de Tripp Lite. Visite www.tripplite.com para obtener detalles. Las cuatro ruedas del juego SRCASTER y los accesorios de montaje se instalan en los orificios pre-barrenados ubicados en la base del gabinete. Para obtener instrucciones de instalación adicionales, consulte el manual incluido con el kit SRCASTER. 11.
Manuel du propriétaire Station de charge et de synchronisation de la tablette Modèles : CS16USB, CS32USB, CS48USB Table des matières 1. 2. 3. 4. 5. 6. Consignes de sécurité importantes 20 Vue d’ensemble 20 Identification des caractéristiques 21 Installation de l’enceinte 22 4.1 Préparation 22 4.2 Déballage 22 4.3 Placement 22 4.4 Raccordement au sol 22 Montage mural de l’enceinte 23 5.1 Montage du CS16USB 23 5.
1. Consignes de sécurité importantes CONSERVEZ CES INSTRUCTIONS Ce manuel contient des instructions et des avertissements qui doivent être respectés lors de l’installation et du fonctionnement du produit décrit dans ce manuel. Le non-respect de ces instructions et avertissements peut annuler la garantie et causer des dommages matériels ou corporels.
3.
4. Installation de l’enceinte Attention! Lisez toutes les instructions et les avertissements avant l’installation! Attention : Les enceintes peuvent être extrêmement lourdes. N’essayez Ne tentez pas de les déballer, de les déplacer ou de les installer sans assistance. Soyez extrêmement prudent lorsque vous manipulez l’enceinte et assurez-vous de suivre toutes les manipulations et les instructions d’installation. N’essayez pas d’installer des équipements sans avoir d’abord stabilisé l’enceinte. 4.
5. Montage au mur de l’enceinte 5.1 Montage du CS16USB Avant l’installation, utilisez un ruban à mesurer et un niveau pour positionner la zone d’installation avec précision. Veillez à utiliser les attaches appropriées (non incluses) pour fixer l’enceinte au mur. Attention: L’endroit où vous prévoyez installer l’enceinte doit être capable de supporter le poids de l’enceinte et tout l’équipement installé.
6. Configuration de l’enceinte 6.1 Serrures de portes Les portes avant et arrière ont des serrures qui sont accessibles avec les clés incluses. Remarque : Le modèle CS16USB ne contient pas de porte arrière verrouillable. CS32USB Chaque panneau latéral se verrouille avec un levier en forme de L à l’intérieur de l’enceinte. 1 Pour déverrouiller et retirer les panneaux latéraux, soulevez la jambe la plus courte du « L» et retirez-la de la paroi latérale.
7. Chargeur/concentrateur USB à 16 ports 7.1 Caractéristiques du chargeur USB /concentrateur • Le chargeur/concentrateur USB de qualité professionnelle charge et synchronise jusqu’à 16 appareils USB, y compris des iPads®, iPods® et iPhones®, et les tablettes et téléphones intelligents Android™. • Fournit à chaque port USB un niveau de charge optimal pour un appareil particulier (jusqu’à 2,4 ampères).
8. Réglage des diviseurs de l’étagère de rangement La station de chargement de votre tablette est fournie avec une (CS16USB), deux (CS32USB) ou trois (CS48USB) étagères de rangement avec diviseurs réglables qui peuvent chacune recevoir jusqu’à 16 appareils électroniques personnels par étagère. 8.1 Réglage des diviseurs d’étagère CS16USB Enlever tous les appareils électroniques personnels rangés sur le plateau de l’étagère.
10. Roulettes facultatives Un kit de roulettes optionnel (modèle : SRCASTER) est disponible séparément chez Tripp Lite. Visiter www.tripplite.com pour plus de détails. Les 4 roulettes et la quincaillerie de montage de la trousse du SRCASTER doivent être installés dans les avant-trous qui se trouvent sur la base du boîtier. Pour des instructions d’installation supplémentaires, se référer au manuel inclus avec le it SRCASTER. 11.
Руководство пользователя Зарядно-синхронизационная станция для планшетных ПК Модели: CS16USB, CS32USB, CS48USB Содержание 1. Основные правила безопасности 2. Общие сведения 3. Схема расположения элементов 4. Установка шкафа 4.1 Подготовка 4.2 Распаковка 4.3 Размещение 4.4 Заземление 5. Крепление шкафа к стене 5.1 Монтаж устройства CS16USB 5.2 Монтаж устройств CS32USB и CS48USB 6. Элементы конструкции шкафа 6.1 Дверные замки 6.
1. Основные правила безопасности ПРОСЬБА СОХРАНИТЬ НАСТОЯЩИЕ ПРАВИЛА В настоящем руководстве содержатся указания и предупреждения, которые необходимо соблюдать в процессе монтажа и эксплуатации описанного в нем изделия. Несоблюдение вышеупомянутых указаний и предупреждений может привести к аннулированию гарантии, а также к повреждению имущества или человеческим травмам.
3.
4. Установка шкафа Внимание! Перед началом установки внимательно ознакомьтесь со всеми указаниями и предупреждениями! Предупреждение: шкафы могут быть крайне тяжелыми. Не пытайтесь распаковывать, передвигать или устанавливать шкаф в одиночку без посторонней помощи. При перемещении шкафа соблюдайте крайнюю осторожность и соблюдайте все указания по транспортировке и монтажу. Не пытайтесь производить установку какого-либо оборудования внутрь шкафа до его закрепления. 4.
5. Крепление шкафа к стене 5.1 Монтаж устройства CS16USB С помощью уровня и рулетки точно наметьте места крепления. Прикрепите шкаф к стене, используя надлежащий крепеж (в комплект поставки не входит). Внимание: место, к которому вы намереваетесь прикрепить шкаф, должно быть рассчитано на вес самого шкафа и всего монтируемого в него оборудования. 1 Внимание: при креплении монтажной пластины к стене убедитесь в том, что все три монтажных крюка направлены кнаружи от стены.
6. Элементы конструкции шкафа 6.1 Дверные замки Передняя и задняя дверцы шкафа снабжены замками, открываемыми с помощью входящих в комплект ключей. Примечание. Модель CS16USB не оснащается задней запирающейся дверцей. CS32USB Каждая из боковых панелей закрывается с помощью Г-образного рычажка, расположенного с внутренней стороны шкафа. 1 Для отпирания и снятия боковых панелей поднимите короткое плечо Г-образного рычажка вверх и потяните его в направлении от боковой панели.
7. 16-портовое зарядное устройство/концентратор USB 7.1 Возможности зарядного устройства USB / USB-хаба • Зарядное устройство / концентратор USB профессионального класса обеспечивает возможность зарядки и синхронизации до 16 устройств с разъемами 16 USB, включая устройства линеек iPad®, iPod® и iPhone®, и Android™ планшетные компьютеры и смартфоны. • Обеспечивает оптимальный уровень зарядного тока (до 2,4 А) для каждого порта USB в зависимости от подключенного к нему устройства.
8. Регулировка положения разделительных перегородок Приобретенная вами зарядная станция для планшетных ПК комплектуется одной (мод. CS16USB), двумя (мод. CS32USB) или тремя (мод. CS48USB) полками для хранения с регулируемыми разделительными перегородками, на каждой из которых вы сможете разместить до 16 персональных электронных устройств. 8.1 Регулировка положения разделительных перегородок на полке мод. CS16USB Извлечь все персональные электронные устройства, находящиеся на полке.
10. Использование дополнительных роликов Комплект роликов (модель SRCASTER) поставляется компанией Tripp Lite по отдельному заказу. Более подробную информацию можно получить по адресу www.tripplite.com. 4 ролика из набора SRCASTER и монтажные приспособления устанавливаются в заводские отверстия, просверленные в основании шкафа. Более подробные указания по установке роликов см. в прилагаемом к комплекту SRCASTER руководстве. 11.