
Owners manual


5
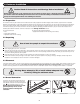
5. Wall Mounting the Enclosure
Before mounting, use a level and tape measure to position your mounting area precisely. Be sure to
use appropriate fasteners (not included) to secure the enclosure to the wall. Warning: The area
you plan to mount the enclosure to must be able to withstand the weight of the
enclosure and all mounted equipment.
1
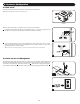
Using user-supplied hardware, attach the mounting plate to a wall or other suitable mounting
surface. Each mounting hole can accommodate an M8 or 5/16” bolt and the holes are spaced
16" apart to accommodate standard stud placement as reflected in the diagram.
Note: When mounting the mounting plate to the wall, be sure the three mounting hooks are facing outwards and
away from the wall.
2
After the mounting plate has been securely attached to the mounting surface, hang the
enclosure’s three mounting notches onto the three mounting hooks on the plate attached to the
wall. The notches will fit over the hooks and the enclosure should slide down onto the hooks
until secure.
Note: Mounting notches exist on both the upper and lower rails of the back panel. This allows for mounting in the
standard or reversed positions.
3
After the mounting plate has been secured and the enclosure hung properly, secure the
enclosure to the mounting plate by installing the three supplied screws in the holes on the
mounting hooks as shown.
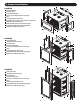
5.1 Mounting the CS16USB
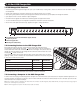
5.2 Mounting the CS32USB and CS48USB
Warning: Do not attempt to mount the tablet charge and sync station to the wall with
any tablets or other personal electronic devices inside.
There are 16 keyhole cutouts on the back door of the CS32USB and CS48USB enclosures. Each
keyhole can accommodate an M10 or 3/8” bolt (for the CS32USB model) or an M5 or 3/16” bolt
(for the CS48USB model). Each of the four keyhole sets are centered 16” apart horizontally and
are spaced in 2.25” increments toward the outer edges (see corresponding model diagrams for
exact keyhole measurements).
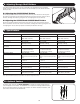
Using a level, measure to position your mounting areas precisely. Use appropriate fasteners (not
included) to secure the enclosure to the wall. Once the enclosure is safely hanging on the fasteners
and secured to the wall, open the unit from the rear door and tighten all mounting hardware.
Note: The tablet charge and sync station enclosure must be installed by a qualified technician. Before mounting, use a
level and tape measure to position your mounting area precisely. Use appropriate fasteners (not included) to secure the
tablet charge and sync station to the wall. Use suitable mounting means when installing to cinder block, concrete,
drywall or wood studs. Warning: The supporting surface must be able to safely support the combined load
of the equipment and all attached hardware and components. Go to the Specifications section on page 8
for more information on your model’s weight and dimensions.
16”
2.75”
2.75”
16”
A
A
B
B
C
C
1
2
3
17.858”
17.125”
19.375”
14.875”
16”
16”
16”
16”
12.625”
16”
28.4”
16”
28.4”
CS48USB
CS32USB