OV - 2910
OV-2910 stoom oven Tijdens gebruik van een elektrisch toestel, dienen de basis veiligheidsmaatregelen altijd in de gaten gehouden worden, inclusief de volgende: Lees alle instructies door vóór het gebruik van uw stoom oven. Waarschuwing: om de kans op brand, elektrische schok of letsel te verminderen: BELANGRIJKE VOORZORGSMAATREGELEN Lees alle instructies.
eruit trekken. Altijd de stekker vasthouden, en nooit aan het netsnoer trekken. Uiterste voorzichtigheid is geboden tijdens het verplaatsen van een druipende pan met hete olie of andere hete vloeistoffen. Het kruimelblad of elk ander deel van de oven niet bedekken met aluminium folie. Dit kan oververhitting van de oven veroorzaken. Uiterste voorzichtigheid gebruiken bij het verwijderen van het blad, rekken of bij het verwijderen van hete vetten of andere vloeistoffen.
Gebruik hem niet buitenshuis. Gebruik het toestel niet anders dan waar hij voor bestemd is Dit toestel is ALLEEN VOOR HUISHOUDELIJK GEBRUIK. Bewaar het instructieblad.
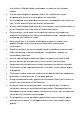
M; GLAZEN DEUR N: DEUR FRAME (BOVEN) O: DEUR HANDEL P: BAK REK Q: BAK PLAAT R: HANDEL Voordat u de stoomoven gebruikt. Voordat u voor de eerste keer gebruikmaakt van uw stoomoven, zorg er dan voor dat u : o Alle instructies in de handleiding leest. o Ervoor zorgt dat de stekker uit het stopkontakt is en de tijdschakelaar in de o De accessoires wast u in heet, zeepwater of in de vaatwasser, verwijder ook “UIT” (OFF) stand staat.
Bakken: warmte element onder werkt Roosteren: warmte element boven en onder werken UIT (Off): Stoom: warmte element voor stoom werkt 3.Tijdschakelaar: Werkt indien u de schakelaar naar rechts (met de wijzers van de klok mee)draait. Deze functie heeft een bel die ringt op het einde van de geprogrammeerde tijd. Braden : Voor de beste resultaten, is het aan te raden de oven voor te verwarmen voor 15 minuten op 200ºC. Werking Zet de temperatuur regelaar op de hoogste stand.
T-BONE STEAK 200º 25-30 min HAMBURGER 200º 25-28 min VARKENSKARBONADE 200º 40-45 min LAMSKOTELET 200º 30-40 min KIPPENPOTEN 200º 30-35 min GEFILEERDE VIS 200º 20-25 min ZALM MOTEN 200º 20-25 min Opmerking: Alle braadtijden zijn gebaseerd op vlees met koelkasttemperatuur. Bevroren vlees kan aanzienlijk langer duren. Daarom, wordt het gebruik van een vlees thermometer ten zeerste aanbevolen .
Opmerking: Wanneer u een enkel bakrek gebruikt, plaats het bakrek in de onderste steungeleider. Werking Plaats het metalen rek in de onderste of middelste rek steun.. De oven voorverwarmen voor ongeveer 15 minuten. Plaats het te koken eten op het metalen rek. Draai de Functie Regelaar naar de stand BAKKEN (BAKE). Draai de Tijdschakelaar naar de stand gematigd. Als het braden is voltooid ringt de bel. Plaatsing van de Bak Rekken Koekjes – Gebruik de onderste en middelste Steun-Geleiders.
Draai de tijdschakelaar naar de stand gematigd. Als het koken is voltooid zal de bel ringen. Kook Instructies Kook resultaten kunnen variëren, pas deze tijden aan naar uw persoonlijke behoeftes. Tevens, regelmatig controleren gedurende het braden om overkoken te voorkomen.
Alle accessoires dienen gewassen te worden in heet zeepwater of kunnen in een vaatwasser gewassen worden. De deur kan afgeveegd worden met een vochtige spons en droog geveegd worden met een stuk papier of een doek. GEBRUIK GEEN SCHUURMIDDEL DAAR DIT DE AFWERKING AAN DE BUITENKANT KAN BESCHADIGEN. GEBRUIK GEEN SCHUURMIDDEL OF STAALWOL SCHUURSPONS OP HET DAAR DIT DE PORSELEINE EMAILLE AFWERKING KAN BESCHADIGEN.
Ne pas faire fonctionner l'appareil avec un cordon ou une prise endommagés ou après des défaillances de l'appareil ou le fait qu'il ait été endommagé de quelque manière que ce soit. Recherchez régulièrement des dommages sur la prise et le cordon. Retournez l'appareil au centre de services agréé le plus proche pour examen, réparation ou réglage. L'utilisation d'équipements accessoires non recommandés par le fabricant de l'appareil peut provoquer des dangers ou des blessures.
cuisine ou de cuisson construits en d'autres matériaux que du métal ou du verre prévu pour aller au four. Assurez-vous que rien ne touche les éléments du bas ou du haut du four. Ne placez aucun des matériaux suivants sur le four : carton, plastique, papier ou tout autre matériau similaire. Ne stockez aucun matériel autre que les accessoires recommandés par le constructeur dans ce four lorsqu'il n'est pas en fonctionnement.
A : PROTÈGE-LAMPE DE L'INDICATEUR DE VAPEUR B : BOUTON INTERRUPTEUR C : BOUTON DU MINUTEUR D : PROTÈGE-LAMPE DE L'INDICATEUR DE MISE SOUS TENSION E : BOUTON DE COMMANDE DE LA TEMPÉRATURE F : RÉSERVOIR D'EAU G : CAPOTAGE H : SOUPAPE D'ÉVACUATION I : SORTIE DE VAPEUR J : PANNEAU AVANT K : CROCHET DE PORTE L : ENCADREMENT DE PORTE (INFÉRIEUR) M : GLACE DE PORTE N : ENCADREMENT DE PORTE (SUPÉRIEUR) O : POIGNÉE DE PORTE P : GRILLE DE CUISSON Q : PLATEAU DE CUISSON R : POIGNÉE Avant d'utiliser votre four à vapeu
fonction rôtir pendant environ 15 minutes pour éliminer tous les résidus d'emballage qui pourraient subsister après l'expédition. Cela supprimera également toutes les traces ou odeurs présentes à l'origine. Veuillez noter le point suivant : l'opération de démarrage initial peut entraîner un peu d'odeur et de fumée ; cela est normal et sans danger. Cela est dû à la combustion des substances protectrices appliquées sur les éléments de chauffage en usine. Utilisation de votre four à vapeur : 1.
La nourriture doit être placée le plus près possible de l'élément de Réglez la commande de température sur la température adaptée chauffage supérieur sans le toucher. Badigeonnez la nourriture avec des sauces ou de l'huile, selon vos préférences. Tournez le minuteur sur la position de modération. Lorsque la cuisson au grilloir est terminée, la sonnerie retentit. Guide pour le grilloir Les résultats de cuisson peuvent varier, ajustez ces temps selon vos besoins individuels.
muffins, gaufres surgelées ou crêpes surgelées. Pour le toastage de seulement 1 à 2 éléments, placez les aliments sur la grille de cuisson au centre du four. Fonctionnement Réglez la commande de température sur 140 °C. Tournez la commande de fonction sur toast. Placez la nourriture à toaster sur le panier à broches Tournez le minuteur sur le degré de cuisson désirée (clair vers sombre) La sonnerie va retentir pour signaler la fin du cycle de toastage.
Avant d'utiliser votre four à vapeur. Avant d'utiliser votre four à vapeur pour la première fois, assurez-vous des points suivants : Lisez toutes les instructions incluses dans le manuel. Assurez-vous que le réservoir d'eau est rempli d'eau. Assurez-vous que la soupape d'évacuation n'est pas bouchée. Pendant l'utilisation du four à vapeur, ne touchez pas la soupape d'évacuation.
OEUF 10 à 12 min POULET 25 à 30 min POISSON 12 à 15 min POMMES DE TERRE 30 à 35 min Remarque : tous les temps de cuisson au grilloir sont basés sur des viandes à la température du réfrigérateur. Les viandes congelées peuvent nécessiter beaucoup plus de temps. C'est la raison pour laquelle, l'utilisation d'un thermomètre à viande est fortement recommandée. Entretien et nettoyage Avertissement : assurez-vous de débrancher le four et laissez-le refroidir avant d'effectuer le nettoyage.
OV-2910 Dampf-Backofen Beim Betrieb eines elektrischen Geräts müssen immer grundlegende Sicherheitsmaßnahmen beachtet werden, einschließlich der folgenden: Lesen Sie diese Bedienungsanleitung vor dem ersten Gebrauch des Ihres Dampf-Backofens sorgfältig durch. Achtung: Um die Gefahr eines Brandes, elektrischen Schlages oder Verletzungen zu vermeiden: WICHTIGE SICHERHEITSHINWEISE Lesen Sie sorgfältig alle Anweisungen vor Gebrauch durch.
Grifffläche an und ziehen Sie niemals an dem Netzkabel. Größte Vorsicht beim Umsetzen des Backblechs mit heißem Fett oder anderen heißen Flüssigkeiten. Decken Sie das Krümelblech oder ein andere Teile des Ofens nicht mit Metallfolien ab. Das kann zu einer Überhitzung des Ofens führen. Größte Vorsicht beim Entfernen des Backblechs, Grillrosts oder dem Ausschütten von heißem Fett oder anderen heißen Flüssigkeiten.
HAUPTKOMPONENTEN A: ABDECKUNG DER DAMPFANZEIGELEUCHTE B: EINSCHALTKNOPF C: TIMER D: ABDECKUNG DER BETRIEBSANZEIGELEUCHTE E: TEMPERATURREGLER F: WASSERTANK G: GEHÄUSE H: ABLASSVERSCHLUSS I: DAMPFAUSTRITT J: FRONTSCHEIBE K: TÜRAUFHÄNGUNG L: TÜRRAHMEN (UNTEN) M: TÜRSCHEIBE N: TÜRRAHMEN (OBEN) O: TÜRHANDGRIFF P: BACKROST
Q: BACKBLECH R: BACKBLECH-HANDGRIFF Vor der Verwendung des Dampf-Backofens Vor dem Erstgebrauch des Dampf-Backofens: o Lesen Sie alle Anweisungen in der Bedienungsanleitung. o Vergewissern Sie sich, dass der Ofen vom Netz getrennt ist und der Timer sich in der „OFF“ Position befindet. o Waschen Sie das Zubehör in heißem Seifenwasser oder in einem Geschirrspüler. Nehmen Sie auch den Grillspieß und die Grillklammern aus der Verpackung und reinigen sie in heißem Seifenwasser.
Arbeitsschritte Stellen Sie den Temperaturregler auf die höchste Einstellung. Stellen Sie den Funktionsschalter auf GRILLEN. Heizen Sie den Ofen vor. Stellen Sie den Backrost auf das Backblech. Legen Sie das Grillgut auf den Backrost und schieben das Backblech mit dem Backrost in den oberen Einschub. Das Grillgut sollte sich so nahe wie möglich am oberen Heizelement befinden ohne es zu berühren. Stellen Sie den Temperaturregler auf eine passende Temperatur ein.
Toasten Das große Fassungsvermögen des Ofens erlaubt das Toasten von 4 bis 6 Brotscheiben und 6 Muffins, gefrorenen Waffeln oder Pfannkuchen. Zum Toasten von nur 1 oder 2 Stück Toastgut legen Sie die Speisen auf dem Backrost in der Mitte des Ofens. Arbeitsschritte Stellen Sie den Temperaturregler auf 140ºC. Stellen Sie den Funktionsschalter auf TOAST. Legen Sie das Toastgut auf den Backrost. Stellen Sie den Temperaturregler auf die gewünschte Bräunung ein (hell bis dunkel).
nach der anderen). Torten – Verwendung des unteren und mittleren Einschubs. Dampf: Vor der Verwendung des Dampf-Backofens. Vor dem Erstgebrauch des Dampf-Backofens: Lesen Sie alle Anweisungen in der Bedienungsanleitung. Füllen Sie den Wassertank mit Wasser auf. Vergewissern Sie sich, dass der Ablassverschluss geschlossen ist. Berühren Sie nicht während des Betriebs den Ablassverschluss.
KNÖDEL 10-15 Min. EIER 10-12 Min. HÜHNCHEN 25-30 Min. FISCH 12--15 Min. KARTOFFELN 30-35 Min. Anmerkung: Alle Dämpfzeiten basieren auf Fleisch bei Kühlschranktemperatur. Gefrorenes Fleisch kann bedeutend länger brauchen. Deswegen ist ein Fleischthermometer sehr empfehlenswert. Pflege und Reinigung Achtung: Vor der Reinigung den Netzstecker aus der Steckdose ziehen und den Ofen abkühlen lassen.
BESCHICHTUNG BESCHÄDIGT WERDEN KANN. LASSEN SIE ALLE TEILE UND OBERFLÄCHEN VOLLSTÄNDIG ABTROCKNEN, BEVOR SIE DEN NETZSTECKER EINSTECKEN UND DEN OFEN IN BETRIEB NEHMEN. ***** When using an electrical appliance, basic safety precautions should always be observed, including the following: Read all instructions before using your steam oven. Warning: to reduce the risk of fire, electrical shock, or injury: IMPORTANT SAFEGUARDS Read all instructions.
Do not cover crumb tray or any part of the oven with metal foil. This may cause the oven to overheat. Use extreme caution when removing the tray, racks or disposing of hot grease or other hot liquids. Do not clean the inside of the oven with metal scouring pads, pieces can break off the pad and touch electrical parts, creating a risk of electric shock.
MAIN COMPONENT A: STEAM INDICATOR LIGHT COVER B: SWITCH KNOB C: TIMER KNOB D: POWER INDICATOR LIGHT COVER E: TEMPERATURE CONTROL KNOB F: WATER TANK G: HOUSING H: DRAIN TAP I: STEAM EXPORT J: FRONT PANE K: DOOR HOOK L: DOOR FRAM (LOWER) M;DOOR GLASS N: DOOR FRAM (UPPER O: DOOR HANDLE P:BAKE RACK
Q:BAKE TRAY R: HANDLE Before using your steam oven Before using your steam oven for the first time, be sure to: o o Read all of the instructions included in the manual. Make sure that the oven is unplugged and the Time control is in the “OFF” position. o Wash the accessories in hot, soapy water or in the dishwasher, also remove the rotisserie skewer and skewer clamps from the packing and wash these in hot, soapy water.
Broil : For best results, it is recommended to preheat the oven for 15 minutes on 200ºC. Operation Set temperature control to highest position. Turn function control to BROIL. Preheat the oven. Place the wire rack on the drip pan. Place food on the wire rack and slide into the top rack. Food should be placed as close as possible to the top heating element without touching it. Set temperature control to appropriate temperature Brush food with sauces or oil, as desired.
Note: All broiling times are based on meats at refrigerator temperature. Frozen meats may take considerably longer. Therefore, use of a meat thermometer is highly recommended. Toasting Large capacity oven allows for toasting 4 to 6 slices of bread, 6 muffins, frozen waffles or frozen pancakes. When toasting only 1or 2 items, place food on the bake rack in the center of the oven. Operation Set the temperature control to 140º Turn the function control to toast.
Positioning of the Bake Racks Cookies – Use bottom and middle Support Guides. Layer Cakes – Use bottom Support Guide only (bake one at a time). Pies – Use bottom and middle Support Guides. Steam: Before using your steam oven. Before using your steam oven for the first time, be sure to: Read all of the instruction included in the manual. Make sure that water tank is full of water.. Make sure that drain tap does not obdurate. During use steam oven , do not touch drain tap.
DUMPLING 10-15 min EGG 10-12 min CHICKEN 25-30 min FISH 12--15 min POTATO 30-35 min Note: All broiling times are based on meats at refrigerator temperature. Frozen meats may take considerably longer. Therefore, use of a meat thermometer is highly recommended. Care & Cleaning Warning: Be sure to unplug the oven and allow it to cool before cleaning. Your oven features a continuous clean coating that automatically cleans itself during normal operation.
Forno a vapore OV-2910 Quando si utilizzano apparecchi elettrici, si dovrebbero sempre osservare delle basilari precauzioni di sicurezza, incluso quanto segue: Leggere tutte le istruzioni prima di utilizzare il forno a vapore. Attenzione: per ridurre il rischio di incendi, scosse elettriche, e infortuni: IMPORTANTI SALVAGUARDIE Leggere tutte le istruzioni.
Afferrare sempre la spina, e non tirare mai il cavo di alimentazione. Quando si spostino teglie che contengano olio o altri liquidi caldi è necessaria estrema cautela. Non rivestire il vassoio raccoglibriciole né altra parte del forno con stagnola. Questo potrebbe provocare il surriscaldamento del forno. Usare estrema cautela quando si rimuovono il vassoio e la griglia e quando si smaltiscono grasso o altri liquidi caldi.
Non utilizzare all'esterno. Non utilizzare l'apparecchio per scopi diversi da quelli cui è destinato. Questo apparecchio è destinato ESCLUSIVAMENTE ALL'USO DOMESTICO. Conservare queste istruzioni.
K: GANCIO PORTA L: TELAIO PORTA (INFERIORE) M: PORTA IN VETRO N: TELAIO PORTA (SUPERIORE) O: MANIGLIA PORTA P: GRIGLIA COTTURA Q: VASSOIO COTTURA R: IMPUGNATURA Prima di utilizzare il forno a vapore Prima di utilizzare il forno a vapore per la prima volta, assicurarsi di: o o Leggere tutte le istruzioni contenute nel manuale. Assicurarsi che la spina del forno sia scollegata e che il controllo Tempo sia in posizione "OFF".
Arrosto: resistenza superiore in funzione Cottura al forno: resistenza inferiore in funzione Tostatura: resistenza superiore e resistenza inferiore in funzione Off: Vapore: resistenza vapore in funzione 3. Controllo tempo: quando si ruota il controllo verso destra (senso orario). Questa funzione dispone di una segnalazione acustica al termine del tempo programmato. Arrosto : Per ottenere i migliori risultati, si raccomanda di preriscaldare il forno per 15 minuti a 200°C.
HAMBURGER 200º 25-28 min BRACIOLA DI MAIALE 200º 40-45 min BRACIOLA DI AGNELLO 200º 30-40 min COSCE DI POLLO 200º 30-35 min FILETTI DI PESCE 200º 20-25 min BISTECCHE DI SALMONE 200º 20-25 min N.B.: Tutti i tempi di cottura sono basati su carni a temperatura di frigorifero. La carne congelata può necessitare di tempi considerabilmente più lunghi. Quindi si consiglia caldamente l'utilizzo di un termometro per carni.
plastica, carta e simili nel forno. N.B.: Quando si usa un'unica griglia, posizionarla sulla guida più bassa. Funzionamento Posizionare la griglia nel supporto inferiore o di mezzo. Pre-riscaldare il forno per circa 15 minuti. Porre gli alimenti da cuocere sulla griglia. Ruotare il controllo funzione su COTTURA AL FORNO. Regolare il controllo tempo sulla posizione di moderato. Al termine della cottura, suona il campanello.
cottura, suona il campanello. Guida alla cottura I risultati della cottura possono variare, adattare i tempi indicati alle proprie esigenze. Inoltre, verificare spesso gli alimenti, durante la brasatura, per evitarne l'eccessiva cottura. CARNI TEMPO DI COTTURA COSTATA 18-22 min RISO 25-30 min PANE AL VAPORE 15-18 min RAVIOLI 10-15 min UOVA 10-12 min POLLO 25-30 min PESCE 12--15 min PATATE 30-35 min N.B.: Tutti i tempi di cottura sono basati su carni a temperatura di frigorifero.
Tutti gli accessori devono essere lavati in acqua calda e detersivo, e possono essere lavati in lavastoviglie. La porta può essere pulita con una spugna bagnata e asciugata con un tovagliolo di carta o un canovaccio. Pulire l'esterno con una spugna bagnata. NON UTILIZZARE DETERGENTI ABRASIVI CHE POTREBBERO DANNEGGIARE LA FINITURA ESTERNA. NON UTILIZZARE DETERGENTI ABRASIVI O PAGLIETTE SULLA TEGLIA POICHÉ POTREBBERO DANNEGGIARE LA LAMINATURA.
servicio autorizado para examinarlo, repararlo o ajustar. El uso de accesorios no recomendados por su fabricante pueden causar daños o accidentes. No coloque el aparato cerca o encima de encimeras o quemadores de gas. Cuando haga funcionar el aparato, mantenga al menos 10 cm de espacio en los alrededores del horno para permitir ventilación de aire adecuada. Desenchufe el cable de alimentación de la toma de corriente cuando no use el aparato y antes de limpiarlo.
No coloque ningún material que no sea recomendado por su fabricante en este horno. Use siempre guantes protectores, aislados cuando inserte o retire comida en el horno caliente. Este aparato tiene una puerta de cristal de seguridad templado. El cristal es resistente a cualquier rompedura. El cristal templado puede romperse por los lados. Evite arañar la superficie de la puerta o rasgar los bordes.
B: BOTÓN DE ENCENDIDO C: BOTÓN DE TIEMPO D: LUZ INDICADORA DE LA TAPA E: BOTÓN DE TEMPERATURA F: TANQUE DE AGUA G: CARCASA H: TAPA RECOGEGOTAS I: SALIDA DE VAPOR J: VIDRIO DELANTERO K: GANCHO DE LA PUERTA L: MARCO DE LA PUERTA (INFERIOR) M: PUERTA DE CRISTAL N: MARCO DE LA PUERTA (SUPERIOR) O: ASA DEL PUERTO P:REJILLA PARA ASAR Q:BANDEJA PARA COCCIÓN R: ASA Antes de usar su horno de vapor Antes de usar su horno de vapor por la primera vez, asegúrese de que: o Lea todas las instrucciones del manual..
Por favor anote: puede que haya olor y humo durante el funcionamiento inicial del aparato: esto es normal e inofensivo. Es debido a la quema de las sustancias protectoras aplicadas a los elementos de calentamiento en la fábrica. Usar su horno de vapor: 1.Botón de temperatura: elija la temperatura deseada desde 120 to 140ºC para su horno. 2.
Guía de asado a la parrilla Los resultados de cocción pueden variar, ajuste los botones como lo desea. Verifique de vez en cuando el asado a la parrilla para evitar un sobre asado.
Cocción Cuece su cookies, pasteles, tortas, brownies favoritos, etc. Los objetos de cocción que serán instalados en su horno miden más de 23 cm de largo. No le recomendamos el uso de bolsas para horno o recipiente de cristal. No use nunca cartulinas de plástico, papel o algo similar en el horno. Nota: cuando use solo una bandeja, colóquela en la parte inferior del horno. Funcionamiento Coloque la rejilla en el soporte más bajo o mediano. Precaliente el horno aproximadamente durante 15 minutos.
Funcionamiento Coloque la comida que desea cocinar en la bandeja para cocer. Asegúrese de que el tanque de agua está lleno de agua, luego póngalo en el soporte para tanque de agua. Ajuste la temperatura a 120ºC. Coloque el botón de función de encendido en la función de vapor. Coloque el botón de control de tiempo en posición moderada. Cuando haya terminado la cocción la campana sonará. Guía de cocción Los resultados de cocción pueden variar, ajuste los botones como lo desea.
horno están en funcionamiento. Si lo desea, limpie las paredes con una esponja húmeda, paño o estropajo de nilón y detergente suave. NO USE ESTROPAJOS DE ACERO, LIMPIADORES ARASIVOS O ROCE LAS PAREDEDES CON UN USTENSILIOS METÁLICO, YA QUE TODOS ESTOS MÉTODOS PODRÍAN DAÑAR LA CAPA CONTINUA LIMPIA. Todos los accesorios deben de lavarse con agua enjabonada caliente o pueden lavarse en el lavavajillas. Puede limpiar la puerta con una esponja húmeda, luego séquela con un paño o papel seco y limpio.
quentes. Não utilize um aparelho que tenha o cabo ou a ficha danificados ou após verificar o mau funcionamento do aparelho ou se verificar qualquer outro tipo de danos. Verifique regularmente se existem danos na ficha e no cabo. Entregue o aparelho no serviço de reparação autorizado mais próximo, para examinarem o aparelho, reparar ou ajustar. O uso de acessórios não recomendados pelo fabricante do aparelho, pode causar danos ou ferimentos.
Deverá ter cuidado extra ao cozinhar em recipientes que não sejam em metal ou em vidro destinado ao uso no forno. Certifique-se que nada toca nas partes superior ou inferior do interior do forno. Não coloque nenhum dos seguintes materiais dentro do forno: Cartão, plástico, papel ou materiais semelhantes. Não coloque outros materiais no forno além dos acessórios recomendados pelo fabricante, quando em funcionamento.
A: LUZ INDICADORA DE VAPOR B: INTERRUPTOR C: TEMPORIZADOR D: LUZ INDICADORA DE FUNCIONAMENTO E: CONTROLO DE TEMPERATURA F: DEPÓSITO DE ÁGUA G: INTERIOR H: TAMPA PARA DRENAR I: SAÍDA DE VAPOR J: VIDRO DA FRENTE K: PRESILHA DA PORTA L: MOLDURA DA PORTA (INFERIOR) M: PORTA DE VIDRO N:PORTA DE VIDRO MOLDURA DA PORTA (SUPERIOR) O: PUXADOR P: GRELHA DE COZINHAR Q: BANDEJA DE COZINHAR R: PEGA Antes de utilizar o seu forno a vapor Antes de utilizar pela primeira ver o seu forno a vapor, certifique-se que: o Leu t
possam surgir. Tenha em atenção: da primeira vez que liga o aparelho pode verificar algum cheiro e fumo: é normal e inofensivo. Deve-se ao facto de a substância de protecção aplicada nos elementos de aquecimento, pelo fabricante, começarem a evaporar. Utilizar o seu forno a vapor: 1. Controlo da temperatura: escolha a temperatura desejada entre 120 e 140ºC para cozinhar a vapor ou forno. 2.
Pincele os alimentos com molhos ou azeite, como preferir. Coloque o temporizador numa posição moderada. Quando o processo de tostar terminar, o alarme toca. Guia de tostar Os resultados de cozinhados podem variar, ajuste os tempos de acordo com os requisitos. Durante o processo de tostar, verifique frequentemente os seus alimentos, para evitar cozinhar demasiado. CARNE TEMP.
Meta o controlo de funcionamento na posição torrar Coloque a comida a torrar na grelha. Coloque o temporizador na posição desejada (mais torrado ou menos torrado). O alarme toca ao sinal de fim da função de torrar. Nota: A grelha de cozinhar deve ser colocada no meio do forno, com os entalhes virados para baixo. Cozinhar Cozinhe os seus bolos, biscoitos, tartes, brownies preferidos, etc. Os instrumentos de cozedura que cabem no seu forno podem ter até 23 cm de cumprimento.
O depósito de água está cheio. A tampa de drenar não está rígida. Durante o uso do forno a vapor, não toque na tampa de drenar. Quando não usa o seu forno a vapor durante um longo período de tempo, deve esvaziar o depósito de água. E colocar o Controlo de funcionamento na posição TOAST (torrar) durante cinco minutos, para secar o interior do aparelho. Após terminar de cozinhar o bolo, retire o depósito de água e retire a água.
BATATAS 30-35 min Nota: Todos os tempos de cozedura são baseados em alimentos que estão à temperatura do frigorífico. Os alimentos congelados levam consideravelmente mais tempo. Desse modo, recomenda-se fortemente o uso de um termómetro para alimentos. Cuidado & Limpeza Atenção: Certifique-se que desliga o forno da corrente eléctrica e deixa arrefecer por completo, antes de limpar. O seu forno possui um revestimento de limpeza contínuo que limpa automaticamente o forno durante o funcionamento normal.
verpakking attendeert u hier op. De gebruikte grondstoffen zijn geschikt voor hergebruik. Met het hergebruik van gebruikte apparaten of grondstoffen levert u een belangrijke bijdrage voor de bescherming van ons milieu. Informeer bij uw lokale overheid naar het bedoelde inzamelpunt.
portarlo ad un centro di raccolta per il riciclaggio di apparecchi elettrici ed elettronici. I materiali sono riutilizzabili in conformità alla loro marcatura. Con il riutilizzo, il ricupero dei materiali oppure altre forme del ricupero di apparecchi vecchi si contribuisce in modo importante alla tutela del nostro ambiente. Richiedete all’amministrazione comunale i dati relativi al punto di smaltimento competente.