
Operation Manual


9
Garantievoorwaarden en service
• Bij schade veroorzaakt door het niet opvolgen van de gebruiksaanwijzing, vervalt het
recht op garantie! Voor vervolgschade die hieruit ontstaat zijn wij niet aansprakelijk.
• Voor materiële schade of persoonlijk letsel veroorzaakt door ondeskundig gebruik of
het niet opvolgen van de veiligheidsvoorschriften zijn wij niet aansprakelijk. In
dergelijke gevallen vervalt elke aanspraak op garantie.
• Anders dan het schoonmaken, zoals genoemd in deze handleiding, is aan dit
apparaat geen ander onderhoud noodzakelijk.
• Indien er reparaties moeten worden uitgevoerd, mag dit uitsluitend door een
geautoriseerd bedrijf gebeuren.
• Dit apparaat is alleen bedoeld voor HUISHOUDELIJK gebruik en niet voor
commercieel of industrieel gebruik.
• Het product mag niet worden gewijzigd of veranderd.
• Indien zich problemen zouden voordoen gedurende 2 jaar na aankoopdatum, welke
gedekt zijn door de fabrieksgarantie, zal TRISTAR het apparaat repareren of
vervangen.
• Uitsluitend materiaal- en/of fabricagefouten zijn voorbegrepen in deze garantie.
TRISTAR is niet verantwoordelijk voor schade:
1) Ten gevolge van een val of ongeluk.
2) Indien het apparaat technisch is gewijzigd door gebruiker of derden.
3) Door oneigenlijk gebruik van het apparaat.
4) Door normale gebruiksslijtage.
• Door eventuele reparatie wordt de oorspronkelijke garantieperiode van 2 jaar niet
verlengd. Deze garantie is slechts geldig op Europees grondgebied. Deze garantie
heft de gebruikersrechten volgens Europese richtlijn 1944/44CE niet op.
• Voor vragen of klachten kunt zich melden bij uw verkooppunt.
• Bewaar altijd uw aankoopbewijs, zonder dit aankoopbewijs kunt u geen aanspraak
maken op enige vorm van garantie.
Aanwijzingen ter bescherming van het milieu
Dit product mag aan het einde van zijn levensduur niet bij het normale huisafval
worden gedeponeerd, maar dient bij een speciaal inzamelpunt voor het
hergebruik van elektrische en elektronische apparaten te worden aangeboden.
Het symbool op artikel, gebruiksaanwijzing en verpakking attendeert u hier op. De
gebruikte grondstoffen zijn geschikt voor hergebruik. Met het hergebruik van
gebruikte apparaten of grondstoffen levert u een belangrijke bijdrage voor de
bescherming van ons milieu. Informeer bij uw lokale overheid naar het bedoelde
inzamelpunt.
Verpakking
Het verpakkingsmateriaal is 100% recyclebaar, lever het verpakkingsmateriaal gescheiden in.
Product
Dit apparaat is voorzien van het merkteken volgens de Europese richtlijn 2002/96/EG
Inzake Afgedankte elektrische en elektronische apparaten(AEEA). Door ervoor te zorgen dat
dit product op de juiste manier als afval wordt verwerkt, helpt u mogelijk negatieve
consequenties voor het milieu en de menselijke gezondheid te voorkomen.
EG-conformiteitsverklaring
Dit apparaat is ontworpen om in contact te komen met levensmiddelen en is ontworpen in
overeenstemming met de EG-richtlijn 89/109/EEC
Dit apparaat is ontworpen, vervaardigd en in de handel gebracht in overeenstemming met: de
veiligheidsdoeleinden van de “laagspanningsrichtlijn”nr. 2006/95/EC, de
beschermingsvoorschriften van de EMC-richtlijn 2004/108/EC “Electromagnetische
compatibiliteit” en de vereiste van richtlijn 93/68/EG
10
Operation and maintenance
UK
Remove all packaging of the device.
Check if the voltage of the appliance corresponds to the main voltage of your home.
Rated voltage : AC220-240V 50Hz
This vacuum is not designed to collect liquids and sharp items. Never vacuum hot ashes,
make sure it is fully cooled.
First use
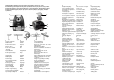
Place the vacuum foot (No.16) on the telescope tube (No.14) The telescope tube length can
be made, according to your wishes, by pressing the button down and push the tube to extend
or reduce. Place the tube (No.15) with the side of the hose coupling) in front of the vacuum, if
you hear a click, this just confirmed. To disconnect the hose press the button of the hose
coupling. Pull out the main cable to the full length and plug into the main supply. Note that you
don’t exceed the red mark when pulling out the cord. The yellow mark shows you the ideal
length of the cable.
Using the button on the vacuum foot in the desired position, with or without a brush on the
bottom of the suction foot.
Always make sure that all the filters and the dust bag are correctly fitted before using the
appliance. Damaged or incorrectly fitted filters or dust bag may cause damage to the appliance.
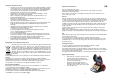
Use
Pull the plug from the vacuum cleaner and place it into a wall outlet. Press the ON/OFF button
and start your vacuum cleaner.
The air regulator (No.4) controls the suction if it should be temporarily reduced.
To turn the unit off, press the ON / OFF button. Unplug the power cord and press the cable
rewind button (No. 3). You can use the storage clip to store the vacuum bar when you store
the vacuum cleaner.
Cleaning of the device
You need to empty the dust bag when the dust full indicator light (No. 7) lights.
Do this immediately otherwise it loses much suction power.
The exhausted filter and the motor protection filter (as found under the front cover should be
cleaned in time. To do that, unclip the grille and shake the filter to clean any dust accumulated.
Then relocate the filter and clip the grille.
The plug must be removed from the power socket before any maintenance or replacement.
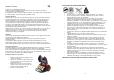
Replacing the dust bag
• Open the front cover by pressing the lock clip
• Lift off the Paper bag from dust bag hold.
Please always keep the dust inlet hole upper
in order to void dust leakage.
• Replace the dust bag and install a new
dust bag to the holder. Make sure the card
of dust bag reach to the bottom of dust holder.
• Close the front cover.