
Operating Guide


9Section 2 — ASSembly & Set-Up
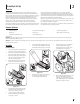
Side Discharge Chute/Mulch Plug
Your mower was shipped as a mulcher. To
convert to side discharge, make sure grass
catcher is not installed and rear discharge door
is closed.
1. On the right side of the mower, lift the
mulch plug. See Figure 2-8.
Mulch Plug
2
1
Figure 2-8
2. Slide two hooks of side discharge
chute under hinge pin on mulch plug
assembly. Lower the mulch plug.
IMPORTANT: Do not remove mulch plug
at any time.
To remove side discharge chute, lift the mulch
plug. Lift the side discharge chute up to release
the slide hooks from under the mulch plug
hinge pin. Release mulch pulg to allow it to
close.
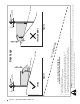
Cutting Height
The cutting height adjustment lever is located
above the front and rear left wheel.
1. Pull the cutting height adjustment lever
towards wheel.
2. Move lever to desired position for a
change in cutting height. See Figure 2-9.
Figure 2-9
IMPORTANT: Both the front and rear
wheels must be placed in the same
relative position. For rough or uneven
lawns, move the height adjustment
levers to a higher position. This will stop
scalping of grass.
3. Release lever towards deck.
WARNING: Do not at any time
make any adjustment to lawn
mower without first stopping
motor and removing safety key.
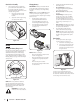
Installing Battery
IMPORTANT: Use only with model 4144 or
6216 batteries
1. Lift up the battery housing lid.
2. Slide the battery into the active (left
side) battery port so that the battery
indicator light faces away from the
battery latch. See Figure 2-10.
3. Push the battery (a) firmly until the
battery locks into place. There should be
an audible “click” and the battery latch
(b) should be in the upright position.
4. Close battery housing lid.
(a)
(b)
Figure 2-10
NOTE:
The second
battery (right side) bay
can be used for storage
of a backup battery. The
backup battery installs
with the indicator lights
facing away from the
latch.
STORAGE
ACTIVE