Operator’s Manual TB35 EC Electric Start Capable 2-Cycle Trimmer TABLE OF CONTENTS Service . . . . . . . . . . . . . . . . . . . . . . . . . . . . . . . . . . . . . . . . . . . . . . .1 Safety . . . . . . . . . . . . . . . . . . . . . . . . . . . . . . . . . . . . . . . . . . . . . . .2 Know Your Unit . . . . . . . . . . . . . . . . . . . . . . . . . . . . . . . . . . . . . . . .5 Specifications . . . . . . . . . . . . . . . . . . . . . . . . . . . . . . . . . . . . . . . . .5 Assembly . . . . . . . . . .
SAFETY SPARK ARRESTOR NOTE The purpose of safety symbols is to attract your attention to possible dangers. The safety symbols, and their explanations, deserve your careful attention and understanding. The safety warnings do not by themselves eliminate any danger. The instructions or warnings they give are not substitutes for proper accident prevention measures. SYMBOL NOTE: For users on U.S. Forest Land and in the states of California, Maine, Oregon and Washington. All U.S.
SAFETY WARNINGS FOR GAS UNITS • WARNING: Gasoline is highly flammable and its vapors can explode if ignited. Take the following • precautions: • • • • • • • Store fuel only in containers specifically designed and approved for the storage of such materials. Always stop the engine and allow it to cool before filling the tank. Never remove the fuel tank cap or add fuel when the engine is hot. Always loosen the fuel tank cap slowly to relieve any pressure in the tank before fueling.
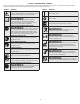
• SAFETY & INTERNATIONAL SYMBOLS • This operator's manual describes safety and international symbols and pictographs that may appear on this product. Read the operator's manual for complete safety, assembly, operating and maintenance and repair information. SYMBOL MEANING SYMBOL • SAFETY ALERT SYMBOL MEANING • ON/OFF STOP CONTROL Indicates danger, warning or caution. May be used in conjunction with other symbols or pictographs.
KNOW YOUR UNIT APPLICATIONS As a trimmer: • Cutting grass and light weeds. • Edging • Decorative trimming around trees, fences, etc. Other optional attachments may be used with this unit.
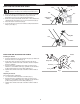
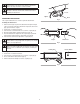
ASSEMBLY INSTALLING THE CUTTING HEAD SHIELD Mount Bracket Hole WARNING: To prevent serious personal injury, never operate the unit without the cutting head shield in place. Tab Bolt 1. Remove the wing nut and washer from the cutting head shield. 2. Insert the short tab (the one without a hole) on the mount bracket into the slot on the cutting head shield (Fig. 1). 3. Rotate the cutting head shield until the bolt on the cutting head shield protrudes through the hole on the mount bracket (Fig. 1). 4.
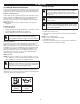
WARNING: Before using any attachment, read and understand the manual that came with the attachment. Follow all safety information contained within. WARNING: To avoid serious personal injury and damage to the unit, shut the unit off before removing or installing an attachment. Loosen Tighten Knob OPERATING THE COUPLER Fig. 4 The coupler enables the use of various optional attachments. Installing the Attachment 1. Remove the hanger cap from the attachment.
OIL AND FUEL FUELING THE UNIT OIL AND FUEL MIXING INSTRUCTIONS The use of old and/or improperly mixed fuel is the most common cause of performance problems. Use only fresh, clean unleaded gasoline. Follow the instructions carefully for the proper gasoline/oil mixture. WARNING: Gasoline is extremely flammable. Ignited vapors may explode. Always stop the engine and allow it to cool before filling the fuel tank. Do not smoke while filling the tank. Keep sparks and open flames at a distance from the area.
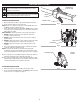
STARTING AND STOPPING WARNING: Operate this unit only in a well-ventilated outdoor area. Carbon monoxide exhaust fumes can be lethal in a confined area. On/Off Switch (I = On / O = Off) WARNING: Avoid accidentally starting the unit. To avoid serious injury, the operator and the unit must be in a stable position when pulling the starter rope (Fig. 9). Throttle Lockout STARTING INSTRUCTIONS Throttle Control 1. Mix gasoline with oil. Refer to Oil and Fuel Mixing Instructions. 2. Fill the fuel tank.
USING THE ELECTRIC START ACCESSORY Item No. This unit can be started with an optional electric start accessory (items sold separately). Refer to the electric start accessory operator’s manual for the proper use of this feature. Please contact your local retailer, call the Customer Support Department or visit our website for more information. Description 49M2027P966 . . . . . . . . . . . . . . . . . . . . . . . . . . . . . . .Electric Starter 49MESCBP966 . . . . . . . . . . . . . . . . . . . . . . . . . .
OPERATION HOLDING THE UNIT WARNING: Always wear eye, hearing, hand, foot and body protection to reduce the risk of injury when operating this unit. WARNING: To prevent serious personal injury, avoid arm contact with the engine while operating the unit. The engine may be extremely hot. • • • • • • Stand in the operating position (Fig. 11). Stand up straight. Do not bend over. Keep feet apart and firmly planted. Hold the shaft grip with the right hand. Keep the right arm slightly bent.
DECORATIVE TRIMMING When trimming around trees, posts, fences, etc., rotate the whole unit so that the cutting head is at a 30° angle to the ground (Fig. 13). Fig. 13 EDGING The trimmer attachment can be used for edging (Fig. 14). Alternatively, bladed lawn edger attachments can also be purchased for use with this unit. Rotating the Trimmer Attachment WARNING: To avoid serious personal injury and damage to the unit, shut the unit off before rotating the attachment.
MAINTENANCE MAINTENANCE SCHEDULE WARNING: To avoid serious personal injury, always stop the engine and allow it to cool before cleaning or maintaining the unit. Never perform cleaning or maintenance while the unit is running. Disconnect the spark plug wire to prevent the unit from starting accidentally. Perform these required maintenance procedures at the frequency stated in the table. These procedures should also be a part of any seasonal tune-up.
Indexing Teeth Split Wall Holding Slots Slot Fig. 18 Fig. 19 Part 2 - Winding New Trimming Line onto the Inner Reel • • • Top Hole If using single line, refer to Winding Single Line. If using split line, refer to Winding Split Line. If using a prewound inner reel, proceed to Part 3 - Installing the Inner Reel. Split Wall Winding Single Line 1. Cut one 12-foot (3.7 m) length of new single trimming line. Fold the line in half to create a loop in the middle. 2.
MAINTAINING THE AIR FILTER Air Filter Failure to maintain the air filter can result in poor performance or can cause permanent damage to the engine. Engine failure due to improper air filter maintenance is not covered by the product warranty. Cleaning the Air Filter 1. Open the air filter cover: press in the lock tab and swing the air filter cover to the right (Fig. 23). 2. Remove the air filter from inside the air filter cover (Fig. 23). 3. Wash the air filter in detergent and water.
MAINTAINING THE SPARK PLUG 1. Stop the engine and allow it to cool. Grasp the spark plug boot firmly and pull it from the spark plug. 2. Clean around the spark plug. Remove the spark plug from the cylinder head with a 5/8-inch socket, turning counterclockwise. WARNING: Do not sand blast, scrape or clean spark plug electrodes. Grit in the engine could damage the cylinder. 0.025 in. (0.635 mm) 3. Inspect the spark plug.
CLEANING AND STORAGE CLEANING STORAGE • WARNING: To avoid serious personal injury, always stop the engine and allow it to cool before cleaning or maintaining the unit. • • • • • Use a small brush to clean the outside of the unit. Do not use strong detergents. Household cleaners that contain aromatic oils such as pine and lemon, and solvents such as kerosene, can damage plastic. Wipe off any moisture with a soft cloth. Never store a fueled unit where fumes may reach an open flame or spark.
TROUBLESHOOTING PROBLEM SOLUTION THE ENGINE WILL NOT START The fuel tank is empty Fill the fuel tank with properly-mixed fuel The primer bulb was not pressed enough Press the primer bulb 10 times or until fuel is visible The engine is flooded Squeeze the throttle control and pull the starter rope until the engine starts The fuel is old (over 30 days) and/or improperly mixed Drain the fuel tank and add fresh, properly-mixed fuel The spark plug is fouled Replace the spark plug The choke lever was
NOTES 19
MANUFACTURER’S LIMITED WARRANTY FOR: The limited warranty set forth below is given by Troy-Bilt LLC (Troy-Bilt) with respect to new merchandise purchased and used in the United States, its possessions and territories. Troy-Bilt warrants this product against defects in material and workmanship for a period of two (2) years commencing on the date of original purchase and will, at its option, repair or replace, free of charge, any part found to be defective in material or workmanship.
Manual del Operador TB35 EC Recortadora de 2 ciclos con capacidad para arranque eléctrico ÍNDICE Servicio . . . . . . . . . . . . . . . . . . . . . . . . . . . . . . . . . . . . . . . . . . . . .21 Seguridad . . . . . . . . . . . . . . . . . . . . . . . . . . . . . . . . . . . . . . . . . . .22 Conozca su unidad . . . . . . . . . . . . . . . . . . . . . . . . . . . . . . . . . . . .25 Especificaciones . . . . . . . . . . . . . . . . . . . . . . . . . . . . . . . . . . . . . .25 Montaje . . . . . . . . . .
SEGURIDAD NOTA SOBRE EL AMORTIGUADOR DE CHISPAS El objetivo de los símbolos de seguridad es dirigir su atención hacia posibles peligros. Los símbolos de seguridad, así como sus explicaciones, necesitan su atención y comprensión completas. Las advertencias de seguridad no eliminan por sí mismas ningún peligro. Las instrucciones o advertencias que contienen no reemplazan a las medidas adecuadas de prevención de accidentes. NOTA: Para usuarios de los territorios de bosques de EE. UU.
ADVERTENCIAS DE SEGURIDAD PARA LAS UNIDADES A GASOLINA • ADVERTENCIA: La gasolina es sumamente inflamable y sus vapores pueden explotar si se • encienden. Adopte las siguientes precauciones: • • • • • • • Almacene el combustible únicamente en recipientes diseñados específicamente y aprobados para el almacenamiento de dichos materiales. Detenga siempre el motor y déjelo enfriar antes de llenar el depósito.
• • GUARDE ESTAS INSTRUCCIONES Nunca rocíe ni arroje chorros de agua ni de ningún otro líquido a la unidad. Mantenga las manijas secas y limpias (sin residuos, aceite ni grasa). Limpie la unidad luego de cada uso. Consulte Limpieza y almacenamiento. No utilice solventes o detergentes fuertes. Guarde estas instrucciones. Consúltelas con frecuencia y úselas para capacitar a otros usuarios. Si le presta esta unidad a otras personas, también debe prestarles estas instrucciones.
CONOZCA SU UNIDAD APLICACIONES HERRAMIENTAS DE ENSAMBLADO REQUERIDAS: • Bujía de encendido Silenciador Como recortadora: • Corta hierbas y malezas ligeras. • Bordeado • Recorte decorativo alrededor de árboles, vallas, etc. Con esta unidad se pueden usar otros accesorios opcionales.
MONTAJE INSTALACIÓN DEL PROTECTOR DEL CABEZAL DE CORTE Soporte de montaje Orificio ADVERTENCIA: A fin de evitar que se produzcan Lengüeta lesiones personales graves, no opere nunca la unidad sin el protector del cabezal de corte en su lugar. Perno 1. Extraiga la tuerca de mariposa y la arandela del protector del cabezal de corte. 2. Inserte la lengüeta corta (la que no tiene orificio) en el soporte de montaje dentro de la ranura del protector del cabezal de corte (Fig. 1). 3.
ADVERTENCIA: Antes de comenzar a utilizar cualquiera de los accesorios, lea y comprenda el manual que viene con dicho accesorio. Tenga en cuenta toda la información de seguridad que incluye. ADVERTENCIA: A fin de evitar lesiones personales graves y daños a la unidad, apáguela antes de extraer o instalar un accesorio. Afloje Apriete Perilla FUNCIONAMIENTO DEL ACOPLADOR Fig. 4 El acoplador permite el uso de varios accesorios opcionales. Instalación del accesorio 1.
ACEITE Y COMBUSTIBLE INSTRUCCIONES PARA LA MEZCLA DEL ACEITE Y EL COMBUSTIBLE El uso de combustible viejo y/o mal mezclado es la causa más frecuente de los problemas de rendimiento. Sólo se debe utilizar gasolina nueva, limpia y sin plomo. Siga atentamente las instrucciones para que la mezcla de gasolina/aceite sea adecuada.
ARRANQUE Y PARADA ADVERTENCIA: Opere esta unidad solamente en un área exterior bien ventilada. El monóxido de carbono de los gases de escape puede ser letal en un área confinada. Interruptor encendido / apagado (I = Encendido / O = Apagado) ADVERTENCIA: Evite arrancar la unidad por accidente. A fin de evitar lesiones graves, el operador y la unidad deben estar en una posición estable al tirar de la cuerda de arranque (Fig. 9).
USO DEL ACCESORIO DE ARRANQUE ELÉCTRICO N.° de artículo Esta unidad se puede arrancar con un accesorio de arranque eléctrico opcional (artículos que se venden por separado). Consulte el manual del operador del accesorio de arranque eléctrico para obtener instrucciones para el uso adecuado de esta función. Comuníquese con el distribuidor minorista local, llame al Departamento de Asistencia al Cliente o visite nuestro sitio web para obtener más información. Descripción 49M2027P966 . . . . . . . . . . . . .
FUNCIONAMIENTO CÓMO SOSTENER LA UNIDAD ADVERTENCIA: Utilice siempre protección ocular, auditiva, de manos, pies y corporal para reducir el riesgo de sufrir lesiones durante la operación de esta unidad. ADVERTENCIA: A fin de evitar lesiones personales graves, evite el contacto del brazo con el motor mientras opere la unidad. El motor puede estar muy caliente. • • • • • • Párese en la posición de arranque (Fig. 11). Párese derecho. No se incline sobre el aparato.
RECORTE DECORATIVO Cuando recorte alrededor de árboles, postes, vallas, etc., rote toda la unidad de manera que el cabezal de corte quede en un ángulo de 30° en relación con el suelo (Fig. 13). Fig. 13 BORDEADO El accesorio de la recortadora puede ser utilizado para el bordeado (Fig. 14). De manera alternativa, también se pueden comprar accesorios de bordeadora de césped con cuchillas para utilizar con esta unidad.
MANTENIMIENTO ADVERTENCIA: A fin de evitar lesiones personales PROGRAMA DE MANTENIMIENTO ADVERTENCIA: Utilice vestimenta de protección y respete todas las instrucciones de seguridad para evitar que se produzcan lesiones personales graves. Realice estos procedimientos de mantenimiento requeridos con la frecuencia establecida en la tabla. Estos procedimientos también deben realizarse como parte de la afinación estacional.
Dientes de posición Divisor Ranuras de sujeción Ranura Fig. 18 Fig. 19 Parte 2 - Enrollado del hilo de recorte nuevo en el carrete interior • • • Orificio superior Si se utiliza un hilo simple, consulte Enrollado de hilo simple. Si se utiliza Split-Line, consulte Enrollado de Split-Line. Si se utiliza un carrete de hilo preenrollado, prosiga a la Parte 3 – Instalación del carrete interior. Divisor Enrollado del hilo simple 1. Corte un largo de 12 pies (3.7 m) de hilo de recorte simple nuevo.
MANTENIMIENTO DEL FILTRO DE AIRE Filtro de aire Si no se mantiene el filtro de aire se puede obtener un rendimiento insuficiente o se pude dañar el motor de manera permanente. Las averías del motor ocasionadas por un mantenimiento inadecuado del filtro de aire no están cubiertas por la garantía del producto. Limpieza del filtro de aire 1. Abra la cubierta del filtro de aire: oprima la lengüeta de fijación y gire la cubierta del filtro de aire hacia la derecha (Fig. 23). 2.
MANTENIMIENTO DE LA BUJÍA 1. Detenga el motor y déjelo enfriar. Agarre firmemente la pipa (capucha) y sáquela de la bujía. 2. Limpie alrededor de la bujía. Saque la bujía de la culata girándola en sentido contrario a la agujas del reloj con una llave de bujía de 5/8 de pulgada. ADVERTENCIA: No sople, raspe ni limpie los electrodos con arena. La arenisca en el motor podría dañar el cilindro. 0.025 pulgadas (0.635 mm) 3. Inspeccione la bujía.
LIMPIEZA Y ALMACENAMIENTO LIMPIEZA ALMACENAMIENTO • ADVERTENCIA: A fin de evitar lesiones personales graves, siempre pare el motor y deje que se enfríe antes de limpiar o mantener la unidad. • • Use un cepillo pequeño para limpiar el exterior de la unidad. No utilice detergentes fuertes. Los productos de limpieza para el hogar que contienen aceites aromáticos como pino y limón, y los disolventes como el queroseno, pueden dañar el plástico. Limpie todo rastro de humedad con una tela suave.
SOLUCIÓN DE PROBLEMAS PROBLEMA SOLUCIÓN EL MOTOR NO ARRANCA El tanque de combustible está vacío Llene el tanque de combustible con la mezcla adecuada La pera del cebador no se oprimió lo suficiente Oprima la pera del cebador 10 veces o hasta que se vea el combustible El motor está rebosado Apriete el control del acelerador y tire de la cuerda de arranque hasta que arranque el motor El combustible está viejo (tiene más de 30 días) y/o mal mezclado Vacíe el tanque de combustible y eche combustible nu
NOTAS 39
GARANTÍA LIMITADA DEL FABRICANTE PARA: La garantía limitada que se extiende a continuación es otorgada por la empresa Troy-Bilt LLC (Troy-Bilt) y cubre mercaderías nuevas compradas y utilizadas en los Estados Unidos, sus posesiones y territorios.