TRUE FOOD SERVICE EQUIPMENT, INC.
True Food Service Equipment, Inc. ............ www.truemfg.com ............
True Food Service Equipment, Inc. SAFETY INFORMATION How to Maintain Your Refrigerator to Receive the Most Efficient and Successful Operation You have selected one of the finest commercial refrigeration units made. It is manufactured under strict quality controls with only the best quality materials available. Your TRUE cooler when properly maintained will give you many years of trouble-free service. WARNING! Use this appliance for its intended purpose as described in this Owner Manual.
True Food Service Equipment, Inc. SAFETY INFORMATION 2 ............ www.truemfg.com ............
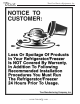
True Food Service Equipment, Inc. SAFETY INFORMATION DANGER! RISK OF CHILD ENTRAPMENT PROPER DISPOSAL OF THE REFRIGERATOR Child entrapment and suffocation are not problems of the past. Junked or abandoned refrigerators are still dangerous… even if they will sit for “just a few days.” If you are getting rid of your old refrigerator, please follow the instructions below to help prevent accidents. Before You Throw Away Your Old Refrigerator or Freezer: • Take off the doors.
True Food Service Equipment, Inc. SAFETY INFORMATION WARNING! HOW TO CONNECT ELECTRICITY Do not, under any circumstances, cut or remove the ground prong from the power cord. For personal safety, this appliance must be properly grounded. The power cord from this appliance is equipped with a grounding plug which minimizes the possibility of electric shock hazard. Have the wall outlet and circuit checked by a qualified electrician to make sure the outlet is properly grounded.
True Food Service Equipment, Inc. INSTALLATION / OPERATION INSTRUCTIONS INSTALLATION / OPERATION INSTRUCTIONS OWNERSHIP To ensure that your unit works properly from the first day, it must be installed properly. We highly recommend a trained refrigeration mechanic and electrician install your TRUE equipment. The cost of a professional installation is money well spent. Before you start to install your TRUE unit, carefully inspect it for freight damage.
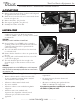
True Food Service Equipment, Inc. INSTALLATION / OPERATION INSTRUCTIONS LOCATING A. Remove louver from the front of cabinet and backguard (if applicable) from rear of cabinet. B. Skid bolts are located in each of 4 corners inside cabinet bottom. (See photo A). C. Remove skid bolts. (See photo B). D. Cut straps if applicable. (See photo C). E. Carefully lift cabinet off of skid. A Removing skid from bottom of cabinet. C LEVELING A. Set unit in its final location.
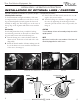
True Food Service Equipment, Inc. INSTALLATION / OPERATION INSTRUCTIONS INSTALLATION OF OPTIONAL LEGS / CASTORS Important Safeguard for installation of leg/castor (Images 1-5 demonstrate procedure) Securing Castors and Legs To obtain maximum strength and stability of the unit, it is important that you make sure each castor is secure. Legs are hand-tightened securely against the lower rail assembly see image 4-5. The bearing race on the castor of the top edge of the leg must make firm contact with the rail.
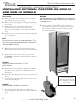
True Food Service Equipment, Inc. INSTALLATION / OPERATION INSTRUCTIONS INSTALLING OPTIONAL CASTORS ON GDM-10 AND GDM-12 MODELS Final Location A. Place styrofoam corners behind cooler for cushion and carefully tilt unit on it’s back. B. Remove the louvered grill by removing four phillipshead screws. C. Remove the four bolts from the skid with an adjustable wrench, and locate the four castors. Castors are placed inside cooler, within the bubble wrap. D.
True Food Service Equipment, Inc. INSTALLATION / OPERATION INSTRUCTIONS SLIDE DOORS TRUE Logo STEP 1 Before removing slide door do not use the side latch. Tension on the door cord is needed to execute these operation instructions. Doors can not be removed unless placed in specific locations stated in these instructions. STEP 2 Two Door Units: Slide the front door so it is centered on the cabinet. The door can not be removed unless it is centered.
True Food Service Equipment, Inc. INSTALLATION / OPERATION INSTRUCTIONS CONDUCTORS AND CIRCUITS Wire Gauge for 2% Voltage Drop in Supply Circuits.
True Food Service Equipment, Inc. INSTALLATION / OPERATION INSTRUCTIONS ELECTRICAL INSTRUCTIONS A. Before your new unit is connected to a power supply, check the incoming voltage with a voltmeter. If anything less than 100% of the rated voltage for operation is noted, correct immediately. B. All units are equipped with a service cord, and must be powered at proper operating voltage at all times. Refer to cabinet data plate for this voltage.
True Food Service Equipment, Inc. INSTALLATION / OPERATION INSTRUCTIONS STARTUP A. The compressor is ready to operate. Plug in the cooler. B. Temperature control set at No. 4 position gives refrigerators an approximate temperature of 35°F. Allow unit to function several hours, completely cooling cabinet before changing the control setting. C. Excessive tampering with the control could lead to service difficulties.
True Food Service Equipment, Inc. INSTALLATION / OPERATION INSTRUCTIONS (On GDM Freezers, the LAE Electronic Control is located on inside of cooler’s grill.) IF YOUR CABINET IS BUILT WITH THIS TEMPERATURE CONTROL, PLEASE SEE THE FOLLOWING INSTRUCTIONS. 13 ............ www.truemfg.com ............
True Food Service Equipment, Inc. LAE CONTROL FOR GDM FREEZERS SEQUENCE OF OPERATION 1. Cabinet is plugged in. a. Display will illuminate. b. Interior light will illuminate on glass door models only. (If lights do not come on please see instructions on following page(s).) Solid door cabinet lights are controlled by door switch. 2. After the LAE control preprogrammed time delay of 3 minutes, the compressor and evaporator fan(s) will start if the control is calling for cooling. a.
True Food Service Equipment, Inc. LAE Electronic Control LAE Control Icons Compressor Running Evaporator Fan Running Cabinet in Defrost Activation of 2nd Parameter Set - NA Alarm - NA Info/Set Point Button Manual Defrost/ Down Button Manual Activation/ Up Button Stand-By Button LOCKING & UNLOCKING LAE CONTROLLER WHY: LOCKING OF CONTROL IS NECESSARY TO PREVENT CHANGES TO PROGRAM THAT MAY AFFECT CABINET OPERATION 1 HOW: A. To change lock setting press and release the info button . “t1” will appear.
True Food Service Equipment, Inc. LAE Electronic Control LAE Control Icons Compressor Running Evaporator Fan Running Cabinet in Defrost Activation of 2nd Parameter Set - NA Alarm - NA Info/Set Point Button Manual Defrost/ Down Button Manual Activation/ Up Button Stand-By Button HOW TO TURN GLASS DOOR MODEL LIGHTS ON/OFF May need to unlock control. WHY: LIGHT MAY BE CONTROLLED BY LAE CONTROLLER OR INTERIOR LIGHT SWITCH. ON Position HOW: A.
True Food Service Equipment, Inc. LAE Electronic Control LAE Control Icons Compressor Running Evaporator Fan Running Cabinet in Defrost Activation of 2nd Parameter Set - NA Alarm - NA Info/Set Point Button Manual Defrost/ Down Button Manual Activation/ Up Button Stand-By Button SETTING TIME OF DAY May need to unlock control. Does not adjust for daylight savings time. This is only necessary if the defrost mode parameter (DFM) is set for “RTC”.
True Food Service Equipment, Inc. LAE Electronic Control LAE Control Icons Compressor Running Evaporator Fan Running Cabinet in Defrost Activation of 2nd Parameter Set - NA Alarm - NA Info/Set Point Button Manual Defrost/ Down Button Manual Activation/ Up Button Stand-By Button HOW TO CHANGE THE “SET POINT” May need to unlock control. WHY: THE SET POINT IS THE TEMPERATURE AT WHICH THE COMPRESSOR WILL SHUT OFF. 1 Please note that the “set point” IS NOT the cabinet holding temperature. 2 HOW: A.
True Food Service Equipment, Inc. LAE Electronic Control LAE Control Icons Compressor Running Evaporator Fan Running Cabinet in Defrost Activation of 2nd Parameter Set - NA Alarm - NA Info/Set Point Button Manual Defrost/ Down Button Manual Activation/ Up Button Stand-By Button HOW TO INITIATE A MANUAL DEFROST May need to unlock control. WHY: A ONE TIME ADDITIONAL DEFROST MAY BE NECESSARY TO CLEAR ACCUMULATED FROST/ICE FROM EVAPORATOR COIL.
True Food Service Equipment, Inc. LAE Electronic Control LAE Control Icons Compressor Running Evaporator Fan Running Cabinet in Defrost Activation of 2nd Parameter Set - NA Alarm - NA Info/Set Point Button Manual Defrost/ Down Button Manual Activation/ Up Button Stand-By Button HOW TO CHANGE “DEFROST INTERVALS” May need to unlock control. This can only be changed if defrost mode parameter “DFM” is set for “TIM”. WHY: THE DEFROST INTERVAL IS THE TIME DURATION BETWEEN DEFROST CYCLES.
True Food Service Equipment, Inc. LAE Electronic Control LAE Control Icons Compressor Running Evaporator Fan Running Cabinet in Defrost Activation of 2nd Parameter Set - NA Alarm - NA Info/Set Point Button Manual Defrost/ Down Button Manual Activation/ Up Button Stand-By Button HOW TO CHANGE A “DEFROST CYCLE” May need to unlock control. This can only be changed if defrost mode parameter (DFM) is set for “RTC”. 1 WHY: THE DEFROST TIME IS THE TIME OF DAY DEFROST CYCLES ARE INITIATED.
True Food Service Equipment, Inc. INSTALLATION / OPERATION INSTRUCTIONS TEMPERATURE CONTROL ADJUSTMENT FOR HIGH ALTITUDE ONLY! TERMS: ___________ STEP 4 ____________ Cut-out - Temperature sensed by the For high elevation installations, it controller that shuts the compressor may be necessary to "warm-up" the off. set points.
True Food Service Equipment, Inc. INSTALLATION / OPERATION INSTRUCTIONS SHELVING INSTALLATION / OPERATION & LIGHT SWITCH LOCATION SHELF & ORGANIZER INSTALLATION: Step 1 A. Hook shelf clips onto shelf standards. (see illustration). B. Position all four shelf clips equal in distance from the floor for flat shelves. C. Lower front of gravity feed TrueTrac organizers to enable proper feed. Step 2 Place shelves or organizers on shelf clips making sure all corners are seated properly.
True Food Service Equipment, Inc. INSTALLATION / OPERATION INSTRUCTIONS INSTALLING BOTTLE ORGANIZERS (20 OZ.) NOTE Shelf retainer clip installation, both sides. (retainer clip When installing shelves, be sure to plan position varies depending on adequate space between shelves for model, GDM-12 shown) product to be stocked and removed. Step 1 Install wire shelves so rear shelf clips are four slots higher than front shelf clips (for gravity feed).
True Food Service Equipment, Inc. INSTALLATION / OPERATION INSTRUCTIONS FREEZER DEFROST TIME CLOCK OPERATION (Grasslin Timer) RECOMMENDED DEFROST SETTINGS: TRUE Manufacturing has factory set your defrost time clock to a recommended time and duration defrost scenario. All refrigeration equipment operating below 30°F will accumulate frost on the evaporator coil and will require routine defrost. Your TRUE equipment has been designed for three defrost periods (6:00 a.m., 2:00 p.m. and 10:00 p.m.).
True Food Service Equipment, Inc. INSTALLATION / OPERATION INSTRUCTIONS IF THE COMPRESSOR WILL NOT RUN 1. If there is no voltage at the compressor terminals, follow the wiring diagram and check back from compressor to the power supply to find where the circuit is interrupted. 2. If power is available at the compressor terminals, and the compressor does not run, check the voltage at the compressor terminals while attempting to start the compressor.
True Food Service Equipment, Inc. INSTALLATION / OPERATION INSTRUCTIONS 4. If all operating conditions are normal, the voltage supply at the compressor terminals balanced and within limits, the compressor crankcase temperature within normal limits, and the amperage drawn within the specified range, the motor protector may be defective, and should be replaced.
True Food Service Equipment, Inc. INSTALLATION / OPERATION INSTRUCTIONS Light Cover Installation for GDM-10F & GDM-12F IMPORTANT Before installing lamp cover turn cabinet on and allow it to reach temperature. ____________ STEP 1 _____________ Locate rubber gasket behind lamp holder mounted to evaporator housing. (See Image 1). ____________ STEP 3 _____________ Be sure lamp cover is seated properly in rubber gasket.
True Food Service Equipment, Inc. MAINTENANCE, CARE & CLEANING MAINTENANCE, CARE & CLEANING CLEANING THE CONDENSER COIL When using electrical appliances, basic safety precautions should be followed, including the following: REQUIRED TOOLS: • Phillips Screwdriver • Stiff Bristle Brush • Adjustable Wrench • Air Tank or CO2 Tank • Vacuum Cleaner ____________ STEP 8 _____________ Reinstall louver assembly onto unit with appropriate fastener and clips. Tighten all screws.
True Food Service Equipment, Inc. MAINTENANCE, CARE & CLEANING IMPORTANT WARRANTY INFORMATION Condensers accumulate dirt and require cleaning every 30 days. Dirty condensers result in compressor failure, product loss, and lost sales... which are not covered by warranty. If you keep the Condenser clean you will minimize your service expense and lower your electrical costs. The Condenser requires scheduled cleaning every thirty days or as needed.
True Food Service Equipment, Inc. MAINTENANCE, CARE & CLEANING STAINLESS STEEL EQUIPMENT CARE AND CLEANING CAUTION: Do not use any steel wool, abrasive or chlorine based products to clean stainless steel surfaces. • Stainless Steel Opponents There are three basic things which can break down your stainless steel’s passivity layer and allow corrosion to rear its ugly head.
True Food Service Equipment, Inc. MAINTENANCE, CARE & CLEANING STAINLESS STEEL EQUIPMENT CARE AND CLEANING Recommended cleaners for certain situations / environments of stainless steel A) Soap, ammonia and detergent medallion applied with a cloth or sponge can be used for routine cleaning. B) Arcal 20, Lac-O-Nu Ecoshine applied provides barrier film for fingerprints and smears.
TRUE REFRIGERATION® MADE IN U.S.A. SINCE 1945 WARRANTY INFORMATION (U.S.A. & CANADA ONLY!) ONE YEAR PARTS & LABOR WARRANTY TRUE warrants to the original purchaser of every new TRUE refrigerated unit, the cabinet and all parts thereof, to be free from defects in material or workmanship, under normal and proper use and maintenance service as specified by TRUE and upon proper installation and start-up in accordance with the instruction packet supplied with each TRUE unit.