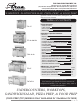
TRUE FOOD SERVICE EQUIPMENT, INC. 2001 East Terra Lane • O’Fallon, Missouri 63366-4434 (636)-240-2400 • FAX (636)272-2408 • INT’L FAX (636)272-7546 • (800)325-6152 Parts Department (800)424-TRUE • Parts Department FAX# (636)272-9471 INSTALLATI O N MA N U AL F O R U N D E R C O UN TE R S , W O R KT OPS, SAND WI CH/ S ALAD , P IZ Z A P R E P , & F O OD PREP Spanish, German, French, Dutch, Portuguese, and Polish versions included.
True Food Service Equipment, Inc. ............ www.truemfg.com ............
True Food Service Equipment, Inc. SAFETY INFORMATION How to Maintain Your TRUE Unit to Receive the Most Efficient and Successful Operation You have selected one of the finest commercial refrigeration units made. It is manufactured under strict quality controls with only the best quality materials available. Your TRUE cooler when properly maintained will give you many years of troublefree service. WARNING! Use this appliance for its intended purpose as described in this Owner Manual.
True Food Service Equipment, Inc. SAFETY INFORMATION DANGER! RISK OF CHILD ENTRAPMENT PROPER DISPOSAL OF THE REFRIGERATOR Child entrapment and suffocation are not problems of the past. Junked or abandoned refrigerators are still dangerous… even if they will sit for “just a few days.” If you are getting rid of your old refrigerator, please follow the instructions below to help prevent accidents. Before You Throw Away Your Old Refrigerator or Freezer: • Take off the doors.
True Food Service Equipment, Inc. SAFETY INFORMATION WARNING! HOW TO CONNECT ELECTRICITY Do not, under any circumstances, cut or remove the ground prong from the power cord. For personal safety, this appliance must be properly grounded. The power cord from this appliance is equipped with a grounding plug which minimizes the possibility of electric shock hazard. This provides the best performance and also prevents overloading building wiring circuits which could cause a fire hazard from overheated wires.
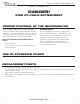
True Food Service Equipment, Inc. INSTALLATION / OPERATION INSTRUCTIONS INSTALLATION / OPERATION INSTRUCTIONS OWNERSHIP To ensure that your unit works properly from the first day, it must be installed properly. We highly recommend a trained refrigeration mechanic and electrician install your TRUE equipment. The cost of a professional installation is money well spent. Before you start to install your TRUE unit, carefully inspect it for freight damage.
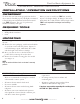
True Food Service Equipment, Inc. INSTALLATION / OPERATION INSTRUCTIONS LOCATING A. Place packing material behind cabinet as a cushion. Carefully lay the unit on its back to remove skid. When lifting unit remember to leave the cabinet upright for 24 hours before plugging into power source. B. Remove skid by unscrewing all base rail anchor brackets. Place skid to the side. C. Carefully lift cabinet upright. Removing skid from bottom of cabinet. D.
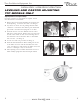
True Food Service Equipment, Inc. INSTALLATION / OPERATION INSTRUCTIONS INSTALLATION OF LEGS AND CASTORS TSSU, TWT, TUC, TPP Important Safeguard for installation of leg/castor (Images 1-5 demonstrate procedure) Securing Castors and Legs To obtain maximum strength and stability of the unit, it is important that you make sure each castor is secure. Legs are hand-tightened securely against the lower rail assembly.
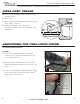
True Food Service Equipment, Inc. INSTALLATION / OPERATION INSTRUCTIONS LEVELING AND CASTOR ADJUSTING TFP MODELS ONLY Adjusting Castors for Proper Leveling Level unit. If unit is not level shims are required. Follow these instructions to install shims. 1. Remove front and rear grill depending upon which castor needs adjusting. Locate the castor box. (See image 1). 2. Lay unit on it’s back. Use soft packing material and be careful not to scratch the unit.
True Food Service Equipment, Inc. INSTALLATION / OPERATION INSTRUCTIONS PIZZA PREP TABLES A. Remove rear grill and thread electric cord through grommet in grill. B. Replace grill. C. Align cutting board with Rivnuts and attach retainer clip to table top (figure 1). D. Install the lid brackets. Note that there is a specifically designed left, center (if applicable), and right bracket. RETAINER CLIP CUTTING BOARD TABLE TOP Figure 1.
True Food Service Equipment, Inc. INSTALLATION / OPERATION INSTRUCTIONS LEVELING A. Set unit in its final location. Be sure there is adequate ventilation in your room. Under extreme heat conditions, (100°F+, 38°C+), you may want to install an exhaust fan. WARNING Warranty is void if ventilation is insufficient. B. Proper leveling of your TRUE cooler is critical to operating success (for non-mobile models). Effective condensate removal and door operation will be effected by leveling. C.
True Food Service Equipment, Inc.
True Food Service Equipment, Inc. INSTALLATION / OPERATION INSTRUCTIONS STARTUP A. The compressor is ready to operate. Plug in the cooler. B. Temperature control set at No. 4 position gives refrigerators an approximate temperature of 35°F. Allow unit to function several hours, completely cooling cabinet before changing the control setting. C. Excessive tampering with the control could lead to service difficulties.
True Food Service Equipment, Inc. INSTALLATION / OPERATION INSTRUCTIONS TEMPERATURE CONTROL LOCATION AND SETTING - TFP UNITS ONLY TFP Temperature control is located on the back of the unit. Set control to 5. TEMPERATURE CONTROL ADJUSTMENT FOR HIGH ALTITUDE ONLY! TERMS Cut-out - Temperature sensed by the controller that shuts the compressor off. Cut-in - Temperature sensed by the controller that turns the compressor on.
True Food Service Equipment, Inc. TUC-24-HC and TUC-24G-HC Only DISPLAY 13 ............ www.truemfg.com ............
True Food Service Equipment, Inc. LAE CONTROL SEQUENCE OF OPERATION 1. Cabinet is plugged in. a. Display will illuminate. b. Interior light will illuminate on glass door models only. (If lights do not come on please see instructions on following page(s).) Solid door cabinet lights are controlled by door switch. 2. After the LAE control preprogrammed time delay of 3 minutes, the compressor and evaporator fan(s) will start if the control is calling for cooling. a.
True Food Service Equipment, Inc. LAE Electronic Control LAE Control Icons Compressor Running Evaporator Fan Running Cabinet in Defrost Activation of 2nd Parameter Set - NA Alarm - NA Info/Set Point Button Manual Defrost/ Down Button Manual Activation/ Up Button Stand-By Button LOCKING & UNLOCKING LAE CONTROLLER WHY: LOCKING OF CONTROL IS NECESSARY TO PREVENT CHANGES TO PROGRAM THAT MAY AFFECT CABINET OPERATION 1 HOW: A. To change lock setting press and release the info button .
True Food Service Equipment, Inc. LAE Electronic Control LAE Control Icons Compressor Running Evaporator Fan Running Cabinet in Defrost Activation of 2nd Parameter Set - NA Alarm - NA Info/Set Point Button Manual Defrost/ Down Button Manual Activation/ Up Button Stand-By Button HOW TO TURN GLASS DOOR MODEL LIGHTS ON/OFF May need to unlock control. WHY: LIGHT MAY BE CONTROLLED BY LAE CONTROLLER OR INTERIOR LIGHT SWITCH. ON Position HOW: A.
True Food Service Equipment, Inc. LAE Electronic Control LAE Control Icons Compressor Running Evaporator Fan Running Cabinet in Defrost Activation of 2nd Parameter Set - NA Alarm - NA Info/Set Point Button Manual Defrost/ Down Button Manual Activation/ Up Button Stand-By Button HOW TO CHANGE THE “SET POINT” May need to unlock control. WHY: THE SET POINT IS THE TEMPERATURE AT WHICH THE COMPRESSOR WILL SHUT OFF. 1 Please note that the “set point” IS NOT the cabinet holding temperature. 2 HOW: A.
True Food Service Equipment, Inc. LAE Electronic Control LAE Control Icons Compressor Running Evaporator Fan Running Cabinet in Defrost Activation of 2nd Parameter Set - NA Alarm - NA Info/Set Point Button Manual Defrost/ Down Button Manual Activation/ Up Button Stand-By Button HOW TO INITIATE A MANUAL DEFROST May need to unlock control. WHY: A ONE TIME ADDITIONAL DEFROST MAY BE NECESSARY TO CLEAR ACCUMULATED FROST/ICE FROM EVAPORATOR COIL.
True Food Service Equipment, Inc. LAE Electronic Control LAE Control Icons Compressor Running Evaporator Fan Running Cabinet in Defrost Activation of 2nd Parameter Set - NA Alarm - NA Info/Set Point Button Manual Defrost/ Down Button Manual Activation/ Up Button Stand-By Button HOW TO CHANGE “DEFROST INTERVALS” May need to unlock control. This can only be changed if defrost mode parameter “DFM” is set for “TIM”. WHY: THE DEFROST INTERVAL IS THE TIME DURATION BETWEEN DEFROST CYCLES.
True Food Service Equipment, Inc. INSTALLATION / OPERATION INSTRUCTIONS TSSU-27-12M-C CHILLER HOSE Required Tools: • • Slotted screwdriver Needle nose pliers • Hex-head nut driver 4. Using a hex-head nut remover, remove right or left C-clamps as needed from chiller hose. (Remove clamps from both ends of the assembly). CAUTION Gloves are recommended to avoid contact with possible sharp edges. Kit Components: • 6.
True Food Service Equipment, Inc. INSTALLATION / OPERATION INSTRUCTIONS SHELVING INSTALLATION / OPERATION & LIGHT SWITCH LOCATION WARNING Do not use pliers or any crimping tools when installing shelf clips. Altering shelf clips in any way can lead to shelving instability. 3 1 (You may need to squeeze or twist the bottom of the shelf clip to install) (Installing top tab of shelf clip) Step 2 Bottom tab of the shelf clip will fit tightly.
True Food Service Equipment, Inc. INSTALLATION / OPERATION INSTRUCTIONS TFP DRAWER REMOVAL AND INSTALLATION Removal A. Open drawer completely. Roller clips will be in the down position. (see image 1 & 2) B. While holding the sides of the drawer, use your finger to rotate the clips upward. (see image 3) C. Lift drawer and remove from channel. (see image 4) Rotate clip upward. Image 1 Image 2 Image 3 Image 4 Installation A. Lower rear rollers into channel slots. (see image 1) B.
True Food Service Equipment, Inc. MAINTENANCE, CARE & CLEANING MAINTENANCE, CARE & CLEANING CLEANING THE CONDENSER COIL When using electrical appliances, basic safety precautions should be followed, including the following: REQUIRED TOOLS: • Phillips Screwdriver • Stiff Bristle Brush • Adjustable Wrench • Vacuum Cleaner Step 1 Disconnect power to unit. Step 2 Remove the rear grill by backing out two screws. (See image 3).
True Food Service Equipment, Inc. MAINTENANCE, CARE & CLEANING IMPORTANT WARRANTY INFORMATION Condensers accumulate dirt and require cleaning every 30 days. Dirty condensers result in compressor failure, product loss, and lost sales... which are not covered by warranty. If you keep the Condenser clean you will minimize your service expense and lower your electrical costs. The Condenser requires scheduled cleaning every thirty days or as needed.
True Food Service Equipment, Inc. MAINTENANCE, CARE & CLEANING Stainless Steel Equipment Care and Cleaning CAUTION: Do not use any steel wool, abrasive or chlorine based products to clean stainless steel surfaces. • Stainless Steel Opponents There are three basic things which can break down your stainless steel’s passivity layer and allow corrosion to rear its ugly head.
True Food Service Equipment, Inc. MAINTENANCE, CARE & CLEANING Stainless Steel Equipment Care and Cleaning Recommended cleaners for certain situations / environments of stainless steel A) Soap, ammonia and detergent medallion applied with a cloth or sponge can be used for routine cleaning. B) Arcal 20, Lac-O-Nu Ecoshine applied provides barrier film for fingerprints and smears.
True Food Service Equipment, Inc. MAINTENANCE, CARE & CLEANING Periodic Maintenance for Lids NOTE Because lid pin screws are designed to be removable for cleaning, it is important these are checked periodically to assure they are tight. Step 1 Check to see if lid assembly thumbscrews are tight. See Image 1. Step 2 Use slotted screwdriver to tighten thumbscrews into place. See Image 2. Step 3 Make sure that thumbscrews are secure. 1 27 Inside 2 Outside ............ www.truemfg.com ............
TRUE REFRIGERATION® MADE IN U.S.A. SINCE 1945 WARRANTY INFORMATION (U.S.A & CANADA ONLY!) THIS WARRANTY ONLY APPLIES TO UNITS SHIPPED FROM TRUE’S MANUFACTURING FACILITIES AFTER JANUARY 1, 2013. PRODUCT MUST BE PURCHASED IN THE COUNTRY WHERE SERVICE IS REQUESTED.