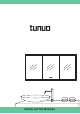
INSTALLATION MANUAL
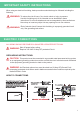
IMPORTANT SAFETY INSTRUCTIONS When using an electrical furnishing, basic precautions should always be followed, including the following: WARNING: To reduce the risk of burns, fire, electric shock or injury to persons. Use this furnishing only for its intended use as described in these instructions. Do not use attachments not recommended by the manufacturer. Never drop or insert any object into any opening.Do not use outdoors. WARNING: Risk of electric shock.
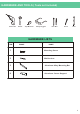
HARDWARE AND TOOLS ( Tools not included) Power Drill Mallet Tape Measure Safety Goggles Drill Bits Pencil Level HARDWARE LISTS ITEM IMAGE NAME 1 Mounting Screw 2 Wall Anchor 3 Aluminum Alloy Mounting Bar 4 Aluminum Corner Support 2
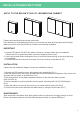
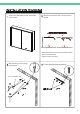
INSTALLATIONINSTRUCTIONS APPLY TO THE BELOW STYLE OF LED MEDICINE CABINET Please read carefully and save these instructions Don't discard any of the packaging until you are sure that you have all of the parts and the fitings Make sure power to the junction box is off before commencing installation. IMPORTANT 1. Unpack LED cabinet. DO NOT lay cabinet on tiled or concrete surface prior to installation Cabinet must be on protected surface to prevent chipping of the corners 2.
Unpack the LED medicine mirror and prepare tools needed. Measure and mark the back mounting holes on the wall. Draw horizontal line connecting the marked location. The line should be level. Adjust to level if necessary. Drill holes,and put in the plastic expansion bolt.
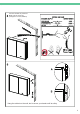
Connect hardwire to power line. Make sure the power off (Voltage:AC110-12V,50/60Hz) Hang the cabinet on the wall; don't remove your hands until its safety.
7 Connect the lower end of wall with the cabinet body by using the coner support.
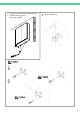
Removing door latch: 1.Take off the hinge cover(1). 2.Press down forcefully on the rear end of the hinge chain arm(2). (B) (A) (2) (C) (1) (1) Installing door latch: 1.Attach the hook of the hinge arm to the hinge base. (Red hook(A) onto green catch(B) ) 2.Press down firmly on the rear end of the hinge arm. (Using strong force, push down on the blue section(C) ) 3.Put on the hinge cover(1). Adjust the shelf to suitable position.
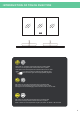
INTRODUCTION OF TOUCH FUNCTION After power on, the button shows white and it is in waiting stagte, click to turn on the light function and the button turn on yellow. Click again to turn off the light function and the button to turn to white. Long click the button to make the light gradually dims Click the button again and the light gradually brightens After power on, the button shows white and it is in waiting state, click to turn on the defogging function and the button turn on yellow.
B A C A - Width B - Height C - Depth Unit: Inch MODELS CE20W26HG CE42W36HG CE60W36HG A 20 42 60 B 26 36 36 C 5.5 5.5 5.5 Note: All dimensions & specifications are approximate and subject to change without notice. Customer Service: For any questions or queries regarding our products, please contact our support team: customerservice@tunuo.net or call 719-259-2880 Visit our website for more information https://tunuo.