
Instructions / Assembly

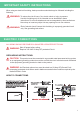
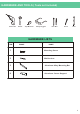
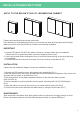
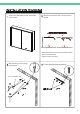
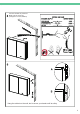
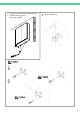

Table Of Contents

3
APPLY TO THE BELOW STYLE OF LED MEDICINE CABINET
Please read carefully and save these instructions
Don't discard any of the packaging until you are sure that you have all of the parts and the fitings
Make sure power to the junction box is off before commencing installation.
IMPORTANT
1. Unpack LED cabinet. DO NOT lay cabinet on tiled or concrete surface prior to installation
Cabinet must be on protected surface to prevent chipping of the corners
2. Care must be taken before drilling pilot holes to avoid any existing wiring or pipe work that may
be concealed.
3. A certified electrician must perform all work.The mirror must be connected to a GFI
INSTALLATION
Please refer the installation diagram on next two installations manual.
MAINTENANCE
Wipe clean with a soft damp cloth. Apply glass cleaner to cloth and do not apply directly to mirror
Never use abrasive cleaners as these could damage the finish or exposed LEDstrip 2
INSTALLATIONINSTRUCTIONS
1) Unpack the LED medicine mirror and prepare tools needed.(See Pic.1)
2) Use the tape measure the height, and draw the horizontal. Measure the distance of the mirror hole,
and mark the hole place on the wall.(See Pic.2)
3) Drill holes,and put in the plastic expansion bolt,then fix the aluminum bar by screws
(See Pic.3&Pic.4);
4) Connect hardwire to power line.Make sure the power off(Voltage:AC110-12V,50/60Hz)(See
Pic.5)
5) Hang the cabinet on the wall; don't remove your hands until its safety.(See Pic.6)
6) Connect the lower end of wall with the cabinet body by using the coner brace.(Pic.7)