
Installation Instructions

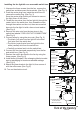

Fig. 4
Terminals
121017
Turn of the Century
TM
1. Unscrew the three screws from the fan, remove the
switch box and disconnect the terminals. (See Fig. 3)
2. Push the center plug from inside the switch box to
remove the center plug. (See Fig. 3)
Save the center plug should you choose to remove
the light fixture in the future.
3. Thread the two wires from the fan light kit through the
center hole in the switch box, then thread the wires
through the washer and hex nut, then secure switch
box onto the fan light kit with a hex nut and washer.
(See Fig. 4)
4. Remove the wire nuts from the two wires in the
switch box labeled “FOR LIGHT KIT CONNECTION”.
(See Fig. 5)
5. Connect wires by using the wire nuts: (See Fig. 5)
---The black (hot) wire from fan light kit to the blue
(hot) wire from the switch box.
---The white (neutral) wire from fan light kit to the
white (neutral) wire from the switch box.
---Carefully put wires back into the switch box.
6. Connect the two terminals respectively from the fan
and switch box. (See Fig. 6)
7. Restore the switch box back to the fan by using the
three screws. (See Fig. 6)
8. Install bulbs (included). See relamping label at socket
area or packaging for maximum allowed wattage.
(See Fig. 6)
9. Attach the glass shade to the light kit, then secure it
with the set screws. (See Fig. 6)
10. Turn on the electric circuit.
Switch Box
Hex Nut
Fan
Nipple
Wire Nut
Washer
Center Plug
Fan Light
Fig.3.
Screw
Switch Box
Fig. 5
Screw
Terminals
Switch Box
Fan
Switch Box
Terminals
Terminals
Fig. 6
Black Wire from
Fan Light
Blue Wire from
the Switch Box
White Wire from
Fan Light
White Wire from
the switch Box
E26 medium base spiral
fluorescent Bulb
(Max.19W, incluced)
Socket
Fan Light
Glass Shade
Set Screw
Installing the fan light kit on a removable switch box: