Tools » Adjustable Wrench(2) 5 Teflon Tape + Groove Jo lint Puller = Phillips Screwdriver Silicone Sealant Maintenance Your new faucet Is designed for years of trouble-free performance. Keep It looking new by cleaning It periodically with a soft cloth. Av old abrasive cleaners, steal wool and harsh chemicals as these well dull the finish and void your warranty. Safety Tips = If you use soldering for the Installation of the faucet, the seats, cartridges and washers well have to be removed before using flame.
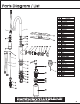
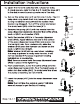
Parts Diagram / List No.
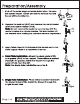
Preparation/Assembly 1. . Apply Teflon gape 1o the threads of the faucet cold & hot % . Deck Plate Installation: Attach the deck plate (#33) . Single Hole Installation: Place silicone sealant beneath Shut off the water supplies before installation. Remove the current faucet. Clean and dry the surface the new faucet will be installed on. Hoi Cold .
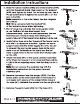
Installation Instructions 6. Slide the rubber washer (#28) and metal washer (#29) onto the threaded shank, then screw on the lock nut (#30) and tighten by hand. Do not over tighten. Use o Philips screwdriver to lighten the screws (#31) on the lock nut Note: Assemble in the order listed. See the diagram for a visual, Hint: Have someone hold the body (#16) of the faucet in place while tightening. 7.
Installation Instructions 12. Open the hot and cold shut offs, Check for leaks, If a leak occurs, refer to step 8 or 9. Hold the hose (#1) in the sink to avoid spraying water out of the sink. 13. Turn on the water and let it run for one minute. This will 37 help clear any debris halt may have come loose t during installation and prevent the system from becoming clogged. Turn off the water and screw * the spray head {#3) onto the hose a9 40 14.
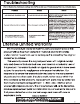
Troubleshooting If you've followed the instructions carefully and your faucet still does not work properly, take these convective steps. Problem Cause Acton Remove the handle (#24) and bim cop Leaks underneath the handle The lock nut (#20) has come loose. | Tighten the lock nut Replace the tim cop [#22) and handle Remove the handle iim cop ond cartridge Check the ceramic disk for dirt and damage.