DC6909
REGISTER YOUR NEW PURCHASE online! INSCRIRE VOTRE NOUVEL ACHAT • REGISTRAR SU NUEVA COMPRA Thank you for purchasing our product. Please take a moment to visit tsicustomerservice.com to register your new purchase: Merci d’avoir acheté ce produit. Veuillez prendre un court instant pour vous rendre sur tsicustomerservice.com et enregistrer votre nouvel achat : Gracias por adquirir nuestro producto. Tómese un momento para visitar tsicustomerservice.com y registrar su nueva adquisición: tsicustomerservice.
PRODUCT DETAILS AND NOTES DÉTAILS ET NOTES DU PRODUIT/DETALLES DEL PRODUCTO Y NOTAS Place of purchase/Lieu de l’achat/Lugar de compra: Date of purchase/Date de l’achat/Fecha de compra: Model #/No de modèle/Número de modelo: Notes/Remarque/Notas: 3 DC6909 REV1.
SAFETY INFORMATION Please read and understand this entire manual before attempting to assemble, operate or install the product. WARNING • Some steps are more easily handled with two adults. CAUTION • Before assembly and/or installation, carefully unwrap all parts. • Locate and set aside the hardware kit before discarding packaging. • Use care when assembling your new product. Take your time and follow assembly instructions closely. DC6909 REV1.
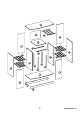
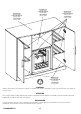
GG OO M N N KK NN S RR RR F F RR EE II H CC JJ A PP DD L R R J QQ BB BB 5 DC6909 REV1.
MAXIMUM LOAD 13.6 kg / 30 lbs MAXIMUM LOAD 18.2 kg / 40 lbs CHARGE MAXIMALE DE 18.2 kg / 40 lbs MAXIMUM LOAD 6.8 kg / 15 lbs CHARGE MAXIMALE DE 13.6 kg / 30 lbs CHARGE MAXIMALE DE 6.8 kg / 15 lbs CARGA MÁXIMA 13.6 kg / 30 lbs CARGA MÁXIMA 6.8 kg / 15 lbs CARGA MÁXIMA 18.2 kg / 40 lbs MAXIMUM LOAD 9.1 kg / 20 lbs CHARGE MAXIMALE DE 9.1 kg / 20 lbs CARGA MÁXIMA 9.
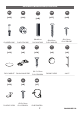
HARDWARE/QUINCAILLERIE/FERRETERÍA AA BB CC DD EE [x32] [x32] [x42] [x17] [x44] PH-KDBZNC001 PH-KDCZNC001 Ø8x30mm PH-DWLNTL001 Ø4x25mm PH-DC6960-DD Ø3x12mm PH-SCRBLK007 FF GG HH II JJ [x12] [x4] [x14] [x4] [x2] PH-DC6909-FF PH-HNG2H35CR95 PH-BMPCLR001 A6417 KK LL MM [x16] [x8] [x1] PH-SPNPCSPLB2 Ø3.5x12mm PH-SCRBLK013 PH-BKTWHT003 Ø3.5 x15mm PH-SCRNKL008 7 DC6909 REV1.
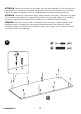
ATTENTION: Follow instructions in the order they are given below. This will ensure that your product is properly assembled. To reduce the risk of damage to your furniture, please lay down a blanket, cloth, or cardboard on the floor prior to assembly. ATTENTION : Suivre les instructions dans l’ordre donné ci-dessous. Cela vous assurera d’assembler correctement le produit.Para reducir el riesgo de daño a sus muebles, por favor coloque una manta, tela o cartón en el suelo antes del montaje.
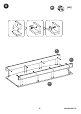
2 [x8] BB B B A 9 DC6909 REV1.
3 DC6909 REV1.
4 [x4] GG C D 11 DC6909 REV1.
5 AA C D DC6909 REV1.
6 BB [x8] D C A 13 DC6909 REV1.
7 DC6909 REV1.
8 AA [x4] E F 15 DC6909 REV1.
9 H E J J F I DC6909 REV1.
CC 10 [x6] K 17 DC6909 REV1.
11 DD L K DC6909 REV1.
12 [x4] BB F K E 19 DC6909 REV1.
13 BB F E DC6909 REV1.
14 CC 21 [x8] DC6909 REV1.
15 HH M G DC6909 REV1.
16 AA [x8] G 23 DC6909 REV1.
17 BB G DC6909 REV1.
18 [x44] EE O N N 25 DC6909 REV1.
19 DC6909 REV1.
20 GG [x4] HH [x8] II [x4] P Q 27 DC6909 REV1.
21 JJ P DC6909 REV1.
22 Q P 29 DC6909 REV1.
[x16] KK 23 R R R R DC6909 REV1.
24 OR 31 DC6909 REV1.
LL 25 DC6909 REV1.
[x2] DD 26 S 33 DC6909 REV1.
27 MM [x1] Wall Stud Poteau Mural Montante De Madera Warning: You must install the tip restraint hardware to help prevent any accidents or damage to the unit. We strongly recommend attaching the tip restraint hardware to a wall stud and your unit. For all other wall types, please visit your local hardware store to obtain the proper hardware. Avertissement: Il est nécessaire d’installer les pièces d’arrimage anti basculement pour prévenir les accidents ou les dommages à l’unité.
CARE / MAINTENANCE SOIN / ENTRETIEN CUIDADO / MANTENIMIENTO • Lors de l’époussetage, utilisez un chiffon doux et propre qui n’égratigne pas la surface. • Il n’est pas nécessaire d’utiliser du poli à meuble. Si vous décidiez d’utiliser du poli à meuble, veuillez d’abord en faire l’essai dans un endroit moins en évidence. • L’utilisation de solvant de quelque sorte sur votre ameublement peut endommager le fini. • Ne jamais utiliser d’eau pour nettoyer votre ameublement car cela peut endommager le fini.
INSTALLED REPLACEMENT PARTS DC6909 PIÈCES DE REMPLACEMENT INSTALLÉES DC6909 PIEZAS DE REPUESTO INSTALADAS DC6909 NN [x6] PH-GLDBRW001 DC6909 REV1.
COMPRESSOR WINE COOLER: JC-46E REFROIDISSEUR DE VIN DU COMPRESSEUR:JC-46E REFRIGERADOR DE VINO DE COMPRESOR: JC-46E NOTICE: READ ALL SECTIONS (INCLUDING WINE COOLER AND CABINET SECTIONS) BEFORE OPERATING THIS UNIT. IF THE INFORMATION IN THIS MANUAL IS NOT FOLLOWED, PROPERTY DAMAGE MAY RESULT. NOTICE: LISEZ TOUTES LES SECTIONS (Y COMPRIS,LE REFROIDISSEUR DE VIN ET LES SECTIONS DE L'ARMOIRE) AVANT D'UTILISER CETTE UNITE.
IMPORTANT SAFETY INSTRUCTIONS To reduce the risk of fire, electrical shock, or injury when using your appliance, follow these basic precautions: WARNING • Read all instructions before using the Wine Cooler. • Before you throw away your old Wine Cooler: Take off the door. Leave the shelves in place so that children may not easily climb inside. • Never allow children to operate, play with, or crawl inside the appliance.
INSTRUCTIONS DE SÉCURITÉ IMPORTANTES AVERTISSEMENT Pour réduire le risque d'incendie, de choc électrique ou de blessure lors de l'utilisation de votre appareil, suivez ces précautions de base. • Lisez toutes les instructions avant d'utiliser le Refroidisseur de Vin. • Avant de jeter votre ancien Refroidisseur de Vin : enlevez la porte. Laissez les étagères en place afin que les enfants ne puissent pas facilement monter à l'intérieur.
INSTRUCCIONES DE SEGURIDAD IMPORTANTES Para reducir el riesgo de incendio, descargas eléctricas o lesiones al utilizar el aparato, siga estas precauciones básicas. ADVERTENCIA • Lea todas las instrucciones antes de usar el refrigerador de vino. • Antes de echar su viejo refrigerador de vino: Quite la puerta. Deje los estantes en su lugar para que los niños no pueden subir fácilmente al dentro. • Nunca permita que los niños operen, jueguen o se arrastren dentro del aparato.
PRODUCT SPECIFICATIONS AND PARTS LISTS LISTE DES SPÉCIFICATIONS ET DES PIÈCES DU PRODUIT ESPECIFICACIONES DEL PRODUCTO Y LISTA DE PIEZAS Rated Voltage/Tension nominale/Voltaje nominal 110-120V Rated Frequency/Fréquence nominale/Frecuencia nominal 60HZ Amperes / Ampères / Amperios 1.3A Temperature Control/Contrôle de température/Control de temperatura 4 °C - 18°C / 39 °F - 65 °F 1 Control Panel is on outside of the door. Panneau de contrôle est à l’extérieur de la porte.
OPERATION INSTRUCTIONS • Your Wine Cooler has an electric temperature control on the upper door frame. You can set the temperature of your Wine Cooler at any temperature from 4 °C to 18 °C (39 °F to 65 °F) . • Pressing the button will turn the wine cooler’s light ON or OFF. • To change between °C and °F, press the •W hen pressing the or button. buttons, the display will be in temperature setting mode. When in temperature setting mode, pressing the buttons will change the thermostat by 1 °F (1 °C.
INSTRUCCIONES DE INSTALACIÓN •S u Enfriador de Vino dispone de un control de temperatura eléctrico en el marco superior de la puerta. Puede configurar su Enfriador de Vino a cualquier temperatura de 4 oC a 18 oC(39 oF a 65 oF). • Presione el botón para ENCENDER o APAGAR la luz del enfriador de vino. • Para cambiar entre oC y oF, mantenga presionado el botón • Al presionar los botones o el butón configuración de temperatura.
INSTALLATION AND OPERATION INSTRUCTIONS INSTRUCTIONS DE L’INSTALLATION ET DE L’OPÉRATION INSTRUCCIONES DE INSTALACIÓN Y OPERACIÓN 1. Before Using Wine Cooler 1. Avant d’utiliser le refroidisseur à vin 1. Antes de usar el refrigerador de vino •R emove the exterior and interior packing. • Retirer l’emballage extérieur et intérieur. • Retire el embalaje exterior e interior.
any circumstances cut or remove the third (ground) prong from the power cord. Any questions concerning power and/or grounding should be directed toward a certified electrician or an authorized service center. • After plugging the Wine Cooler into a wall outlet, allow the unit to cool down for 2-3 hours before placing any items in the compartment. 3. Electrical Connection Warning: Improper use of the grounded plug can result in the risk of electrical shock.
always be plugged into its own individual electrical outlet which has a voltage rating that matches the rating label on the appliance. This provides the best performance and also prevents overloading house wiring circuits that could cause a fire hazard from overheating. Never unplug the appliance by pulling the power cord. Always grip the plug firmly and pull straight out from the receptacle. Repair or replace immediately all power cords that have become frayed or otherwise damaged.
If you attempt to restart before this time delay, the Wine Cooler will not start. 6.Storage Capacity NOTE: You can place 15 standard bottles in this Wine Cooler. Many bottles differ in size and dimensions. As such the actual number of bottles you may be able to store can vary. Bottle capacities are approximate maximums when storing traditional 750ml bottles and include bulk storage. courant ou s’est éteint; attendre 3 à 5 minutes avant de le redémarrer. Il ne redémarrera pas avant ce délai. 6.
CLEANING AND MAINTENANCE 1. Defrosting Your Wine Cooler: Defrost the Wine Cooler when the frost accumulated on the evaporator ( located behind of Shelf) is about 5mm (1/5 inch) thick. Unplug the power cord. Defrosting usually takes a few hours. After defrosting, reset the desired temperature. To defrost from the Wine Cooler and leave the door open. Never use a knife or other metal instrument to scrape ice/frost from the evaporator. 2. Cleaning and Maintenance: a.
NETTOYAGE ET MAINTENANCE 1. Dégivrage de votre Refroidisseur de Vin: Dégivrez le Refroidisseur de Vin lorsque la gelée accumulée sur l'évaporateur atteint une épaisseur d'environ 5 mm (1/5 pouce). Débranchez le cordon d'alimentation. Le dégivrage dure généralement quelques heures. Après le dégivrage, la réinitialisation de la température souhaitée. Pour dégivrer, retirez rapidement les vins du Refroidisseur de Vin et laissez la porte ouverte.
ILIMPIEZA Y MANTENIMIENTO 1. Descongelar su refrigerador de vino: Descongelar el refrigerador de vino cuando la helada acumulada en el evaporador es de aproximadamente 5 mm de espesor. Desconecte el cable de alimentación. El descongelamiento suele tardar unas horas. Después del descongelamiento, restablezca la temperatura deseada. Para descongelar rápidamente, retire los vinos del refrigerador de vino y deje la puerta abierta.
TROUBLESHOOTING / SOLUCIÓN DE PROBLEMAS / DÉPANNAGE PROBLEM / PROBLEMA / PROBLÈME Wine Cooler does not operate. Refroidisseur de vin ne fonctionne pas. El refrigerador de vino no funciona. CORRECTIVE ACTION / MEDIDAS CORRECTIVAS / ACTION CORRECTIVE Check if Wine Cooler is plugged in. Vérifiez si le Refroidisseur de Vin est branché. Compruebe si refrigerador de vino está enchufado. The circuit breaker tripped or a blown fuse. Le disjoncteur a déclenché ou un la rupture du fusible.
The door gasket does not seal properly. Le joint de la porte ne colle pas correctement.. Las juntas de la puerta no están selladas adecuadamente. The Wine Cooler does not have the correct clearances. Le Refroidisseur de Vin n’a pas les dégagements corrects. El refrigerador de vino no tiene las distancias correctas. Vibrations Check to ensure that the Wine Cooler is level. Vibrations Vérifiez que le Refroidisseur de Vin est au niveau. Vibraciones Asegúrese de que el refrigerador de vino esté nivelado.
The Wine Cooler is not level. Le Refroidisseur de Vin n’est pas au niveau. El refrigerador de vino no está nivelado. The Wine Cooler is not level. The door will not close properly. Le Refroidisseur de Vin n’est pas au niveau. La porte ne se ferme pas correctement. El refrigerador de vino no está nivelado. La puerta no se cierra correctamente. The door was reversed and not properly installed. La porte a été inversée et n’été pas correctement installée.
1 YEAR LIMITED WARRANTY GARANTIE LIMITÉE D’UN (1) AN GARANTÍA LIMITADA A 1 AÑO The manufacturer warrants that your new furniture Wine Cooler is free from manufacturing and material defects for a period of one year from date of purchase, subject to the following conditions and limitations. Le fabricant garantit que votre nouvelle armoire à vin est sans défaut de fabrication ou de matériaux pour une période d’un an après la date de l’achat, sous réserve des restrictions et des conditions suivantes. 1.
warranty, nor shall the manufacturer assume responsibility for same. 6.The owner/user assumes all other risks, if any, including the risk of any direct, indirect or consequential loss or damage arising out of the use, or inability to use the product, except as provided by law. All other warranties – expressed or implied –with respect to the product, its components and accessories, or any obligations/liabilities on the part of the manufacturer are hereby expressly excluded. 7.
IF WARRANTY SERVICE IS NEEDED SI VOUS AVEZ BESOIN DU SERVICE DE LA GARANTIE tsicustomerservice.com tsicustomerservice.com For Customer Service Call 1-866-661-1218 Pour le Service Clientèle Appeler le 1-866-661-1218 Questions? Our Customer Service department is available Monday – Friday 8:30 am – 5:30 pm EST. We can help you with assembly and if necessary, replace damaged/missing parts. Questions? Notre service à la clientèle est disponible du Lundi au Vendredi 8h3017h30 HNE.
NOTES REMARQUES NOTAS 57 DC6909 REV1.
NOTES REMARQUES NOTAS DC6909 REV1.
NOTES REMARQUES NOTAS 59 DC6909 REV1.
1-866-661-1218 tsicustomerservice.com When registering your product, be sure to sign up for our updates to receive important service information and helpful tips. We value your privacy and will never share your personal information with other organizations. The information you submit is used only for providing product related services to you. If you are unable to register your product, please save your proof of purchase for part replacement.