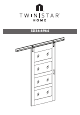
SD36-6964
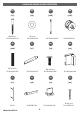
REGISTER YOUR NEW PURCHASE online! INSCRIRE VOTRE NOUVEL ACHAT • REGISTRAR SU NUEVA COMPRA Thank you for purchasing our product. Please take a moment to visit tsicustomerservice.com to register your new purchase: Merci d’avoir acheté ce produit. Veuillez prendre un court instant pour vous rendre sur tsicustomerservice.com et enregistrer votre nouvel achat : Gracias por adquirir nuestro producto. Tómese un momento para visitar tsicustomerservice.com y registrar su nueva adquisición: tsicustomerservice.
PRODUCT DETAILS AND NOTES DÉTAILS ET NOTES DU PRODUIT/DETALLES DEL PRODUCTO Y NOTAS Place of purchase/Lieu de l’achat/Lugar de compra: Date of purchase/Date de l’achat/Fecha de compra: Model #/No de modèle/Número de modelo: Notes/Remarque/Notas: 3 SD36-6964 REV1.
SAFETY INFORMATION Please read and understand this entire manual before attempting to assemble, operate or install the product. WARNING • Some steps are more easily handled with two adults. CAUTION • Before assembly and/or installation, carefully unwrap all parts. • Locate and set aside the hardware kit before discarding packaging. • Use care when assembling your new product. Take your time and follow assembly instructions closely. SD36-6964 REV1.
E A D BB D F B G D B D C 5 SD36-6964 REV1.
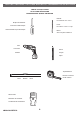
HARDWARE/QUINCAILLERIE/FERRETERÍA AA BB CC DD [x5] [x5] [x20] [x40] Ø8x80mm PH-SD366964-AA Ø16mm PH-WSRBLK002 PH-SD366964-CC PH-KDCZNC001 EE FF GG HH [x20] [x1] [x6] [x2] Ø6.3x25mm PH-SD366964-GG PH-SD366964-HH Ø10x50mm PH-SD366964-EE PH-SD366964-FF II JJ KK LL [x1] [x2] [x1] [x2] A5478 PH-BDRBLK004 SD36-6964 REV1.
MM NN OO PP [x1] [x1] [x1] [x1] t here #1.Fi ge or ed on do template #1.Fit here on door edge PH-SD366964-MM PH-SD366964-NN PH-SD366964-OO 7 t here #1.Fi ge or ed on do PH-SD366964-PP SD36-6964 REV1.
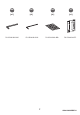
TOOLS NOT INCLUDED / OUTILLAGE NON INCLUS / HERRAMIENTAS NO INCLUIDAS tools you will need outillage nécessaire herramientas que se necesitan Drill Bit: For wood: 6 mm / 1/4 in Phillips Screwdriver Foret: Pour bois : 6 mm / 1/4 po Tournevis à tête Phillips Destornillador de punta Phillips Broca: de 6 mm para madera o Drill Perceuse Pencil Taladro Crayon Lápiz Tape Measure Ruban à mesurer Level Niveau Cinta métrica Nivel Stud Finder Détecteur de montant Localizador de montantes SD36-6964 REV1.
ATTENTION: Follow instructions in the order they are given below. This will ensure that your product is properly assembled. To reduce the risk of damage to your furniture, please lay down a blanket, cloth, or cardboard on the floor prior to assembly. ATTENTION : Suivre les instructions dans l’ordre donné ci-dessous. Cela vous assurera d’assembler correctement le produit.Para reducir el riesgo de daño a sus muebles, por favor coloque una manta, tela o cartón en el suelo antes del montaje.
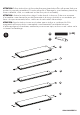
2 A B B B C SD36-6964 REV1.
3 FF G F 11 SD36-6964 REV1.
4 [x10] DD A G B B B C SD36-6964 REV1.
5 D D D D 13 SD36-6964 REV1.
6 DD F SD36-6964 REV1.
7 OO 15 [x1] SD36-6964 REV1.
8 JJ GG MM SD36-6964 REV1.
9 t here #1.Fi ge or ed on do template PP #1.Fit here on door edge t here #1.Fi [x1] ge or ed on do [x1] II Note: Door can be used with or without the included handle. If you wish to install the handle, please use the enclosed drilling template. Note: La porte peut être utilisée avec ou sans la poignée comprise. Si vous voulez installer la poignée, veuillez utiliser le gabarit de perçage entouré. Nota: La puerta se puede utilizar con o sin la manija incluida.
10 NOTE: Hardware included is for drywall installation only. For all other wall types, please visit your local hardware store to obtain the proper hardware. Using a stud finder, FIND the exact location of the studs to which you want to attach the unit. MARK the right and left side to determine the center of each stud. À l’aide d’un détecteur de montant, TROUVER l’emplacement exact des montants sur lesquels doit être attaché.
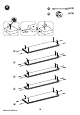
11 NOTE: Mark centerlines of wall studs as shown below. Bottom of mounting rail should be 83-3/4” from the floor. The center of the track should be mounted 1-1/2” from the edge of the door opening for optimal operation. NOTE: Marquez lignes centrales des poteaux muraux comme ce qui illustré ci-dessous. Le fond du rail de montage doit être à 83-3 / 4” à partir du sol. Le centre du chemin doit être monté à 1-1 / 2” à partir du bord de l’ouverture de la porte pour l’opération optimale.
12 NOTE: Drill 3/8” through holes on the mounting rail so they will align with the wall studs. The holes should be drilled 1-1/8” from the top of the rail. NOTE: Percez les trous de 3/8’’ sur le rail de montage afin qu’ils s’alignent avec les poteaux muraux. Les trous doivent être percés à 1 1/8’’ à partir du haut du rail. NOTA: Perfore orificios pasantes de 3/8 ”en el riel de montaje para que se alineen con los montantes de la pared.
13 NOTE: Place mounting rail on wall aligning with markings from step 15. Mark hole locations through mounting holes and onto wall. Drill 1/4”D x 2” deep pilot holes into the wall studs. NOTE: Placez le rail de montage sur le mur en alignant avec les marques à partir de l’étape 15. Marquez les localisations du trou à travers les trous de montage et sur le mur. Percez les trous pilotes 1/4 ”D x 2” en profondeur dans les poteaux du mur.
14 AA [x5] BB [x5] Note: Mounting bolts AA (X5) must be screwed into the wall stud. Note: Les boulons de montage AA (X5) doivent être vissés dans le poteau mural. Note: Les boulons de montage AA (X5) doivent être vissés dans le poteau mural. E Wall SD36-6964 REV1.
15 KK [x1] LL [x2] Wall 23 SD36-6964 REV1.
16 2 1 Wall SD36-6964 REV1.
17 GG [x2] MM Wall 25 SD36-6964 REV1.
18 HH NN Wall SD36-6964 REV1.
CARE / MAINTENANCE SOIN / ENTRETIEN CUIDADO / MANTENIMIENTO Care and Maintenance Soin / Entretien Cuidado / Mantenimiento • Use a soft, clean cloth that will not scratch the surface when dusting. • Use of furniture polish is not necessary. Should you choose to use polish, test first in an inconspicuous area. • Using solvents of any kind on your furniture may damage the finish. • Never use water to clean your furniture as it may cause damage to the finish.
INSTALLED REPLACEMENT PARTS SD36-6964 PIÈCES DE REMPLACEMENT INSTALLÉES SD36-6964 PIEZAS DE REPUESTO INSTALADAS SD36-6964 QQ [x4] PH-TNTZNC001 1-866-661-1218 tsicustomerservice.com When registering your product, be sure to sign up for our updates to receive important service information and helpful tips. We value your privacy and will never share your personal information with other organizations. The information you submit is used only for providing product related services to you.