ULIN_016357_30092.
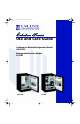
1 Introduction Congratulations on your purchase of a U-Line refrigeration product. A pioneer in the field for more than 40 years, U-Line Corporation is the world’s number one manufacturer of built-in, under-counter, specialty refrigeration and ice making products. U-Line dedicates 100% of its research and development to these products. The result: U-Line technology consistently leads the market with innovation, design, depth of product line and performance.
2 Table of Contents Introduction ...............................................................................................................................2 Warranty Registration .......................................................................................................2 Please Record Your Model Information ...........................................................................2 Table of Contents ...........................................................................................
This page intentionally left blank 4 CO2175FF, 2175RF
WARNING 3 Safety Precautions IMPORTANT PLEASE READ all instructions completely before attempting to install, operate, or service your unit. • Proper installation procedures must be followed if this unit is being initially installed, or is moved to a new location after being in service. An INSTALLATION GUIDE for your unit, providing complete installation information is available from U-Line Corporation directly, and must be consulted before any installation is begun.
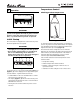
• Self-closing door hinges engage when the door is open approximately 8-10 in. (20-25 cm), ensuring a positive door seal and preventing door bounce back. 4 Product Features Échelon Model 2175RF Refrigerator/ Freezer, Model CO2175FF Ice Maker/ Refrigerator Exclusive Features of Échelon • Both models feature Frost Free technology and a 5.7 cu ft (161 L) capacity. • An electronic control panel with digital display allows you to display the interior temperature and adjust the setting to your preference.
Temperature Control 5 Operation Checking Product Temperature ULIN_0080_A Figure 2 IMPORTANT Proper air flow (Figure 2) is required for your unit to operate at its highest efficiently. A grille, located in the base of the unit, must not be blocked at any time, or your unit will not perform as expected. ULIN_0093_A Initial Startup All U-Line units are shipped with controls that are preset. No initial adjustments are required.
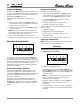
Interior Lighting Temperature Display The LIGHT icon (Figure 3, 5) on the control panel is used to control an additional lighting function. The blackout/ Sabbath mode (not Star K certified) will turn the interior light and display (Figure 3, 3) off. To display the interior temperature: To access the blackout/Sabbath mode (not Star K certified): 2. The display (Figure 5, 3) will indicate the actual refrigerator temperature. 1.
Ice Maker When the ice bucket is full, the ice making mechanism will shut off. However, the refrigeration system will continue to cool and maintain the cube supply. Frost-free icemaker units have lower ice production than manual defrost units. IMPORTANT Do not place cans or bottles in the ice compartment because they will freeze. The ice bucket can be removed for emptying and cleaning. To remove the ice bucket, raise the bin arm and remove the bucket from the ice compartment.
Food Storage Storage, Vacation, Moving Crisper If the unit will not be used for an extended period, or otherwise stored, follow these steps completely: Your models may have a lower crisper drawer for storage. WARNING Electrical Shock Hazard. Disconnect power before servicing. Before operating, replace all panels. Failure to do so may result in death or electrical shock. 1. Remove all consumable contents from the unit. 2. Disconnect power to the unit. 3.
Product Disposal 6 Cleaning and Maintenance If the unit is being removed from service for disposal, check and obey all Federal, State and/or Local regulations regarding the disposal and recycling of refrigeration appliances, and follow these steps completely: General Cleaning 1. Disconnect power to the unit and unplug the power cord from its outlet. Black and White Models: 2. Shut off water supply to the unit at the main water source and disconnect the supply line to the unit’s water valve.
Maintenance CAUTION Proper maintenance of your U-Line product will ensure efficiency, top performance and long life. The maintenance intervals listed are based on normal conditions. You may want to shorten the intervals if you have pets or other special considerations. Defrosting DO NOT use any type of cleaner on the condenser unit. 4. Clean the condenser coil (Figure 9, 2) using a soft brush with a “combing” action or vacuum cleaner. Do not touch the condenser coil. 5.
Ice Cube Thickness Adjustment 4. Install the ice maker assembly cover. Interval - As Required On ice maker equipped models, the cube size may be adjusted by changing the amount of water injected into the ice maker assembly as follows: IMPORTANT Use only genuine U-Line replacement parts. U-Line ice maker parts are not the same as standard FSP Whirlpool parts. Using non U-Line parts can reduce ice rate, cause water to overflow from ice maker mold, damage the unit, and may void the warranty.
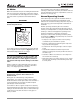
Door Alignment Check and Adjustment IMPORTANT When properly aligned: 1 • The door will not be flush with the top of the cabinet. The top edge of the door will be 1/8 in. (3.175 mm) below the cabinet top. • The door gasket will be firmly in contact with the perimeter of the cabinet and not pinched on the hinge side of the door. The following procedure will correct for up to 1/4 in. misalignment: 2 3 ULIN_0201_A Figure 17 3. Turn the door upside down and inspect the hinge plate mounting holes.
Door Reversal 1 ULIN_0002_A Figure 21 2. Remove plastic screw plugs (three each, top and bottom) (Figure 21, 1) from new hinge location. Do not discard. 3. Remove top hinge (three screws) (Figure 20, 2) and reinstall hinge screw pin (Figure 20, 1). ULIN_0015_A Figure 19 Black and white units may be left- or right-hand opening. Stainless steel unit doors cannot be reversed. The doors are easily reversed by moving the hinge hardware to the opposite side.
5. Remove the two door closer inserts (Figure 23, 1) from the existing bottom hinge and install as shown on the new bottom hinge (Figure 22, 1). Door Shelf Removal/Insertion 6. Remove existing bottom hinge (three screws) and remount on opposite side TOP. Remove hinge screw pin. 1 7. Remove the plastic hole plug from the top of the door to allow the pivot pin to be inserted in the new location. Install the plug into the vacated hole on the opposite side.
Glass Shelf Removal/Installation Light Bulb Replacement Remove the shelves as follows: To replace the light bulb in your U-Line unit: 1 2 ULIN_0001_A Figure 27 1. Grasp the edges of the light housing lens (Figure 27, 1) opposite the exposed tab and gently push the lens toward the tab (Figure 27, 2). 2. Pull the edge of the lens down (Figure 27, 1) and swing it out of the light housing. IMPORTANT ULIN_0213_A Figure 26 1.
7 Service Before Calling for Service If your U-Line product appears to be malfunctioning, read through the OPERATION section of this guide to ensure that the function of all controls are clearly understood. If the malfunction persists, the TROUBLESHOOTING GUIDE in this guide will assist you in quickly identifying common problems, and provide information on possible causes and remedies. Most often, this will resolve the problem without the need to call for service.
Troubleshooting Guide DANGER ELECTROCUTION HAZARD Never attempt to repair or perform maintenance on the unit until the main electrical power has been disconnected. Troubleshooting - What to check when problems occur: PROBLEM POSSIBLE CAUSE REMEDY Unit does not operate and electronic display is blank. No electrical supply Plug unit in or check circuit breaker. No interior light Loose or burned out bulb Tighten or replace bulb (See MAINTENANCE; LIGHT BULB REPLACEMENT).
PROBLEM POSSIBLE CAUSE REMEDY ICE MAKER EQUIPPED MODELS ONLY Water is leaking out the back of the unit. Water supply connection leaking Tighten fitting as required. Ice cubes sticking together Infrequent use of cubes Break apart cubes. No ice Bin arm locked in upright position Lower bin arm. No water to unit Turn on water or contact plumber. Ice cube size too large Set cube size smaller (See MAINTENANCE; ICE MAKER; ICE CUBE THICKNESS ADJUSTMENT).
Electronic Control Quick Guide All Models Task Touch Turn ON/OFF Adjust Temperature Hold 10 seconds Touch Display Release when °F flashes. or or or Touch and release Touch to change temperature View Actual Temperature (T1) Hold 5 seconds Change °F-°C Hold Blackout Mode °F flashes after first touch, set-point saved after 5 seconds of inactivity and °F stops flashing. (For Wine Cooler Only) Will scroll top/middle/bottom temperatures. Release when °F flashes.
This page intentionally left blank 22 CO2175FF, 2175RF
U-Line Corporation Limited Warranty U-Line Corporation warrants each U-Line product to be free from defects in materials and workmanship for a period of one year from the date of purchase; and warrants the sealed system (consisting of the compressor, the condenser, the evaporator, the hot gas bypass valve, the dryer and the connecting tubing) in each U-Line product to be free from defects in materials and workmanship for a period of five years from the date of purchase.
F o r G e n e r a l In q u i r i e s : P.O. Box 245040 Milwaukee, Wisconsin 53224-9540 U.S.A. Phone (800) 779-2547 FAX (414) 354-5696 www.U-Line.com For Service and Parts Assistance: Phone (800) 779-2547 (414) 354-0300 FAX (414) 354-5696 Email: OnLineService@U-Line.com www.U-LineService.com E-mail: OnlineParts@u-line.com For more than four decades, U-Line has distinguished itself as the leader in built-in under-counter ice making, refrigeration and wine storage appliances.