
- Ultra Electronics Sprinter Installation Guide


www.ultramagicard.com
300 & S
p
rinte
r
d
y
e-film installation
g
uide
Special Note:
How to fit UR3 Continuous Resin Dye Film and UR10 Single Colour Dye Film
Before fitting the continuous resin black thermal transfer film dye film or the UR10 single
colour dye film a small modification must be carried out on the take-up spool spigot before
operating the printer.
As this dye film has no panels the optical sensors are inoperative, so for correct operation it is
important that this modification is carried out.
Please Note: Should you revert back to using any other dye film this modification must be
reversed.
The modification is performed as follows:
Switch off the Magicard printer and lift up the Mechanism Top
Cover to the vertical position and remove the dye film and take-up
spools.
ON PRINTERS WITH WHITE PLASTIC DYE FILM TAKE-UP GEAR
Remove the steel pin, which normally engages with the recess in the dye film take-up spool.
This pin is a press fit in the dye film take-up spigot adjacent to
the large plastic spur gear as illustrated in Figure 2.
It may be removed by means of a pair of pliers or a small "Mole"
wrench, using a twisting and pulling action to remove it.
With each new roll of continuous black dye film, a rubber washer
is provided, this washer should be fitted on the plastic dye take-
up spigot adjacent to the large spur gear, and before fitting the
dye film take-up spool.
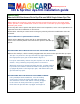
ON PRINTERS WITH BLACK DYE FILM TAKE-UP GEAR
Using a Phillips head screwdriver, turn the locking
screw on the centre of the dye film take-up spigot
anti-clockwise until the tab (which normally engages
in the recess in the dye film take-up spool) drops
flush with the dye film take-up spigot. See Figure 3
.
2
1
3