FILECABINET CS WalkThrough version 14.x.
TL 28230 (04/17/15) Copyright Information Text copyright 1999 - 2015 by Thomson Reuters. All rights reserved. Video display images copyright 1999 - 2015 by Thomson Reuters. All rights reserved. Thomson Reuters hereby grants licensees of CS Professional Suite applications the right to reprint this document solely for their internal use. Trademark Information The trademarks used herein are trademarks and registered trademarks used under license.
Contents Introduction............................................................................................................... 1 The paperless office becomes a reality ............................................................................... 1 Designing FileCabinet CS — our goal ................................................................................. 2 About this walkthrough ........................................................................................................
Contents Working with images and image groups ........................................................................... 22 Copying image files into FileCabinet CS ...................................................................... 22 Creating image groups ................................................................................................. 23 Annotating documents ......................................................................................................
Introduction This walkthrough will provide you with a basic understanding of FileCabinet CS. Because this walkthrough is relatively brief, we cannot show you all of the features and capabilities of the program. However, once you have completed the walkthrough, you will have a good understanding of the basic features of FileCabinet CS.
Introduction Designing FileCabinet CS — our goal FileCabinet CS is designed to provide you with an all-in-one electronic filing cabinet that will simplify processes and improve efficiency in your business. You can easily access paperwork and send copies of documents to clients, banks, and others via print or email.
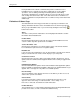
Getting Started This section describes the FileCabinet CS menus and available commands and provides information on how to use the Help menu to learn more about FileCabinet CS. The FileCabinet CS menu, toolbar, and Home Page After you install FileCabinet CS, double-click the FileCabinet CS the Windows desktop to start the program. icon on Notice the FileCabinet CS menu, toolbar, and Home Page. These are the starting points for most work in FileCabinet CS.
Getting Started Each pull-down menu contains commands that pertain to a different area of FileCabinet CS. For example, the File menu commands are used for drawer operations, such as adding, renaming, and deleting drawers; transmitting documents to NetClient CS; sending documents for source-document processing, and sending client documents to files or via email. Please take a few minutes to view the commands in each pull-down menu. You will use many of them later in this walkthrough.
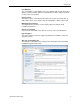
Getting Started User Bulletins The User Bulletins section displays a list of user bulletins that describe the product updates you have installed. Click a user bulletin link to view the changes we made for that version of the product. Data Locations The Data Locations section displays the paths you set up for your client data. To add a data location, choose Setup > System Configuration > Data Locations tab.
Getting Started Using the Help menu to learn about FileCabinet CS The Help menu provides a variety of features and methods for acquainting yourself with FileCabinet CS. The following sections describe some of the commands available from the Help menu. Help & How-To Center The Help & How-To Center provides one-stop access to the information you need while you use FileCabinet CS. The repository is hosted on our website and is accessible directly from within FileCabinet CS.
Storing Documents and Data in FileCabinet CS FileCabinet CS stores documents, images, and data from a variety of sources. The process of sending materials to FileCabinet CS is simple and quick. Before beginning, we will restore a sample drawer in which you can store documents. FileCabinet CS sample data FileCabinet CS includes a sample drawer, FCSSAMPLE, for use with this walkthrough. The sample drawer is designed to show you some of the various types of data that can be stored in FileCabinet CS.
Storing Documents and Data in FileCabinet CS Notes If you installed FileCabinet CS in a folder other than C:\WINCSI, navigate to that folder. For example, if you installed the program in D:\WINAPPS\WINCSI\CABINET, you should navigate to D:\WINAPPS\WINCSI\CABINET\WALKTHRU\FCBDATA. If you access FileCabinet CS through the Virtual Office CS® or SaaS (Software as a Service) environment, sample data is not installed by default.
Storing Documents and Data in FileCabinet CS 3. If necessary, click the Change Restore Location button and navigate to C:\WINCSI\CABINET\WALKTHRU\FCBDATA, where C is the drive on which you installed FileCabinet CS. If you installed FileCabinet CS in a folder other than C:\WINCSI, navigate to that folder. For example, if you installed the program in D:\WINAPPS\WINCSI\CABINET, you should navigate to D:\WINAPPS\WINCSI\CABINET\WALKTHRU\FCBDATA. Click OK after you have chosen the appropriate folder.
Storing Documents and Data in FileCabinet CS Printing to FileCabinet CS from non-CS Professional Suite programs During the FileCabinet CS installation, a printer driver is installed that enables you to store documents in FileCabinet CS from non-CS Professional Suite programs by choosing FileCabinet CS from the list of available printers.
Storing Documents and Data in FileCabinet CS 6. If necessary, clear the Printer checkbox. Note: The Printer checkbox allows you to print a physical copy while also printing to FileCabinet CS. 7. Select a data location from the FileCabinet CS drop-down list. Only the default data location is listed, unless you have added other data locations. (For more information on data locations, see “System configuration” on page 47.) 8. From the Drawer ID drop-down list, select the FCSSAMPLE drawer. 9.
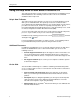
Storing Documents and Data in FileCabinet CS From UltraTax CS, the option to print to FileCabinet CS appears as shown in the following illustration. When you print from Creative Solutions Accounting,™ (CSA) the option to print to FileCabinet CS appears as shown in the following illustration. In this example, we are printing the Trial Balance Report from CSA to FileCabinet CS.
Storing Documents and Data in FileCabinet CS When you print from Practice CS, the option to print to FileCabinet CS appears as shown in the following illustration. In this example, we are printing a Billing Analysis Report from Practice CS to a firm staff member’s folder in FileCabinet CS. Automating backups to FileCabinet CS You can set up your CS Professional Suite applications to automatically back up data to FileCabinet CS.
Storing Documents and Data in FileCabinet CS Scanning documents into FileCabinet CS A scanner captures images from physical documents for electronic editing and onscreen display. General scanner types include hand-held, sheet-fed, flatbed, and all-in-one units. The right type of scanner for you depends on your office environment. High-resolution scanners are used to scan for high-resolution printing, but low-resolution scanners are adequate for capturing images for on-screen display.
Storing Documents and Data in FileCabinet CS ACTIONS Note: For this exercise, your computer must have access to a TWAIN or WIAcompliant scanner. 1. Click the Scan Image Image > Scan. button in the FileCabinet CS toolbar or choose 2. In the Scan Pages dialog, click the Select button in the Scanner / image device type section to select a scanner. 3. Indicate the drawer ID and document folders in which you want the scanned pages to be stored. 4.
Storing Documents and Data in FileCabinet CS The sample drawer, FCSSAMPLE, includes an example of a scanned document. Double-click FCSSAMPLE to open the drawer, and then double-click the UltraTax CS and 12/31/12 folders. Click the 2012 W2 – Karen Miller item to view it in the Watch window.
Working in FileCabinet CS FileCabinet CS is the optimal storage solution for all of your documents. In addition to simplifying the organization of stored materials, FileCabinet CS provides numerous features that maximize the usefulness of those documents.
Working in FileCabinet CS When you select a document or other item in the Folders window, the Watch window displays that item. When you highlight a subfolder of the Data Backup folder, the Watch window shows information about the available backups for the current drawer. When you highlight a Volume folder, the Watch window shows information about the archive volumes available for the current drawer.
Working in FileCabinet CS Various other options are available in the Print dialog. Printer: Click this button to choose a printer other than the default printer. Duplex: If your printer supports duplex printing, mark this checkbox to have the selected documents print on both sides of the paper. 2 Up: If your printer supports 2-up printing, mark this checkbox to print two pages of the selected document on each page.
Working in FileCabinet CS Adding drawer notes and viewing event history FileCabinet CS allows you to enter notes for each drawer in the drawer’s opening display window. ACTIONS The FCSSAMPLE drawer is open. 1. In the Folders window, click the FCSSAMPLE drawer ID. The Watch window displays drawer notes and the event history. 2. Click the Drawer note area and enter text, such as This is a drawer note. 3. Click the Folders window on the left to save the note.
Working in FileCabinet CS Viewing documents To view the sample drawer documents, follow these steps. ACTIONS The FCSSAMPLE drawer is selected. 1. In the Folders window, double-click the FCSSAMPLE drawer folder to expand the list of documents for the sample drawer. (If this action collapsed the list of documents, repeat this step to expand it again.) 2. Click the plus sign to the left of any of the folders to expand them.
Working in FileCabinet CS Navigation buttons Drop-down list Fit Page to View Size button Cycle Zoom button Click the Fit Page to View Size button to view the entire current page in the Watch window, and click it again to return to the previous view. Click the Cycle Zoom button to cycle the zoom magnification of the current page between 25%, 50%, 100%, 200%, and 400%. Working with images and image groups In addition to drawer documents, FileCabinet CS can store image files in selected folders.
Working in FileCabinet CS 3. Click the Select button. 4. If necessary, select the FCSSAMPLE drawer from the Drawer ID drop-down list. Note: Depending on your configuration, you may also choose to store these images in a document folder. Mark the checkbox for the folder in which you want to store the image. 5. Click Yes to accept the image. 6. Repeat steps 1–5 to copy Car_Reg.jpg and Car_Ins.jpg into FileCabinet CS. Hold down the CTRL or SHIFT key to select multiple images in the Select Images dialog.
Working in FileCabinet CS ACTIONS The FCSSAMPLE drawer is open. 1. Choose Image > Image Groups, select from the dropdown list for the Image Group field, and enter Mustang. 2. In the Store Image Group in folder(s) list, mark the checkboxes for the document folders to which you would like to add this image group. Note: If you do not choose document folders for this image group, it will appear in the Not yet filed folder for the related drawer in the Folders window. 3.
Working in FileCabinet CS 5. Click Done to close the Image Groups dialog. You can use the navigation buttons in the FileCabinet CS toolbar to navigate through the three images. Each image appears as a page in the image group. Image groups are useful for scanning long documents into FileCabinet CS. You can create image groups to store each multiple-page image as a single document.
Working in FileCabinet CS 5. Click and hold the left mouse button at one corner of the area you want to highlight. Drag the cursor across the area until it is highlighted, and release the left mouse button. You can resize or move the highlighting later, if necessary. To change the color of the highlighting, right-click the annotation, choose Current Annotation Properties, click the Color button, choose a color in the Color dialog, and click OK twice.
Working in FileCabinet CS 5. Format the annotation as desired. For each of the following changes, right-click the annotation and choose Current Annotation Properties before proceeding. Change the font or other attributes by clicking the Font button. Make changes in the Font dialog and click OK. Activate or deactivate the frame around the annotation by marking the Frame checkbox in the Frame options group box. This command acts as a toggle.
Working in FileCabinet CS Image annotations You can use image files as annotations. The method for using image files as annotations is similar to the method for adding highlighter annotations. ACTIONS 1. Right-click the Watch window and choose Image From File. 2. Click the Watch window where you want to place the annotation. 3. In the Select Image dialog, navigate to C:\WINCSI\CABINET\ WALKTHRU\FCBDATA\IMAGES, select the DraftCpy.bmp file, and click the Select button.
Working in FileCabinet CS Additional annotation types In addition to the annotation types we have discussed in this walkthrough, you can add audio and pencil annotations to your FileCabinet CS documents. For more information on using these annotation types, enter Annotations in the search field in the toolbar and press ENTER. Note: Due to bandwidth usage, audio annotations are not available if you access FileCabinet CS through the Virtual Office CS® module.
Working in FileCabinet CS To add an annotation from the Stamp Library, follow these steps. 1. Right-click the document and choose Stamp Library. 2. From the list of available stamp annotations in the menu, choose a stamp to add it to the document. To designate a stamp with a shortcut key combination, follow these steps. 1. Choose Edit > Annotations > Stamp Library > Open Library to open the Annotation Stamp Library dialog. This dialog contains a list of all available stamps in the Stamp Library.
Working in FileCabinet CS 3. Click Done. Note: You can assign keyboard shortcuts to ten stamps. The shortcuts are CTRL+1, CTRL+2, CTRL+3, and so on, and they appear in the menu next to the annotations to which they are assigned. For more information, enter Stamp annotation shortcuts in the search field in the toolbar and press ENTER.
Working in FileCabinet CS New objects To create an embedded Word document in FileCabinet CS, follow these steps. ACTIONS The FCSSAMPLE drawer is open. 1. Choose Object > Create New to open the Create Object dialog. 2. If necessary, select the FCSSAMPLE drawer from the Drawer ID drop-down list. 3. Select Microsoft Office Word Document from the Object Type list. (If Word is not installed on your PC, choose any available word-processing application.) 4. Replace the text in the Object name field with Memo. 5.
Working in FileCabinet CS 6. Click OK to continue. Depending on the current user preferences, the document opens either in a separate window or in the FileCabinet CS Watch window. Note that the toolbars and menus now contain commands used in the program in which you are creating the object (in this case, Word). 7. Enter a simple sentence, such as This is an embedded Word document. 8.
Working in FileCabinet CS 7. Click OK. The document automatically opens for editing. Once you have embedded a document in FileCabinet CS and closed it, you can edit it again by selecting it in the Folders window and choosing Object > Edit Object, or by double-clicking the document. Notes When you edit an embedded object, changes are made only to the file in the selected FileCabinet CS drawer. If the document was created from an existing file, the original file is not changed.
Working in FileCabinet CS Performing keyword searches FileCabinet CS enables you to search for documents using keywords. You can search for documents in all drawers or within one drawer. During a search, FileCabinet CS searches using the following information. drawer ID and name drawer notes document name and description document page notes document creation information (date and user) Note: FileCabinet CS does not search the text of stored documents.
Working in FileCabinet CS Emailing documents To send documents to email recipients, your email application must support the Messaging Application Programming Interface (MAPI) protocol. If your email application is not MAPI compliant, you can use the “Sending items to a file” procedure on page 37, and attach the file manually to an email message. ACTIONS Select the FCSSAMPLE drawer in the Folders window, if necessary. 1.
Working in FileCabinet CS 4. Click OK. FileCabinet CS opens your email application and creates a message with the selected documents attached. 5. Address the email message to yourself and send the message. When it arrives, you will see what a recipient sees, including the tax return as a PDF attachment. Notes FileCabinet CS exports embedded documents in their original document formats.
Working in FileCabinet CS ACTIONS The FCSSAMPLE drawer is open. 1. Click the drop-down arrow next to the Send To Email button in the toolbar and choose the File command, or choose File > Send To > File to open the Send to File Location dialog. This dialog provides the following file-export options, which you can choose by marking the appropriate checkboxes. You can: include or exclude annotations by type. include page notes.
Working in FileCabinet CS 3. Click the Modify Destination button. 4. Navigate to C:\DOCUMENTS AND SETTINGS\[UID]\DESKTOP, or C:\Users\[UID]\Desktop if you use Windows Vista, Windows 7, or Windows 8 (where UID is the user ID for the current user) and click OK to save the federal return as a file on your desktop. (We are using the desktop for this exercise. However, you may want to choose a different location for your own use.
Working in FileCabinet CS 7. Click the To Cabinet button. A message will appear when the report has completed printing to FileCabinet CS. Click OK. Drawer FCSSAMPLE now has a folder named FileCabinet CS Reports that contains the Drawer Contents Report. Note: To export a report to a DIF file that you can view and edit in Microsoft Excel, click the Export button in the Drawer Selection dialog.
Working in FileCabinet CS For the purpose of this example, we will back up only the FCSSAMPLE drawer, and we will send the drawer file to the desktop. 2. Click the Modify Backup Location button. 3. Navigate to C:\DOCUMENTS AND SETTINGS\[UID]\DESKTOP, or C:\Users\[UID]\Desktop if you use Windows Vista, Windows 7, or Windows 8 (where UID is the user ID for the current user) and click OK. Note: If you use Virtual Office CS, navigate to V:\DOCUMENTS AND SETTINGS\[UID]\DESKTOP, or V:\Users\[UID]\Desktop. 4.
Working in FileCabinet CS Archiving documents Over time, many documents accumulate in FileCabinet CS. You may find that you access older documents infrequently and that their presence makes it increasingly difficult to locate and access more recent documents. The Archiving feature allows you to save older documents to a location other than the primary data location and replace them in the drawer list with an icon that represents the archive volume.
Working in FileCabinet CS 8. Click the Archive button. 9. A message will appear when the files have been archived. Click OK. When the archiving process is complete, the 2011 US Tax Return, W2, and other documents for Karen Miller will be archived, and a Volume the archive will appear in the drawer list. icon representing To access the archived documents, follow these steps. 1. Click the Volume icon. 2. In the Watch window, double-click the 2011 Archive icon.
Working in FileCabinet CS 44 FileCabinet CS WalkThrough
Additional Features In this section, we will explore additional FileCabinet CS features, including settings to customize your interaction with the program and settings that apply globally to all FileCabinet CS users in your company. In addition, we will explore the integration between FileCabinet CS and NetClient CS. User preferences To set the following options for an individual user or workstation, choose Setup > User Preferences, and click either the Drawer List or Misc tab.
Additional Features specific folders, enter Date-specific document folders in the search field in the toolbar and press ENTER. 46 Display the open drawer only: When reviewing documents within FileCabinet CS, you may want to see only the folders and documents within the open drawer. If you mark this checkbox, FileCabinet CS displays only folders for the open drawer. To view all of your drawers again, click the minus sign next to the drawer’s name to close the current drawer.
Additional Features Automatically accept printed documents after countdown: When you mark this checkbox, you will receive a ten-second countdown before the printed document is automatically stored in FileCabinet CS if no action has been taken. If a document already exists in FileCabinet CS with an identical name, the document being printed will automatically receive a new, unique name to avoid overwriting the existing one.
Additional Features Groups tab: If you marked the Enable advanced User/Group Security checkbox in the Security tab, the Groups tab is available in the System Configuration dialog. Use this tab to assign rights to certain areas of FileCabinet CS. You can also add new groups, edit existing groups, or delete groups. Note: You cannot modify the privileges for the default $Administrators and $Unauthorized Users groups.
Additional Features After you add the folder, you can place documents in it for any drawer. Rightclick a document and choose Document Properties. In the Document Properties dialog, mark the checkbox for the folder and click Close. Be sure to delete the folder you created. To do this, go back to the Document Folders tab, highlight the folder you created, and click the Delete button. Any documents you added to the folder will be moved to the Not yet filed folder.
Additional Features Source Document Processing (OCR) tab: Use this tab to configure FileCabinet CS to automatically sequence pages identified by source-document processing or to change the default order of document types that have been identified by source-document processing. Using FileCabinet CS with NetClient CS FileCabinet CS integrates with NetClient CS, which is part of the CS Professional Suite.
Additional Features Designating clients and documents for NetClient CS To designate a drawer as a contributor to NetClient CS, you must be licensed for NetClient CS. Follow these steps to set up a FileCabinet CS client to transmit documents to NetClient CS. ACTIONS FileCabinet CS is open. 1. If necessary, select the FCSSAMPLE drawer. 2. Choose File > Drawer Properties. 3.
Additional Features 1. Choose File > NetClient CS to open the NetClient CS dialog, where you can see a list of all drawers that are designated as NetClient CS contributors. 2. Highlight the drawers that contain the documents you want to send to NetClient CS and click the Select button. 3. The OK button becomes a Connect button. Click the Connect button to open CS Connect. 4. In CS Connect, click the Call Now button to send the selected information to the Thomson Reuters data center.
Additional Features 3. Click the Select Family button. 4. Click the Add button and enter a family name. Notes If you do not specify a new name, the family name will be “Family.” A drawer can be a member of multiple families. 5. In the Drawers available to assign pane, highlight a drawer to add to the family and click the Select button. 6. Click OK. Note: All members of a drawer family are listed together in the Print, Send to Email Recipient, and Send to File Location dialogs.
Additional Features 54 FileCabinet CS WalkThrough
The Winning Combination During this walkthrough, we introduced you to many of the innovative features of FileCabinet CS. In this section, we explain other important aspects of your application investment. When you choose FileCabinet CS to organize your documents, you not only get the most innovative storage application — you open the door to additional substantial timesaving opportunities.
The Winning Combination When you select our products, you get a company committed to working with you honestly and fairly. You also get a company committed to providing your practice with a comprehensive suite of tax and accounting applications, excellent support, and additional services. Practice CS: Practice CS is a practice management system that serves as the workflow hub for your firm, providing real-time status information about your staff, clients, and firm.