EN Installation / User Instructions / Warranty FR Instructions de montage / Mode d'emploi / Garantie ES Instrucciones de montaje / Manejo / Garantía Talis C 04215xx0 04215xx1 04216xx0
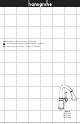
English 3¼" 7⅝" 9⅜" 15" Technical Information Recommended water pressure Max. water pressure Recommended hot water temp. Max. hot water temp Flow rate - 04215xx1 Flow rate - 04215xx0, 04216xx0 Hole size in mounting surface Max. depth of mounting surface 15 - 75 PSI 145 PSI 120° - 140° F* 176°F* 1.5 GPM 2.2 GPM 1½" 2⅜" 21½" max 2⅜" 2½" 8¾" 9⅞" 1⅜" *Please know and follow all applicable local plumbing codes when setting the temperature on the water heater.
Français Español Données techniques Datos tecnicos Pression d’eau recommandée 15 - 75 PSI Pression d’eau maximum 145 PSI Température recommandée 120° - 140° F* d'eau chaude Température maximum d'eau chaude 176°F* Capacité nominale - 04215xx1 1.5 GPM Capacité nominale - 04215/04216xx0 2.2 GPM Dimension du trou dans la surface 1½ po de montage Profondeur maximale de la surface 2⅜ po de montage Presión recomendada en servicio 15 - 75 PSI Presión en servicio max.
Tools Required / Outiles Utiles / Herramientas Útiles 11 mm 19 mm
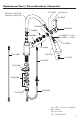
Replacement Parts / Pièces détachées / Repuestos 97735000 95897xx0 - 04215xx0 95898xx0 - 04216xx0 95498xx0 96338000 97209000 95900xx0 95140000 95340000 - 2.2 GPM 95376000 - 1.
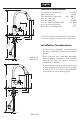
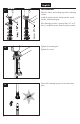
English Installation 1 Place the faucet and sealing ring on the mounting surface. Install the plastic washer, friction washer, metal washer, and mounting nut. max. 2⅜" If the mounting surface is greater than 1¾", or if there is insufficient space, omit the plastic washer. 2 Tighten the mounting nut. 3 Connect the handspray hose to the connection hose. Tighten the screws.
Français Español Installation Instalación Placez l'anneau d'étanchéite et le robinet sur la surface de montage. Coloque el oro de sellado y el grifo sobre la superficie de montaje. Installez la rondelle de plastique, la rondelle en fibre, la rondelle de friction, et l'écrou de montage. Instale la arandela plástica, la arandela de fibra, la arandela de fricción y la tuerca de fijación. S l'épaisseur du comptoir dépasse 1¾ po ou si l'espace disponible est insuffisant, omettez la rondelle de plastique.
English Install the hose weight. 4 Test the handspray hose. If it does not retract smoothly, reposition the weight. 5 Connect the hot and cold supply hoses to the stops. 6 11 m m m m 19 Use two wrenches. Do not allow the supply hoses to twist.
Français Installez le contrepoids sur le tuyau. Tirez sur la douchette. Elle devrait coulisser facilement et se rétracter sans à-coups. Modifiez la position du contrepoids au besoin. Connectez les tuyaux d'arrivée d'eau chaude et d'eau froide aux tuyau d'alimentation. Servez-vous de deux clés, tel qu'illustre dans le schema. Serrez fermement a l'aide des clés. Assurez-vous que les tuyaux n'sentortillent pas.
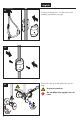
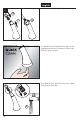
English Install the handspray. Tighten the nut. 7 2 3 1 The QuickClean cleaning function only needs a small manual rub over to remove the lime scale from the spray channels. If the flow of water decreases over time, remove and clean the hose filter.
Français Español Installez la douchette. Serrez l'écrou. Instale el cabezal extraible. Apriete la tuerca. L'aérateur est équipée de QuickClean, le système anticalcaire manuel. Les dépôts de calcaire s’enlèvent en frottant avec un doigt ou avec une éponge sur les ouvertures de jets élastiques. QuickClean, la función de limpieza manual, permite quitar la cal simplemente frotando los ejectores. Si le débit d’eau diminue avec le temps, retirez le filtre.
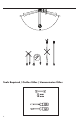
User Instructions / Instructions de service / Manejo on ouvert abierto off fermé cerrar Press the diverter to obtain the spray mode. The diverter will reset to stream mode when the water is turned off. Pour activer le mode jet, appuyez sur l'inverseur. Lorsque vous fermez l'eau, le robinet retourne en mode jet. Presione y mantenga oprimido el distribuidor para activar el modo de rociado. Cierre el paso de agua para volver al modo de corriente.
Maintenance / Entretien / Mantenimiento 1 2 3 4 5 new nouveau nuevo 13
Cleaning Recommendation for Hansgrohe Products Modern bathroom faucets, kitchen faucets and shower products are made from different materials to comply with the needs of the market with regard to design and functionality. To avoid damage to the product, it is necessary to take proper care of it. For best results: • Prevent the buildup of mineral scale and /or soap residue by cleaning your Hansgrohe product(s) when needed. • • Select a cleaning agent specifically intended for the type of product.
Conseil de nettoyage pour les produits Hansgrohe De nos jours le sanitaire moderne, la robinetterie et les douchettes se composent de matériaux très différents pour satisfaire à la demande concernant le design et la fonctionnalité. Pour éviter les détériorations et les réclamations, aussi bien pour l’utilisation que pour le nettoyage prochain, certains critères seront à prendre en considération.
Recomendación de limpieza para los productos de Hansgrohe Hoy en día, las griferías de baño y de cocina así como duchas modernas se componen de materiales muy distintos para satisfacer las exigencias del mercado respecto al diseño y la funcionalidad. Para evitar daños y reclamaciones hay que tener en cuenta ciertos aspectos tanto en el uso como en su limpieza.
Limited Consumer Warranty This product has been manufactured and tested to the highest quality standards by Hansgrohe, Inc. (“Hansgrohe”). This warranty is limited to Hansgrohe products that are purchased by a consumer in the United States or Canada after March 1, 1996, and installed in either in the United States or in Canada. WHO IS COVERED BY THE WARRANTY This warranty extends to the original purchaser only. This warranty is non-transferable.
When warranty service is completed, any repaired or replacement product or part will be returned to you postage prepaid. EXCLUSIONS AND LIMITATIONS REPAIR OR REPLACEMENT (OR, IN LIMITED CIRCUMSTANCES, REFUND OF THE PURCHASE PRICE) AS PROVIDED UNDER THIS WARRANTY IS THE EXCLUSIVE REMEDY OF THE PURCHASER. HANSGROHE NEITHER ASSUMES NOR AUTHORIZES ANY PERSON TO CREATE FOR IT ANY OTHER OBLIGATION OR LIABILITY IN CONNECTION WITH THIS PRODUCT.
www.hansgrohe-usa.com US - Installation Instructions • Part No. 90136001 • Revised 06/2011 Hansgrohe, Inc. • 1490 Bluegrass Lakes Parkway • Alpharetta, GA 30004 Tel.