
Installation Guide
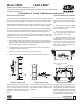

No. 1
Test Cock
No. 2
Test Cock
No. 3
Test Cock
No. 4
Test Cock
Housing
Inlet
Ball Valve
Outlet
Ball Valve
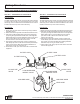
Body
#1 Check
Assembly
#2 Check
Assembly
Inlet
O-ring
Outlet
O-ring
#1 Check
O-ring
#2 Check
O-ring
Spring
Poppet
Tailpiece
Hex Flange Bolts
#1 Seat
#2 Seat
Maintenance Instructions
ZURN WILKINS
1747 Commerce Way, Paso Robles, CA 93446 Phone:855-663-9876 Fax:805-238-5766
3
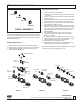
FIGURE 1 FIGURE 2 FIGURE 3
Spring
Seat
Poppet
Tailpiece
CHECK ASSEMBLY
All Model 350XL Double Check Valve Backow Preventers must
be inspected and maintained by licensed personnel at least once
a year or more frequently as specied by local codes. Replace-
ment of worn or damaged parts must only be made with genuine
“ZURN WILKINS” parts.
GENERAL MAINTENANCE
1. Clean all parts thoroughly with water after disassembly.
2. Carefully inspect rubber seal rings and o-rings for damage.
3. Test unit after reassembly for proper operation (refer to
“TESTING PROCEDURES”).
SERVICING CHECK VALVES
1. Close inlet and outlet shut-off valves.
2. Open No. 2, No. 3 and No. 4 test cocks to release pressure
from valve.
3. Unscrew the 4 bolts (1/4-20 UNC Hex Flange) holding the
housing in place.
4. Using a #2 athead screwdriver, pry loose housing by placing
the screwdriver in the notch between housing and body.
5. Pull housing out of the body and remove checks by sliding
them towards the outlet of housing.
6. Using the same screwdriver, locate the notch between seat
and tailpiece of each check. Insert screwdriver and twist to
“snap” checks apart. CAUTION: Checks are spring loaded.
7. Inspect the rubber seal ring around poppet for cuts or
embedded debris.
8. If the poppet is damaged, replace with a new poppet.
9. Inspect the remaining check parts and seating areas.
Remove any debris.
10. If necessary, replace any damaged parts with new ones.
11. Lightly grease o-rings on checks and reinstall into housing
following the above procedures in reverse order.
12. Flush body prior to reinstalling housing.
13. Lightly grease o-rings on housing and reinstall into body
following the above procedures in reverse order.
Note: When installing housing, match slight taper on the outlet of
the housing with corresponding taper in body.
®
www.zurn.com