
Instructions / Assembly


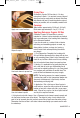

Pliancy Test
A simple pliancy test may be performed by pressing the
sander together using your thumb and index finger.
It
should be easy to press down the rubber and sanding
sleeve against the inner spindle. An alternative test is to
take a 3/8” (10mm) dowel or pencil in diameter and press
it in the middle of the sander. It should be easy to press
the sander together against the inner spindle
.
Application Pressure
The pressure exerted when holding the sander against
the material being sanded affects the result. The abrasive
should not be applied too hard, and must be allowed to
cut at its own rate. Pressing too hard results in the sanding
sleeve rapidly filling with dust and resin while generating
heat. The resins react and harden due to the heat and the
abrasive grits in the sleeve clog up. Too much pressure may
press down fibrous areas that later rise during surface treatment as patchy surfaces.
Using a Guinevere inflatable sander at normal inflation
pressure (i.e. filled with very little air), allows the
sander to press against the material so that the rubber
body fits itself to the material it is touching. This means
that the rubber is pressed together from about 3/16”
(5mm) on the short inflatable sander to about 3/8”
(10mm) on the drum sander.
When the sander is
properly inflated, it will sand into and around the
material it is pressed against.
Releasing Air and Removing Sleeves
Releasing air from the short, long and round inflatable
sanders can bring about an unexpected “banging”
noise. To avoid this and simplify the sleeve replace-
ment process, proceed as follows:
Grip the Guinevere sander in one hand (e.g. left) and
squeeze quite hard.
While doing this
, loosen the nut
two turns with your other hand. Using the left hand,
grip the drive shaft and wiggle it to and fro. Continue
to squeeze gently as the air is released.
Drum, long
and shor
t sanders ma
y also be deflated using the
Allen Key.
T
ak
e care to ensure that the r
ub
ber remains under
the edge of the washer before retightening the nut
by hand. The sander is now ready for the next
sanding sleeve.
GUINEVERE - 5
GUIN_Instru_2012 1/12/15 5:20 PM Page 5