
Installation Guide


5
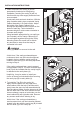
3. Clean area where the vanity (A) will be
permanently located prior to beginning
installation, ensuring the vanity (A) will not
interfere with any water supply and drain lines
once mounted.
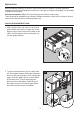
Locate wall studs and mark locations. With the
help of another adult, place completed Vanity
Cabinet Assembly in its final location. Adjust
the height of the Vanity Cabinet (A) by
twisting the adjustable leveler foot pins on the
bottom of each leg. Twist clockwise to
decrease height or twist counter-clockwise to
increase vanity height.
Using hardware appropriate for your wall type
(not included), secure Vanity Cabinet (A) to
two wall studs anywhere through the Vanity
Mounting Plates. Be careful not to disturb
any electrical or water lines that may be
concealed in the wall.
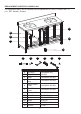
INSTALLATION INSTRUCTIONS
3
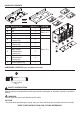
Mounting Plate
A
A
B
2
2
4
1
WARNING
Vanity (A) MUST be secured to the wall.
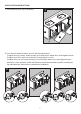
4. To install the Top (B) to the vanity (A).
Apply silicone caulk to the top edge of the
wood cabinet. With the help of another adult,
gently lower the stone top with assembled sink
onto the cabinet. Make sure the stone top is flush
with the back side of the wood cabinet and the
stone overhang is equal on both sides over the
wood cabinet left and right side walls. Remove
any excess caulk before allowing to dry.
At this time, if the vanity purchased has a
semi-recessed sink, use the Instruction Manual,
located in the box with the vanity top (B) to install
the sink bowl (D) to the vanity top.
At this time, if the vanity purchased has an
undermount sink, use the Instruction Manual,
located in the box with the vanity top (B) to
install the sink bowl (D) to the vanity top before
moving to Step 4.
If the vanity purchased has a semi-recessed
sink proceed to Step 4. The semi-recessed sink
bowl (D) will be installed after the vanity top (B)
is attached to the vanity base (A).
Helpful tip: it may be easier to install your
choice of faucet (not included) before securing
the vanity top (B) to vanity base (A).