
User manual

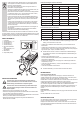


Operation as a power supply (12V-/24V-Version)
Output voltage
DIP switches 13,2V / 26,4V 13,5V / 27,0V 13,8V / 27,6V
4
OFF OFF ON
5
OFF ON OFF
6
ON ON ON
DIPswitches1,2and3switchoffautomatically(regardlessoftheOn/Offposition)ifDIP Î
switch 6 is set to "ON".
Attachthemainscabletothepowersupply(8)andamainssocketwithsafetycontact.•
Attach terminal (3) and then terminal (4) to the battery to be charged or to the consumer to •
besupplied.Ensurecorrectpolarity(RED=pluspole/+;BLACK=minuspole/-).
Whenconnectingbatteriesandconsumers,observethemanufacturer'sOperating Î
Instructions(whenconnectingvehiclebatteriesthevehiclemanufacturer'sOperating
Instruction).
Turn the main switch (9) to "ON". •
TheLED"POWERON"illuminate.TheLEDs"FLOAT","ABSORPTION"and"BULK"illumi-
nate depending on the operating modes.
When the device is fully charged or when the charger is no longer being used as a power •
source, turn the main switch (9) to "OFF".
Disconnectterminal(4)andthenterminal(3)fromthebatteryortheconsumer.•
Isolatethemainsleadfromthesocket.•
On this version of the device, the data interface (7) has no function. Î
OPERATING MODES
Battery charger (booster) mode
This intelligent charger completes the charging operation automatically in four phases.
Phase 1: Preparation of a low or severely discharged battery in order to optimise current ac-
ceptance.TheLEDs"POWERON"and"BULK"illuminate.
Phase 2:Afterapprox.30minutes,thedeviceswitchestothenextphase;thebatteryis
chargedwiththeoutputvoltage.TheLEDs"POWERON"and"BULK"illuminate.
Phase 3:Aftersometime,thedeviceswitchestotheABSORPTIONphase;thebatteryisfully
chargedwithmax.chargecurrent.TheLEDs"POWERON"and"ABSORPTION"illuminate.
Phase 4:Thebatterycontinuestobechargedwithoatvoltage.Thisprotectsthebatteryfrom
overloadandequalisesanyself-discharge.TheLEDs"POWERON"and"FLOAT"illuminate.
Power source mode
This device can also be used as a power source for a consumer.
TheLEDs"POWERON"and"FLOAT"illuminate.
CARE AND MAINTENANCE
Before cleaning, switch off the device. Then remove the battery (if any) from the device and
isolate the device from the mains voltage.
Cleanthedevicewithasoft,cleananddrycloth.Donotuseaggressivedetergentsorchemi-
cals as these can damage the housing (discolouration).
DISPOSAL
Device
Never dispose of devices bearing the symbol opposite in the household waste.
Youareobligedtodisposeoftheseusedelectricalandelectronicdevices
separately.
Askyourlocalauthorityaboutthefacilitiesforcontrolleddisposal.Separate
disposal passes used devices for recycling or other forms of reuse. This helps
preventharmfulsubstancesfrominltratingtheenvironment.
Batteries
As the end user, you have a legal obligation (battery regulation) to return all
usedbatteries;disposingofbatteriesinthehouseholdwasteisprohibited!
Batteries containing harmful substances bear the symbols opposite. These
symbols mean that disposal in the household waste is prohibited. The designa-
tions for the decisive heavy metal area: Pb=lead (designation on the battery,
e.g. below the dustbin symbols, bottom left).
Youcanreturnyourusedbatteriesfreeofchargetoyourlocalcollectionpoints,
any of our branches or wherever batteries are sold!
In doing so, you are satisfying legal obligations and helping protect the environ-
ment.
SERVICE
Haveyourdevicerepairedonlybyqualiedpersons.Thiswillguaranteethatthedevice
remains safe.
STORAGE AND TRANSPORT
Alwayskeepthedevicecoolanddry.
Protect the device from damage during transportation.
Isolatethebatterytobechargedfromallconsumersandleads(rstswitchoff•
all consumers!) before connecting it to the charger. Always isolate the earth
connection(minuspole)fromthebatteryrstandthenthepluspole.
Before connecting the battery to the consumer(s), isolate the charger from the
battery.
Sparkscanoccurwhenconnectingordisconnectingthebattery.Adequate
ventilation should therefore be provided!
If you are not sure how to connect or operate correctly or if you have any questions that are
notansweredintheDirectionsforUse,contactourTechnicalInformationServiceorother
qualiedperson.
Voltcraft®,Lindenweg15,D-92242Hirschau,Tel.+491805865827.
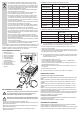
THE DEVICE AT A GLANCE
Charger display1.
Connection screw (+), 2 x2.
Connection terminal (+)3.
Connection terminal (-)4.
Connection screw (-)5.
DIPswitches(foroperating6.
modes)
Data-interface(onlyforthe7.
manufacturer)
Mains connection8.
Main switch (On/Off)9.
CONNECTION AND OPERATION
Always make sure the DIP switches are set correctly for the mode in which
you are operating the device and for the battery type to be charged. There
is a risk of re and explosion!
Always make sure the DIP switches are set correctly for the input voltage
on the consumer. There is a risk of re and explosion!
Makesurethatthemainswitch(9)issetto"OFF".•
Attachthefork-shapedlugontheREDcabletotheterminal(2)onthedevice.Tightenthe•
screw.
Attachthefork-shapedlugontheBLACKcabletotheterminal(5)onthedevice.Tighten•
the screw.
SettheDIPswitches(6)correctlyforthedesiredoperatingmode. •
Refer to the tables.
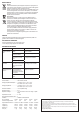
Operation as a battery charger (12V-/24V-Version)
Battery type
DIP switches
SLA/GEL AGM/lead-acid
battery
Lead-acid battery
with calcium board
1
OFF OFF ON
2
OFF ON OFF
3
ON OFF OFF
4
OFF OFF ON
5
OFF ON OFF
6
OFF OFF OFF
Output voltage
14,2V/28,4V 14,6V/29,2V 14,8V/29,6V
Float voltage
13,2V/26,4V 13,5V/27,0V 13,8V/27,6V
3
2
5
6
9
7
8
4
1