
Full Product Manual


Check for parts online at www.ioniceaugers.com or call 800-345-6007 M-F 8-5 CT
6
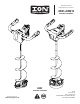
Operator's Manual
ION® Electric Ice Augers
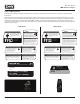
UNPACKING AND ASSEMBLY
To Assemble the Auger to the Powerhead
1. Remove the hex wrench that is included in your parts bag.
2. Insert the hex wrench into the bolt at the top of the auger.
Remove the bolt by turning counter-clockwise.
3. Remove the protective plastic cap from the driveshaft.
Insert the driveshaft of the powerhead into the collar of
the auger assembly. SEE FIGURE 1
4. Align the hole in the auger shaft with the hole in the
powerhead shaft. Tighten rmly, turning clockwise. There
may be some wiggle in the connection; this is normal.
If the connection is too tight, disassembly may be dicult.
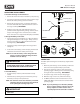
To Charge the Battery for First Use
1. Connect the charger to standard 110 or 240-volt outlet; a
red light should appear on the charger. Always connect
charger to standard 110 or 240-volt wall outlet before
inserting battery. SEE FIGURE 2
2. Charge the battery until the light on the charger turns
solid green.
3. To disconnect the battery, remove the plug from the wall
outlet then disconnect the battery from charger.
NOTE: Do not leave the battery on the charger after the
charge is complete. Unplug the charger from the
wall and remove the battery.
To Install the Battery
1. Slide the battery onto the powerhead until it is fully
seated.
2. Pull the battery retaining strap over the battery to keep
the battery securely on the powerhead.
NOTE: This cannot be done before the battery is installed.
The battery must be inserted onto the powerhead
before placing the retaining strap over it.
POWERHEAD
DRIVESHAFT
PROTECTIVE CAP
BOLT
HEX WRENCH
AUGER
IMPORTANT
BATTERY MUST BE FULLY CHARGED BEFORE
FIRST USE.
IMPORTANT
DO NOT LEAVE BATTERY ON POWERHEAD
WHEN AUGER IS NOT IN USE. ALWAYS DETATCH
BATTERY WHEN NOT USING THE ICE AUGER.
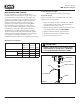
OPERATION
The ION is powered using the 36-volt battery supplied with
the unit.
1. Make sure your footing is secure and that you have the
unit in the vertical position rmly in your hands.
2. Depress the operating lock lever, then squeeze the
operating trigger. Following a two-second safety delay,
the auger will then start drilling. SEE FIGURE 3
3. To stop the auger, release the operating trigger.
4. When the auger is not in use, remove the battery.
5. For ION X, follow the same instructions above. Your
LIGHT FUNCTION is connected to the activation of the
operating trigger.
NOTE: If you are planning to use the battery multiple
times in a single outing, it is ideal to remove the
battery and place in a warm location. This is
especially important in cold weather conditions.
110/240
VOLT OUTLET
FIGURE 2
FIGURE 1