
Use and Care Manual


2
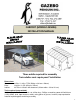
11.83ft x 16.5ft / 3.61m x 5.03m Carport
Instruction Manual
IMPORTANT: RETAIN FOR FUTURE REFERENCE, READ CAREFULLY
For assistance with assembly, installation, parts, or customer service, contact Gazebo Penguin Customer
Service Department at the numbers listed below (English & French, Mon-Fri 8:00AM to 4:00PM EST):
Montreal: (514) 276-3485 Elsewhere in Canada and the US: 1-800-737-7174
CARE AND MAINTENANCE:
In case of a defective or damaged part, or for any other questions concerning the product, please contact the
manufacturer directly.
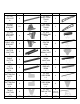
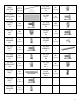
Please have the parts list and part numbers on hand when ordering or requesting replacement parts.
ROOF PANELS:
Gently clean with an environmentally-friendly soap solution and water using a sponge or washcloth.
Do not use abrasive materials, wire brushes, chemicals, harsh cleaners, or bleach.
Rinse using a garden hose and air dry. If removed, ensure thoroughly dry prior to storage.
Do not use pressure washer.
STRUCTURE:
Gently clean with an environmentally-friendly soap solution and water using a sponge or washcloth.
Do not use abrasive materials, wire brushes, chemicals, harsh cleaners, or bleach.
Rinse using a garden hose and air dry.
Do not use pressure washer.
If there are nicks, chips, and/or scratches, go to your local hardware store or home center and obtain a closest match
touch-up paint suitable for outdoor metal use. Follow instructions that come with the paint.
WARNING:
For outdoor use.
Snow should be regularly cleared from the roof and not allowed to accumulate.
PRIOR TO ASSEMBLY:
Choose the site for your carport carefully.
The foundation must be level, flat, and solid, such as concrete or asphalt.
Keep away from overhead utility lines, tree branches, and other structures.
Check for underground pipes or wires if digging or drilling is required.
Do not install near roof lines or other structures that could shed snow, ice, or excessive rain run-off onto the carport.
Assemble the carport as close to its final location as possible.
It is recommended to wear safety gloves, safety glasses, and hard hats for installation.
Do not hang from, climb on, or stand on the structure or roof.
Before assembly, read instructions and check that all parts are present in the boxes. If any parts are missing, refer to
warranty information on pg 15.
A 6ft (1.8mm) stepladder, metric wrenches & Allen keys, Phillips screwdriver, tape measure, level, mallet, tarp to place
parts on, and a power drill with 4mm (1/8in) drill bit will be required for assembly (not included).
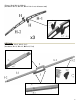
Remove top protective film from roof panels prior to assembly; DO NOT remove bottom protective film until
ready to insert roof panels, so as to identify which side is on top.
Please note that the included wrench (11-765) can be used for all 10mm nuts when tightening.
Please note some parts should be fastened by hand to start, and then tightened with a wrench at a later step.
ANCHORING INSTRUCTIONS:
Proper anchoring of the frame is required for safety.
Any structure not anchored securely has the potential to fly away during high wind causing damage and safety hazard.
How the item is anchored, and the hardware and tools required, will vary based upon the set up location and are not
included. Please check with your local hardware store for the appropriate anchors.
Do not anchor to pavers / pavement slabs because they are not a solid foundation.
Periodically check the anchors to ensure they remain secure.
Consult with your local governing authority / local municipal codes regarding installation of temporary structures before
purchase or assembly. Some jurisdictions may require permits for, or otherwise regulate, installation and use.