
Instructions / Assembly

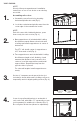

Assembling rail section:
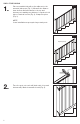
a. Assemble your rail section by inserting
balusters/spindles into rails (Fig.1).
b. Lock tabs on balusters/spindles must face the
outer edge of the routed holes in rails.
NOTE:
Each kit comes with 2 tabbed balusters, space
them evenly into each section (Fig. 2).
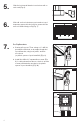
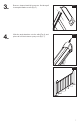
a One support brace is included with 6' railing
kits. Measure equal distance from both ends
of railing and install support brace in center of
bottom rail.
For 67
1
⁄2" rail: install center of support brace
33
3
⁄4" from ends of rail (Fig. 3).
b. Two support braces are included with 8' railing
kits. Measure length of rail, divide by 3 and
measure that distance from your rail to the
center of your rst support brace and install
support brace. Repeat that step from the
opposite side of your rail.
For other rail lengths: install support braces
evenly.
NOTE:
Closely follow post manufacturer's installation
instructions or use a Post Jacket on an existing
wood 4x4.
VINYL RAILING
Fig. 3
33
3
⁄4"
3" Support
Brace
33
3
⁄4"
Fig. 1
Locking
Tab
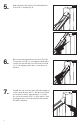
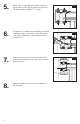
Cut two 3" temporary wood spacer blocks (not
included)
to insert under ends of railing sections to
temporarily assist in aligning railing section (Fig. 4).
Screw in top rail metal brackets to underside of
each end of rail, with #10 x 1
1
⁄4
" square drive screw
(sold separately) in middle slot of bracket (Fig. 5).
Do not tighten at this time (allows for adjustment).
3" Support
Brace
3" Wood
Block
Fig. 4
Fig. 5
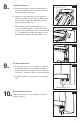
1.
2.
3.
4.
3
Fig. 2