User Manual C BO O V E N S Fire Up the Good Life! A MAJOR CAUSE OF OVEN-RELATED FIRES IS FAILURE TO MAINTAIN REQUIRED CLEARANCES (AIR SPACES) TO COMBUSTIBLE MATERIALS. IT IS OF UTMOST IMPORTANCE THAT THIS OVEN BE INSTALLED ONLY IN ACCORDANCE WITH THESE INSTRUCTIONS.
Outdoor Entertainment Welcome to a whole new dimension of outdoor cooking and entertaining with your new wood burning brick oven from Chicago Brick Oven! We invite you to visit (and frequent) our website, chicagobrickoven.com. It’s a great source of information and suggestions that will help you enjoy your new oven to the fullest: • Choose from dozens of mouthwatering recipes for everything from appetizers and breads to main courses and desserts, and of course, pizzas.
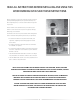
READ ALL INSTRUCTIONS BEFORE INSTALLING AND USING THIS WOOD BURNING OVEN. SAVE THESE INSTRUCTIONS. Before installation, contact local authorities having jurisdiction (municipal building department, fire prevention bureau, etc.) about required permits, restrictions and installation inspection in your area. Please read this entire manual before you install the Oven. Failure to follow instructions may result in property damage, bodily injury or even death.
Table of Contents CBO-500 and CBO-750 Pre-Assembly....................... 8 CBO-500 Assembly Instructions............................... 9-12 CBO-750 Assembly Instructions............................. 13-16 CBO-1000 Pre-Assembly.................................................. 18 CBO-1000 Assembly Instructions...........................19-22 CBO Oven Operating Instructions...............................23 CBO Oven Best Practices.................................................
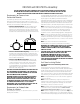
CBO-500 and CBO-750 Pre-Assembly INSTALL AND USE ONLY IN ACCORDANCE WITH CHICAGO BRICK OVEN’S INSTALLATION AND OPERATING INSTRUCTIONS (OR EQUIVALENT). CONTACT LOCAL BUILDING OFFICIALS OR FIRE OFFICIALS ABOUT RESTRICTIONS AND INSTALLATION INSPECTION IN YOUR AREA. Requirements for Clearance from Combustible Materials The CBO-500 and CBO-750 models come with a DuraVent 6" Anchor Plate (Model #9441) that works with a Class A 6" Pipe. You can buy this pipe from any building or hearth manufacturer.
CBO-500 Assembly Instructions CBO-500 OVENS SHOULD BE INSTALLED BY A PROFESSIONAL OR SUITABLY QUALIFIED INDIVIDUAL.
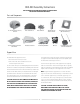
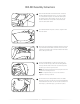
CBO-500 Assembly Instructions Hearth Insulation Sub-hearth Insulation Boards (supplied) Your CBO-500 Oven comes with Insulation Boards (shipped in three pieces) that are placed under both pieces of the Hearth—on top of the 18-gauge Galvannealed Steel Plate—for insulation. Place the Galvannealed Steel Plate on the Support Base. Next, lay the Insulation Boards over the Galvannealed Steel Plate. Then set the Oven Base on the Insulation Boards.
CBO-500 Assembly Instructions 1 After the Galvannealed Steel Plate has been set and the Insulation Boards placed on top of it, you are now ready to set the Hearth into place. Line the Front Hearth piece up with the front of the Oven base. As you can see, the Insulation Boards are not exposed to the elements and cover the entire Main Hearth. 2 Push the Main Hearth into place so there is a tight fit with the Front Hearth. 3 Remove the Front Hearth piece and place the Dome over the top of the Main Hearth.
CBO-500 Assembly Instructions 6 In this picture, you will see we have a Metal Shroud. If you are building a Stone or Brick Shroud, it should follow the contour of the Oven, but not rest on the Arch. Now slide the Front Hearth into place and abut up against the Main Hearth as close as possible. 7 You are now ready to mortar the Arch to the Dome. Use the refractory mortar provided to completely seal the space between the Arch and Dome. You will also put some mortar on the Front Hearth under the Arch.
CBO-750 Assembly Instructions CBO-750 OVENS SHOULD BE INSTALLED BY A PROFESSIONAL OR SUITABLY QUALIFIED INDIVIDUAL.
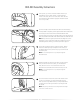
CBO-750 Assembly Instructions Hearth Insulation Sub-hearth Insulation Boards (supplied) Your CBO-750 Oven comes with Insulation Boards (shipped in three pieces) that are placed under both pieces of the Hearth—on top of the 18-gauge Galvannealed Steel Plate—for insulation. Place the Galvannealed Steel Plate on the Support Base. Next, lay the Insulation Board over the Galvannealed Steel Plate. Then set the Oven Base on the Insulation Boards.
CBO-750 Assembly Instructions 1 After you have built the Support Base and positioned the Insulation Boards and Galvannealed Steel Plate as shown, you are ready to place the Dome Assembly on the Insulation Boards. You have two Dome Assembly placement options: • You can align the front of the Dome Assembly with the edge of the Insulation Boards and your 2-inch Arch Assembly and Door will overhang.
CBO-750 Assembly Instructions 6 Cut the back of the Insulating Blanket with a razor blade and tuck it into place. Pull the sides of the Insulating Blanket around the back of the Oven. You can tie the insulation with metal straps, or aluminum tape, or just leave it in place. 7 You are now ready to mortar the Arch to the Dome. Use the refractory mortar provided to completely seal the space between the Arch and Dome. You will also put some mortar on the Front Hearth under the Arch.
CBO-1000 Pre-Assembly INSTALL AND USE ONLY IN ACCORDANCE WITH CHICAGO BRICK OVEN’S INSTALLATION AND OPERATING INSTRUCTIONS (OR EQUIVALENT). CONTACT LOCAL BUILDING OFFICIALS OR FIRE OFFICIALS ABOUT RESTRICTIONS AND INSTALLATION INSPECTION IN YOUR AREA. Requirements for Clearance from Combustible Materials The CBO-1000 Oven comes with a DuraVent 8" Anchor Plate (Model #9641) that works with a Class A Stainless Steel DuraVent 8" Double Wall Pipe (Model #9605 SS) to meet Standard HT 103.
CBO-1000 Assembly Instructions CBO-1000 OVENS SHOULD BE INSTALLED BY A PROFESSIONAL OR SUITABLY QUALIFIED INDIVIDUAL.
CBO-1000 Assembly Instructions Hearth Insulation Sub-hearth Insulation Board (supplied) Your CBO-1000 Oven comes with Insulation Boards (shipped in four pieces) that are placed under both pieces of the Hearth—on top of the 14-gauge Galvannealed Steel Plate—for insulation. Place the Galvannealed Steel Plate on the Support Base. Next, lay two layers of Insulation Board over the Galvannealed Steel Plate. Then set the Oven Base on the Insulation Boards.
CBO-1000 Assembly Instructions 1 After you have built the Support Base and positioned the two Insulation Board layers and Galvannealed Steel Plate as shown, you are ready to place the left side of the Dome Assembly on the Insulation Boards, then join the right side of the Dome Assembly. You have two Dome Assembly placement options: • You can align the front of the Dome Assembly with the edge of the Insulation Boards and your 2 1/2-inch Arch Assembly and Door will overhang.
CBO-1000 Assembly Instructions 7 Cut the back of the Insulating Blanket with a razor blade and tuck it into place. Pull the sides of the Insulating Blanket around the back of the Oven. You can tie the insulation with metal straps, or aluminum tape, or just leave it in place. 8 You are now ready to mortar the Arch to the Dome. Use the refractory mortar provided to completely seal the space between the Arch and Dome. You will also put some mortar on the Front Hearth under the Arch.
CBO Oven Operating Instructions TO PROTECT THE INTERIOR OF YOUR OVEN FROM RAIN AND OTHER MOISTURE, A PROTECTIVE RAIN CAP MUST BE INSTALLED ON TOP OF THE FLUE PIPE TO ENSURE THAT MOISTURE DOES NOT GET INTO YOUR OVEN. Operating Instructions After you have cured your Oven and are ready to start cooking, light a small fire and slowly build it up. The interior Dome of the Oven will at first turn black from the fire smoke.
CBO Oven Best Practices Other Precautions and Instructions away from all combustible materials, pending final disposal. When the ashes are disposed of by burial in soil or otherwise locally dispersed, they should be kept in the closed container until all cinders have thoroughly cooled. • LOCAL REGULATIONS ABOUT WOOD-BURNING EQUIPMENT SHOULD BE CONSULTED. • CBO OVENS SHOULD BE INSTALLED BY A PROFESSIONAL OR SUITABLY QUALIFIED INDIVIDUAL.
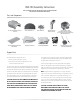
Customized Enclosure Designs However you plan to install your CBO Oven—as a stand-alone unit or as part of a complete outdoor kitchen—and whatever your material preference— stone, brick, stucco, etc.—your design choices for creating a customized enclosure are as limitless as your imagination. Here are just a few examples of how other homeowners have customized their CBO wood burning ovens and created their ultimate outdoor cooking, dining and entertaining spaces. Visit chicagobrickoven.
Curing Your Oven Although your Oven may seem dry once you complete the installation process, there are small amounts of moisture pockets that need to work their way out. Another method of curing your new Oven is to build a fire in a separate location. Then take the coals and place them into the Oven. You’ll generate heat without the flame and the Oven will cure as required. Some new owners find this method a much easier way to cure the Oven and ensure the temperature doesn’t get too hot.
Firing Your Oven A Once you’ve properly cured your Oven, you’re ready to fire it for cooking. B Always start with dry kindling placed 10 inches from the front of the Oven. CAUTION: NEVER USE CHEMICALS OR STARTER FLUIDS; YOU WILL NOT NEED THEM. C Once the fire is going, add small pieces of wood to build the fire. You want to raise the temperature slowly, so avoid building a huge fire that pours out of the mouth of the Oven. D We recommend adding large chunks of wood to the fire once it’s going strong.
How the Oven Works WOOD BURNING BRICK OVENS ARE SPECIALLY DESIGNED TO TAKE FULL ADVANTAGE OF ALL THREE COOKING METHODS—RADIANT HEAT, CONVECTION AND CONDUCTION. FlameRoll ™ Only our proprietary low-dome construction creates the perfect FlameRoll ™ from front to back. In this unique cooking method, the vent pulls the flame horizontally across the top of the Dome and then vertically back down the side.
Cooking in Your Oven ONCE THE OVEN HAS BEEN HEATED TO THE POINT THE ENTIRE DOME HAS TURNED A WHITISH GREY, YOU’RE READY TO COOK USING EITHER THE OPEN-DOOR OR CLOSED-DOOR METHOD. Open-Door Cooking Open-door cooking is used to cook pizzas and other foods that require medium to high temperatures. Keep the fire going in the back of the Oven. Sweep out the front of the Hearth with a wire brush and you’re ready to cook. The Oven will become hot enough and the small fire on top will generate radiant heat.
Using Flavored Wood JUST IMAGINE THE AROMA AND MOUTHWATERING TASTE OF APPLE WOOD TURKEY, ORANGE WOOD DUCK OR MAPLE WOOD STEAK! To maximize your cooking experience, there’s nothing better than using a fine cooking wood—alder, apple, apricot, cherry, grape, hickory, lemon, maple, mesquite, nectarine, orange, peach, pear, pecan, plum, white oak. Which Kind of Wood to Use Hard, dry, aged wood burns hotter and cooks faster. The best burning hardwoods are arbor, ash, beech, bower, maple and oak.
Frequently Asked Questions What besides pizza can I cook in my wood burning brick oven? What types of ovens are better— refractory concrete, clay or brick? There is no limit to what you can cook in your CBO wood-fired brick oven. Anything you can cook in your home oven, you can cook in your CBO Oven—whole turkeys, bread, grinders, chicken, steaks, chops, vegetables, stews, empanadas, desserts and more. We’re partial to refractory and brick ovens because of their look and durability.
Limited Warranty Chicago Brick Oven, a manufacturer of wood-fired ovens, warrants the products to be free from defects in materials and workmanship for a period of three (3) years from the date of shipment. Local regulations about wood burning equipment should be consulted.
For more information, visit chicagobrickoven.com Chicago Brick Oven 205 E. Butterfield, #448 Elmhurst, IL 60126 © 2015 Chicago Brick Oven. All rights reserved.