
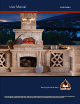
Full Product Manual


12
CBO-500 Assembly Instructions
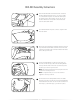
You are now ready to mortar the Arch to the Dome. Use the refractory
mortar provided to completely seal the space between the Arch and Dome.
You will also put some mortar on the Front Hearth under the Arch.
You don’t need a lot of mortar; just enough to make a seal. Place the mortar
all the way around the Arch and on the Hearth on both sides under the Arch.
Note: Be very careful to not get any mortar in the mounting holes for the
Arch and Door. If you do get mortar in the holes, attempt to clean it out
immediately; the bolts will not go in all the way if mortar is present.
7
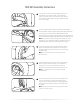
Line up the Arch and put the two top bolts in place. Tighten
the bolts to hand-tight. Upon completion of the install, you
will tighten the bolts more; at this time you just want to hold
the Arch in place.
Note: Do not over-torque bolts or you may dislodge the
threaded inserts!
8
Attach the Metal Door and insert the bolts to hold it in place.
Once you have all four bolts in place, you should tighten
them, but do not force it. You should create a nice seal
between the Arch and the Dome with the mortar you used.
Note: Do not over-torque bolts or you may dislodge the
threaded inserts!
9
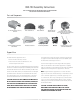
Use some mortar to finish off the install. If the Shroud is brick
or stone, you should also use mortar around the top of the
Arch. If you are using a Metal Shroud, use a high-temperature
resistant silicone on the top of the Arch to seal the joint with
the Shroud.
Note: Each year you will need to touch-up the mortar and/or
silicone for cosmetic reasons.
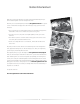
10
In this picture, you will see we have a Metal Shroud. If you
are building a Stone or Brick Shroud, it should follow the
contour of the Oven, but not rest on the Arch. Now slide the
Front Hearth into place and abut up against the Main Hearth
as close as possible.
6