
Installation Guide
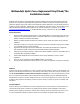
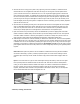

6. Start the second row using 1/3rd of a plank. Place the cut end against the wall. Insert the tongue on the
long side of the plank into the groove of the plank in the first row. Hold the plank in a 20° to 30° angle
while applying pressure inward and down until they lock together (diagram 1a). Angle the plank and push
the tongue into the groove and adjust it until the tongue locks into place (diagram 1b). Complete the
second row allowing 1/4 inch (6.35mm) expansion space at the start and end of the row.
7. Start the third row using a 2/3rd length of a plank with the cut end against the wall. Complete each row
thereafter using a random layout with end joints off-set by at least 8”. Plan the layout to avoid using small
planks (less than 6”) at the walls. The cut piece at the end of the row can often be used to start the next
row provided it achieves a random layout. Always place the cut end against the wall and allow for the
expansion space.
8. Hydri-Core planks are unique in that they can also be installed with a pull bar or tapping block and rubber
mallet or hammer in difficult areas such as the last row, and when fitting under door trim. Use a pull bar
and rubber mallet or hammer to lock the joints together in the last row. Always use a pull bar on the cut
edge of the plank. Factory edges can be damaged if the pull bar is used directly against them.
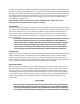
9. When fitting around door trim it will be necessary to slide the plank under the trim. This can be
accomplished easily by starting the row on the side of the room with the door trim and then sliding the
plank into place once it is attached. The row can be completed by inserting the tongue into the groove or
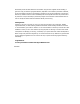
the groove into the tongue depending on the direction. A tapping block and pull bar (Diagrams 2a & 2b)
can also be used to lock the joints together while the planks are in a flat position. Use a series of light taps
until the joint is gradually locked together.
Diagram 2a Diagram 2b
Tile Installation (double tiles)
1. Tiles should be measured equally around the room for a more uniform tile look. There may be exceptions
since it is all a matter of preference.
2. To avoid narrow tile widths or short tile lengths near the walls/doors, it is important to do some pre-
planning. Using the width of the room, calculate how many full boards will fit into the area and how much
space remains that will need to be covered by partial tiles and adjust accordingly.
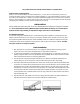
3. Start in the left hand corner of the room with the tongue side and end toward the wall. Lay the first row
of tiles along a chalk line or equivalent and trim to fit to the wall allowing a 1/4 inch (6.35mm) expansion
space. If starting the first row with a full tile it will be necessary to trim the tongues next to the wall, then
place the cut ends next to the wall. To trim the tile, use a utility knife and a straight edge to score the top
surface of the tile, and then bend it downward to separate the pieces; using a table saw or equivalent is
another option for cutting tiles.
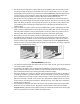
4. Align and attach the end joints of the tiles in the first row. Insert the tongue into the groove while holding
the tile at a 20° to 30° angle to the floor. Apply pressure inward and down until the Tiles lock together
(Diagrams 1a & 1b), a slight tap using a tapping block may be needed. Use spacers between the long edge
and end of the Tiles next to the wall to maintain the expansion space.