
Owner's Manual (Complete)


Chapter 1—What is the Home Control Assistant?
2 The Home Control Assistant
Quick tour of HCA
To start the Home Control Assistant once you have installed it:
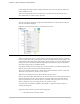
1. From the Windows task bar, click the Start button.
2. Choose Programs.
3. Then click Home Control Assistant.
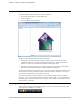
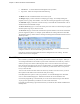
The Home Control Assistant window is split into two panes.
The left pane, the design pane, shows the HCA design outline with items in the design
organized into folders. Everything in the left pane has properties: simply right-click the
element you want to access and choose Properties from the popup menu.
The right pane, the display pane, is reserved for the displays in your design, and at different
times also shows the Visual Scheduler, Visual Link Editor, and messages.
As with a typical Windows environment, you can re-size the panes by clicking the divider between
the two panes, and moving it either left or right to achieve the relative sizes that you want. You
can even close one side entirely to show just the other side.
Across the top of the Home Control Assistant you see the Ribbon which contains a number of
categories – tabs – that control buttons to activate various features of HCA. Across the bottom of
the display pane is a tab bar that shows a tab for displays in your design. Across the bottom of the
whole window is a status bar.
Opening and Closing HCA
When you first start HCA, its main window appears on the screen. Also in the system tray on the
system task bar, a small HCA icon appears: