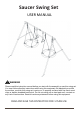
Saucer Swing Set :$51,1* Please read this instruction manual before you start with the assembly or use this swing set. You must follow all safety instructions while using this equipment; Be absolutely sure that the surface, on which this swing set is set up on, is properly surfaced with fine sand, wood chips or double shredded bark mulch. Do not use swing set on hard pack soil, concrete or any kind of hard surface. Read all cautionary statement before using this equipment.
PLEASE DO NOT RETURN TO STORE STOP Please do not return this product to the retailer!! We are able to assist you in ANY way If you find that you have any trouble with assembly or missing or damaged parts please contact WKH VHOOHU
WARNING: BURN HAZARD t 1BZ TQFDJBM BUUFOUJPO UP QMBTUJD BOE NFUBM TVSGBDFT BT UIFZ NBZ CF IPU FOPVHI UP DBVTF CVSOT t "MXBZT DIFDL UIF UFNQFSBUVSF PG UIF QSPEVDU CFGPSF MFUUJOH ZPVS DIJMESFO QMBZ PO JU t 3FNFNCFS UIBU UIF QSPEVDU NBZ DBVTF CVSOT JG MFGU JO EJSFDU TVOMJHIU t "MXBZT CF BXBSF PG UIF TVO BOE XFBUIFS DPOEJUJPOT BOE EP OPU BTTVNF UIBU UIF FRVJQNFOU JT TBGF CFDBVTF UIF BJS UFNQFSBUVSF JT OPU WFSZ IJHI NOTE 0CTFSWF UIF GPMMPXJOH TUBUFNFOUT BOE XBSOJOHT UP SFEVDF UIF MJLFMJIPPE PG TF
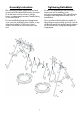
Positioning Your 4XJOH 4FU Suggested Playground Surfacing t 5IF TXJOH TFU JT EFTJHOFE UP CF JOTUBMMFE PO B MFWFM TVSGBDF CZ BO BEVMU XJUI BO BEVMU IFMQFS 1MBDF JO B GMBU BSFB PG ZPVS ZBSE UP NJOJNJ[F HSPVOE QSFQBSBUJPO t %P OPU JOTUBMM IPNF QMBZHSPVOE FRVJQNFOU PWFS DPODSFUF BTQIBMU QBDLFE FBSUI HSBTT DBSQFU PS BOZ PUIFS IBSE TVSGBDF " GBMM POUP B IBSE TVSGBDF DBO SFTVMU JO TFSJPVT JOKVSZ UP UIF FRVJQNFOU VTFS t $IPPTF B MFWFM MPDBUJPO GPS UIF FRVJQNFOU 5IJT DBO SFEVDF UIF MJLFMJIPPE PG
IT IS IMPORTANT TO CHECK AND TIGHTEN ALL HARDWARE AT THE BEGINNING AND DURING THE SEASON AS THEY MAY LOOSEN DUE TO WOOD EXPANSION AND CONTRACTION.
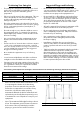
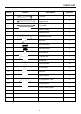
3$576 /,67 3DUW 1R 3LFWXUH 'HVFULSWLRQ 4XDQWLW\ A 7RS %DU % 6XSSRUW /Hg 8 & &URVV %DU ' *URXQG 6WDNH 4 ( MHWDO %UDFNHW &RQQHFWLQg 7XEH (\H %ROW 6 3 %ROW M8*6 PP 4 4 %ROW M8*50PP 8 5 Flat WaVKHU 4 6 Trapeze Bar 1 &DUDELQHU 6 8 Nylon Nut M8 26 9 $UF WDVKHU 48 WUHQFK $OOHQ WUHQFK 1 Flying Saucer Tube 8 13 Flying Saucer 2 14 Saucer Swing Rope 4
"TTFNCMZ *OTUSVDUJPO 5JHIUFOJOH #PMUT /VUT t t 1MBDF UIF QMBZHSPVOE FRVJQNFOU PO MFWFM HSPVOE OPU MFTT UIBO GU GSPN BOZ TUSVDUVSF PS PCTUSVDUJPO TVDI BT B GFODF HBSBHF IPVTF PWFSIBOHJOH CSBODIFT MBVOESZ MJOFT PS FMFDUSJDBM XJSFT %P OPU PWFS UJHIUFO UIF OVUT BOE CPMUT XIFO ZPV BSF BTTFNCMJOH ZPVS QMBZHSPVOE FRVJQNFOU 5IJT XJMM BMMPX GPS TPNF QPTTJCMF BEKVTUNFOUT BOE FBTF PG JOTUBMMBUJPO t t %P OPU JOTUBMM UIF QMBZHSPVOE FRVJQNFOU PWFS DPODSFUF BTQIBMU QBDLFE FBSUI PS BOZ PUIFS IBSE TVSGBDF
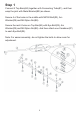
Step 1 Connect 2 Top Bars(#A) together with Connecting Tube(#1), and then wrap the joint with Metal Bracket(#E) as shown. Secure 4 of the holes in the middle with M8*60 Bolt(#3), Arc Washer(#9) and M8 Nylon Nut(#8). Secure the rest 6 holes on Top Bar(#A) with Eye Bolt(#2), Arc Washer(#9) and M8 Nylon Nut(#8). And then attach one Carabiner(#7) to each Eye Bolt(#2). Note: For easier assembly, do not tighten the bolts to allow room for adjustment.
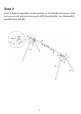
Step 2 Insert 4 Support Legs(#B) into the sockets on Top Bar(#A) as shown. Align the holes on left side and secure with M8*50mm Bolt(#4), Arc Washer(#9), and M8 Nylon Nut(#8).
Step 3 Insert the rest 4 Support Legs(#B) into sockets as shown, and attach the Cross Bar(#C). Align the hole and secure with M8*50mm Bolt(#4), Flat Washer(#5), Arc Washer(#9) and M8 Nylon Nut(#8).
Step 4 Insert the Ground Stake(#D) into the bottom opening of the Support Leg(#B), and then into the ground.
Step 5 Slide the Tube(#12) into the sleeve of Flying Saucer(#13), and then connect the 4 tubes together. Step 6 Insert the EROW end of the Swing Rope(#14) into the hole where the 2 frame tubes connect, use Arch Washer(#9) and M8 Nylon Nut(#8) to secure.
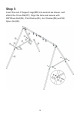
Step 7 $WWDFK the other end of the Swing Rope(#14) into the Carabiner(#7) secured to Top Bar(#A).
Step 8 Attach the Trapeze Bar(#6) to the Carabiner(#7) in the middle.
Step 9 Attach the other Saucer Swing(#14) into the Carabiner(#7)secured to Top Bar(#A). Now you have finished assembling your swing set. Go back and tighten all bolts and nuts securely before using the playset.