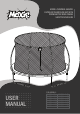
MOXIE™ PUMPKIN-SHAPED OUTDOOR TRAMPOLINE SET WITH PREMIUM TOP-RING FRAME SAFETY ENCLOSURE FOR MODELS: USER MANUAL MXSF03-6-BL MXSF03-6-OR MXSF03-8-GA MXSF03-8-GR MXSF03-10-OR MXSF03-10-BK MXSF03-12-GA MXSF03-12-BL MXSF03-14-DG MXSF03-14-GR MXSF03-15-GA MXSF03-15-BK MXSF03-16-BL MXSF03-16-DG
By Upper Bounce USA UK Call us 1-888-965-3331 020-3150-0484 Email us support@upperbounce.com support@upperbounce.co.uk Check out our website www.uppperbounce.
GENERAL INSTRUCTIONS Included in this manual are instructions for: Proper assembly, care and maintenance of product, safety tips, warnings, and proper use; in order to ensure a secure and fun use of the trampoline. All users and supervisors must read and familiarize themselves with all these instructions and all other information in this manual. As with any type of recreational physical activity, without being careful participants can be injured.
Never set up the trampoline in rainy, windy or stormy conditions, especially lightening conditions. It is recommended that the trampoline be anchored with ground stakes. Do not alter the product; use it only as described in this manual. Care and Maintenance Always inspect the trampoline before each use. Check for damage, wear or defective parts, as they can impair the overall safety of the trampoline. The damaged, worn, or defective parts should be replaced immediately.
Do not perform somersaults on the trampoline as this will increase the chances of landing on your head or neck, paralysis or even death can result. Children do not recognize the potential dangers of this product, so do not allow your children to play on this product without adult supervision. Warnings Secure the trampoline against unauthorized use. Do not use during pregnancy or if suffering from high blood pressure.
Proper Use The maximum weight allowed on the trampoline is 500 lbs. Overloading the trampoline above the recommended user weight will cause damage to the trampoline. No more than one person at a time should be allowed on the trampoline! Avoid unsupervised use of the trampoline. Do not use the trampoline if it is wet. Do not wear shoes while jumping; this will damage the jumping mat. Do not sit or lean on the cover pad as it needs to be flexible so it can move with the jumping mat.
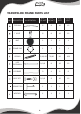
TRAMPOLINE FRAME PARTS LIST PART DESCRIPTION ILLUSTRATION QTY. QTY. 6/8/10FT 12/14FT QTY. 15FT QTY.
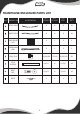
TRAMPOLINE ENCLOSURE PARTS LIST PART DESCRIPTION QTY. QTY. 6/8/10FT 12/14FT ILLUSTRATION QTY. 15FT QTY.
ASSEMBLY INSTRUCTIONS Two adults are required for the folling assembly. For your safety, you should wear suitable gloves. Failure to follow these instructions can result in injury. Step 1 : Assembling the frame The upper rail (part A) has 2 different ends - one side is narrow, the other side is wider. Please put the T-piece (part B) on the wide end of the upper rail part A). Please repeat this for all the other upper rails.
Step 3 : Please screw the “vertical leg extensions” (part F) to the leg base (part G). Please use the bolts (part H) for this. Step 4 : Assemble the legs (in step 3) with the frame (in step 2). Caution! Please note that all bolts point to the center of the frame.
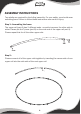
Step 5 : Assembly of the jumping mat Use caution when installing the jumping mat. Two people, work gloves, and proper attire are recommended. 1) Unfold the jumping mat inside the ring. 2) Please attach the springs. The narrower opening of the spring (A) goes into the jumping mat eyelet. Using the spring tool (part I) please pull the wider opening of the spring (B) towards the frame and insert the spring.
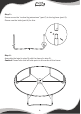
3) Please repeat this process for all springs one after the other. So that the tension of the jumping mat is evenly distributed, please note the following figure and keep to the sequence of the spring assembly. 1ST 7TH 5TH 10TH 12TH 4TH 3RD 9TH 11TH 8TH 6TH 2ND Caution: Please be careful not to injure your fingers. As mentioned at the beginning, please use gloves! 4) Installation of the frame pad Please place the edge cover (part D) over the springs and the steel frame.
ENCLOSURE ASSEMBLY For your safety, it is recommended that assembly is done by 2 adults wearing working gloves. Step 1 : Please connect the poles to each other by inserting the lower enclosure pole (enclosure part B) into the upper enclosure pole (enclosure part A) securing it with the safety pin. Repeat this process for all other bars. Step 2 : Slide the pole sleeve (Enclosure Part F) over each of the assembled bars.
Step 4 : Hold the enclosure net (Enclosure Part C), with sleeves facing up. Pull each section of the fiberglass rod (Enclosure Part D) through each sleeve on the net. Connect the ends together forming a circle. This is easier when two people hold the net. Step 5 : A. Align the two parts of the Pole Clip (Enclosure Part E) according to the below diagram. B. Insert over each open section of the fiberglass loop. C.
Step 6 : Pull back the frame pad for better visibility. Align the bottom hem of the enclosure net to the eyelet rings on the jumping mat and insert the Rope (Enclosure Part I) alternating between the slits in the jumping mat, and the eyelet rings. R R Congratulations you have completed the trampoline assembly! Remember to abide by all the safety rules. Have fun, play safe...
JUMP LIKE A PRO! 1. Standing starting position, feet shoulder-width apart, head straight and eyes on the jumping mat. 2. Swing your arms forwards and up in a circular motion. 3. Bring your feet together in the air, toes pointing down. 4. When landing on the jumping mat, the feet must be shoulder-width apart again. 1. Start with a basic jump. 2. Land on your knees, keeping your body and back straight. Keep your balance with your arms. 3. Jump back to the basic jump position by swinging your arms. 1.
Dispose of the packaging Please recycle all parts appropriately. Paper, cardboard, and plastic should be disposed to correct recycle areas according to your local recycling laws.