
Instructions / Assembly
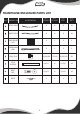


1
ST
2
ND
6
TH
11
TH
5
TH
7
TH
12
TH
10
TH
3
RD
4
TH
9
TH
8
TH
3) Please repeat this process for all springs one after the other.
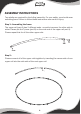
So that the tension of the jumping mat is evenly distributed, please note the
following figure and keep to the sequence of the spring assembly.
Caution: Please be careful not to injure your fingers. As mentioned at the begin-
ning, please use gloves!
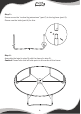
4) Installation of the frame pad
Please place the edge cover (part D) over the springs and the steel frame. Attach
the elastic bands of the edge cover to the frame.
11