
Instructions / Assembly


Page 2 of 72
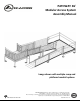
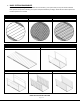
PATHWAY 3G
®
Modular Access System
Assembly Manual
ATTENTION INSTALLER and END USER
For residential use only!
1,000 Lb. weight capacity.
Read this manual in its entirety, ensuring you understand all instructions and warnings prior to ramp
assembly and use.
INSTALLER: Please leave this ASSEMBLY MANUAL with the end user.
Please read and become familiar with the ‘MAINTENANCE AND SAFETY’ section of this manual.
Fill out online warranty registration.
TOOLS TYPICALLY REQUIRED
1/2″ SOCKET OR 1/2″ WRENCH
9/16″ SOCKET OR 9/16″ WRENCH
5/16″ SOCKET OR 5/16″ WRENCH
LEVEL
FILE
RUBBER MALLET
POWER DRILL
25’ TAPE MEASURE
#2 PHILLIPS HEAD SCREW DRIVER PLIERS
5/16″ DRILL BIT (IF BRACE ASSEMBLIES ARE
USED)
5/32″ ALLEN WRENCH (INCLUDED)
3/16″ ALLEN WRENCH (INCLUDED)
BOX KNIFE
HAMMER
1/4″ MASONRY DRILL BIT (USED WHEN
INSTALLING TO CONCRETE PORCH, STEP, ETC.)
DIGGING TOOLS (IF AN OBSTACLE NEEDS TO BE
REMOVED)
HACKSAW (FOR OPTIONAL HANDRAIL KITS)
VIEW PACKING LIST
Each ramp system is shipped with a packing list. Be sure to check that all items and tools are present before starting
installation.
SYMBOL MEANINGS
The WARNING symbol indicates a potentially hazardous condition/situation. The safety warnings
throughout this manual, and on your equipment, if any, are for the protection of people and property.
Failure by any operator to abide by safety warnings will result in a waiver of all liabilities, loss of your
warranty, and could result in equipment damage and or failure, property damage, risk of serious bodily
injury, and or death. The symbol may appear in various colors and in conjunction with other symbols.
The NOTE symbol indicates important information. Failure to obey all notes could result in improper
operation, less-than-optimum equipment performance, and at the sole discretion of the equipment
manufacturer, may void your warranty. The symbol may appear in various colors and in conjunction with
other symbols.