
Full Product Manual


www.sureheat.com
200378-01A6
Suitable for Outdoor Use. Approved for Use on Combustible Floors.
Approprié pour l’utilisation extérieure. Approuvé pour utilisation sur les
planchers combustibles.
Apropiado para usar al aire libre. Aprobado para uso en pisos combustibles.
ASSEMBLED IN THE USA
ASSEMBLE AUX ETATS-UNIS
ENSAMBLADA EN LOS EE.UU.
SHM International Corp.
3140 Moon Station Road
Kennesaw, GA 30144
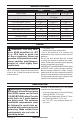
Models/Modelos/Modèles
RH80T
80,000 BTU/Hr
Type of Fuel Oil
Type de Mazout/Tipo de Fuel Oil
No.1/No.2 Kerosene
No.1/No.2 Diesel
No.1/No.2 Fuel Oil
200353-01A
Read Owner’s Manual Before Use
START
1. Fill tank with kerosene, #1/#2
diesel/fuel oil, JET A, or JP-8
fuels.
2. Plug power cord into
120V/60hZ grounded outlet
through a 3-prong grounded
extension cord.
3. Turn thermostat knob to
desired setting.
Light will flash and heater will
start within 8 seconds.
RESET
1. Wait 2 minutes before
restarting.
2. Turn thermostat knob to
STANDBY for 10 seconds.
Then restart heater.
STOP
1. Turn thermostat knob to
STANDBY.
2.
Unplug heater when not in use.
Fuel Consumption 0.60 Gal/Hr
Consommation de carburant 2,3 litres/h
Consumo de combustible 2.3 litros/h
Pump Pressure 3.8 PSI
Pression de la pompe/Presión de la bomba
Electrical Input 120V/60Hz
Alimentation électrique/Entrade eléctrica
2.9 Amps,1O
Line Fusing 15 or 20 Amps
Fusible indépendant/Linea de fusible Ampéres/Amperios
Lisez le manuel du propiétaire
avant utilisation
DÉMARRAGE
1. Remplissez le réservoir avec du
kérosene, du diesel et mazout n
1 et n 2, du carburant JET A ou
JP-8.
2. Branchez le cordon électrique
dans la prise de terre 120 V/60
Hz avec un rallonge avec mise à
la terre à 3 fiches.
3. Tourner le bouton du thermostat
à la position désirée.
Lumière clignote et chauffage va
commencer dans les 8 secondes.
RÉINITIALISATION
1. Patientez deux minutes avant de
réinitialiser.
2. Tourner le bouton du thermostat
sur STANDBY pendant 10
secondes. Puis redémarrez
chauffe.
ARRÊT
1. Tourner le bouton thermostat sur
STANDBY.
2. Débranchez le chauffage lorsqu’il
n’est pas utilisé.
Lea el manual del propietario
antes de su uso
ENCEDIDO
1.
Llene el tanque con kerosene,
diesel o aceite combustible n° 1 ó
n° 2 combustibles JET A ó JP-8.
2. Conecte el cable de
almentación a un tomacorriente
con conexión a tierra de 120
V/60 Hz a través, de un cable
de extension con conexion a
tierra de tres patas.
3.
Gire la perilla del termostato
a la posición deseada. La luz
parpadea y el calentador
comenzará dentro de 8 segundos.
RESTABLECER
1. Espere dos minutos antes
de restablecer.
2. Gire la perilla del thermostato
en STANDBY durante 10
segundos. A continuación,
reinicie el calentador.
APAGAR
1. Gire la perilla del
termostato en STANDBY.
2. Desenchufe el calentador
cuando no se utilice.
With Thermostat
Con thermostato
Avec thermostat
Fuel Tank Capacity 5.5 Gal
Capacité du réservoir de carburant 20,8 litres
Capacidad del tanque de combustible 20.8 litros
Maximum Outlet Temperature 753°F
1 ft. in front of heater 401°C
Température de sortie maximale 20,5 cm
(1 pi) devant l’appareil de chauffage
Temperatura máxima de salida a 20 cm
(1 pie) frente al calentador
Please call 1-800-229-5647 for assistance, parts or service.
Por favor llame 1-800-229-5647 para asistencia técnica, repuestos o servicio.
S'il vous plaît appelez 1-800-229-5647 pour assistance, de pièces ou service.
Patents
(Other Patents Pending)
5,567,144 8,430,666
D670,369
Canadian Patents:
2,184,532 146,580
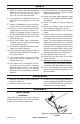
IMPORTANT: Review and un-
derstand the warnings in the
Safety section, pages 2 and 3.
They are needed to safely oper-
ate this heater. Follow all local
ordinances and codes when
using this heater.
TO START HEATER
1. Follow all ventilation and safety information.
2. Locate heater to provide maximum circu-
lation of the heated air. Follow all location
requirements noted in Safety, pages
2 and 3.
3. Fill fuel tank with fuel and attach fuel cap.
Use only kerosene, #1/#2 diesel/fuel oil,
JET A or JP-8 fuels to avoid risk of re or
explosion. Never use gasoline, oil drained
from crank cases, naphtha, paint thinners,
alcohol or other ammable fuels.
4. Plug heater’s power cord into approved,
grounded, three-wire extension cord.
Extension cord must be at least 6 feet
(1.8 m) long.
Extension Cord Size Requirement
• 6 to 10 feet (1.8 to 3 m) long, use 18
AWG (0.75 mm
2
) rated cord
• 11 to 100 feet (3.3 to 30.5 m) long, use
16 AWG (1.0 mm
2
) rated cord
• 101 to 200 feet (30.8 to 61 m) long, use
14 AWG (1.5 mm
2
) rated cord
5. Plug extension cord into standard 120
volt/60 hertz, 3-prong grounded outlet.
6. Turn thermostat knob to the desired tem-
perature setting.
If thermostat set temperature is higher
than the surrounding air temperature,
heater should ignite immediately. If heater
thermostat set temperature is lower than
surrounding air temperature, heater will
not ignite. Exposure to direct sunlight
or extreme cold may affect temperature
reading and/or thermostat operation.
The LED will ash for 8 seconds before
ignition. The LED will remain on during
heater operation, even if the heater is
cycled off by the thermostat. The LED will
ash rapidly if the heater shuts down for
any reason (Example: If out of fuel).
WARNING: This heater is
equipped with a thermostat.
Heater may start at any time.
TO STOP HEATER
1. Turn thermostat knob counterclockwise
to STANDBY.
2. Unplug heater when not in use.
TO RESET HEATER
1. Wait two minutes before restarting.
2. Turn thermostat knob to STANDBY for 10
seconds, then restart heater.
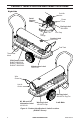
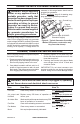
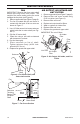
OPERATION
Figure 3 - Controls Display
Thermostat Knob
LED Light