
User's Manual


- 6 -
INSTALL AND TURN ON R3
You can mount the R3 on the windshield (1- and 2- cup suction brackets included) or on the dashboard (hook
and loop tape included).
INSTALL/POWER ON
Windshield
When you mount the R3 on the windshield, mount it in the middle of the windshield between the driver and
passenger. Be sure there are no obstructions and that there is a clear view through the windshield.
1. Attach the rubber suction cups to the bracket and push the cups firmly onto the windshield.
2. Slide the unit onto the bracket until it clicks into place.
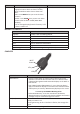
3. Plug the power cord RJ45 connector into the R3 and plug the cigarette lighter adapter into the vehicle’s
cigarette lighter.
4. When the vehicle turns on, the R3 automatically turns on and runs through a self test cycle.
Release the R3 from the bracket by pressing the Eject key on top of the detector.
Dashboard
The same types of mounting requirements for the windshield apply for mounting the unit on the dashboard.
1. Attach the unit to the dashboard using the hook and loop fastener tape.
Be careful not to cover any air vent holes with the hook and fastener tape.
2. Plug the power cord RJ45 connector into the R3 and plug the cigarette lighter adapter into the vehicle’s
cigarette lighter.
3. When the vehicle turns on, the R3 automatically turns on and runs through a self test cycle.
Pull the unit from the dashboard, separating the hook and loop tape.
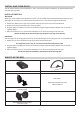
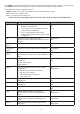
WHAT’S IN THE BOX
R3 Radar Detector 12V DC Power Cord with RJ45 Connector
Not Shown:
Hook and Loop Fastener Tape
Owner’s Manual
Windshield Mounting Bracket
(1 Suction Cup)
Windshield Mounting Bracket
(2 Suction Cups)