UBC3300XLT OM 5/14/04 3:28 PM Page i UBC3300XLT SCANNER
UBC3300XLT OM 5/14/04 3:28 PM Page ii
UBC3300XLT OM 5/14/04 3:28 PM Page iii Contents Introduction ...........................................................................................1 Front View ............................................................................................2 Icon Display ..........................................................................................3 UBC3300XLT SHORTCUTS ................................................................4 Important Notice ........................................
UBC3300XLT OM 5/14/04 3:28 PM Page iv Programming and Receiving Trunked Systems .................................45 STEP1: Selecting or Changing Trunking System Type..................45 STEP2: Programming Trunking Frequencies.................................46 STEP3: Programming ID Scan List Manually.................................47 Scan Lists .......................................................................................47 Setting the Squelch ..................................................
UBC3300XLT OM 5/14/04 3:28 PM Page 1 Introduction The UBC3300XLT is a state-of-the-art radio with TrunkTracker III and automatic scanning capabilities. It can store frequencies such as police, fire/emergency, marine, railroad, air, amateur, and other communications into 10 banks of 100 channels for a total of 1000 channels.
UBC3300XLT OM 5/14/04 3:29 PM Page 2 Front View 11 12 1 13 2 14 3 UBC3300XLT 4 5 CH/ FRQ HOLD/ MAN 6 RSM SCAN AIR/STEP SEARCH MENU/BACK TRUNK 7 8 9 10 1. 2. 3. 4. 5. 6. 7. 8. 9. 10. 11. 12. 13. 14. 15. 16. 17. 18. 19. 20. 21. 22. 23. 15 16 17 18 19 20 21 L/O REVERSE SELECT .
UBC3300XLT OM 5/14/04 3:29 PM Page 3 Icon Display ICON P L /O DESCRIPTION Priority Channel Indicator Lock Out Mode Indicator Scan/Search Direction Indicator SRCH Chain Search Mode Indicator SRVC Air Service Search Mode Indicator SCAN Scan Mode Indicator ID SCAN ID SEARCH C M L E AM,FM WFM,NFM ID Scan Mode Indicator ID Search Mode Indicator Channel Type Conventional Type Trunk Type Morola Tracking Type LTR Tracking Type EDACS Tracking Type Receiving Mode Indicators Signal Meter Battery Indicat
UBC3300XLT OM 5/14/04 3:29 PM Page 4 UBC3300XLT SHORTCUTS MENU/ BACK 3 2 1 MENU/ BACK MENU/ BACK 3 1 1 MENU/ BACK 1 3 3 2 3 1 1 3 9 1 2 the neat entry Programming. MENU/ BACK 3 4 1 MENU/ BACK Rotate the VFO control to enter the text and using RSM or HOLD/MAN to move the cursor. After the text is entered, press E (for example; replace the frequency on channel 5 to 155.
UBC3300XLT OM 5/14/04 3:29 PM Page 5 UBC3300XLT SHORTCUTS To set up a system for trunk tracking, select a bank, then enter the trunk type. MENU/ BACK 6 1 2 1 select bank SEARCH MENU/ BACK 2 2 E 1 1 Then enter the trunk type you want to track. Press E . To change the alpha tag on the specific search range of frequencies that you set, do the following: MENU/ BACK 1 select range 2 2 E 1 To begin searching between the Range press SEARCH .
UBC3300XLT OM 5/14/04 3:29 PM Page 6 Important Notice • The installation, possession, or use of this scanning radio in a motor vehicle may be prohibited, regulated, or require a permit in certain states, cities, and/or local jurisdictions. Your local law enforcement officials should be able to provide you with information regarding the laws in your community.
UBC3300XLT OM 5/14/04 3:29 PM Page 7 Terminology What is Scanning? Unlike standard AM or FM radio stations, most two-way communications do not transmit continuously. The UBC3300XLT scans the Frequencies you have programmed into the Scanner’s channels until it finds an active frequency. Scanning stops on an active frequency and remains on that channel as long as the transmission continues. When the transmission ends, the scanning cycle resumes until another transmission is received.
UBC3300XLT OM 5/14/04 3:29 PM Page 8 replies for a few seconds, they are removed from the frequency so another talkgroup can use it. Sharing of the available public service frequencies, or trunking, allows cities, counties, or other agencies to accommodate hundreds of users with relatively few frequencies. Following a conversation on a trunked system using a scanner is difficult, if not impossible.
UBC3300XLT OM 5/14/04 3:29 PM Page 9 Feature Highlights • Trunk Tracking – Follow VHF High Band UHF 800/900MHz trunked public safety and public service systems just as if conventional two-way communications were used. • Multi-Track – Track more than one trunking system at a time. Scan conventional and trunked systems at the same time. • 1000 Channels – Program one frequency into each channel. You must have at least one channel programmed to use the Scan mode.
UBC3300XLT OM 5/14/04 3:29 PM Page 10 • Text Tags – You can customize your scanner by storing text tags (up to 16 characters). • Auto Store – The scanner automatically stores found active frequencies into an assigned bank. • CTCSS/DCS – The scanner can receive and search for subaudible tones. • LCD Back-Light – LCD illuminates when you press the Light/Lock ( ) key. You can select the lighting length of time in the Menu mode.
UBC3300XLT OM 5/14/04 3:29 PM Page 11 Where to Obtain More Information Before using your scanner, you must program frequencies into available channels. To obtain frequency information for your area, contact your local dealer. Information on the Internet If you have access to the internet, you may want to visit the following website for additional information: www.bearcat1.
UBC3300XLT OM 5/14/04 3:29 PM Page 12 Included with Your Scanner Package If any of these items are missing or damaged, immediately contact your place of purchase.
UBC3300XLT OM 5/14/04 3:29 PM Page 13 Setup Installing the Battery Pack 1. Open the cover. 2. Connect the battery pack connector observing the correct polarity. 3. Replace the cover and press down until it clicks into place. Charging the Battery Pack Use the AC Adapter/Charger to power the UBC3300XLT from an AC outlet. CH/ FRQ RSM HOLD/ MAN SCAN AIR/STEP SEARCH You can use your scanner while the battery charges.
UBC3300XLT OM 5/14/04 3:29 PM Page 14 Flexible Antenna Attach the flexible antenna to the antenna connector. Beltclip The beltclip is designed to fit snugly on the back of the scanner. Line up the four arms on the beltclip with the four tabs on the scanner and slide the beltclip into place, as shown on the right. Listening Safely To protect your hearing, follow these guidelines when you use an earphone or headphones. • Do not listen at extremely high volume levels.
UBC3300XLT OM 5/14/04 3:29 PM Page 15 Basic Operation Turn the Scanner On Turn the VOLUME control clockwise out of the detent position. The scanner automatically starts scanning. Since there are no frequencies programmed in your scanner initially, you may not receive any signals. Once you set the squelch and program some frequencies, you will begin hearing conversations regularly.You can select the type of the frequency when you turn the unit ON.
UBC3300XLT OM 5/14/04 3:29 PM Page 16 Next you must program some frequencies (page 26). It is recommended that you read the next part "Understanding the Menu System" because it will assist you in accessing and understanding many of the features. Later in a section called "Additional Features", you will find explanations on how to disable the keypad acknowledgement tones, mute the audio, change the appearance of the display and other general features.
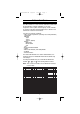
UBC3300XLT OM 5/14/04 3:29 PM Page 17 • ID Search mode/ID Search Hold mode 1:SERVICE OPTION MENU MODE 2:SCAN OPTION 3:SYSTEM OPTION Menu Description and Numeric Keypad Equivalents Below are the Menu screens and a brief description or purpose of the feature. 1:SERVICE OPTION 1:AIR The Air Service Search feature allows you to scroll through the preprogrammed services. 2:CHAIN SEARCH You can program up to 10 search ranges. The first time you program a range you will need to do so through the Menu.
UBC3300XLT OM 5/14/04 3:29 PM Page 18 4:ALPHA TAG You can enter an Alpha Tag for any or all of the search ranges. 5:TRUNK During Chain Search mode, when the scanner finds an active frequency. The trunk tracking system will be active. Four frequency plans apply to the Control Channel Only feature (for details see page 69). 3:DELAY Set the delay for the search ranges to 1:ON or 2:OFF. This applies to Search mode (See 2:SCAN OPTION / 1:CONVENTIONAL / 2:DELAY for details).
UBC3300XLT OM 5/14/04 3:29 PM Page 19 2:SCAN OPTION 1:CONVENTIONAL Choose the channel number. The following options are available for the selected channel only. Repeat using a different channel number, if necessary. 1:FREQUENCY Allows you to edit or enter a frequency in each channel you select. Also you can set an alphanumeric text tag for each programmed frequency. 2:DELAY The delay for all programmed channels is 2 seconds.
UBC3300XLT OM 5/14/04 3:29 PM Page 20 The RF Attenuation feature works in all modes and attenuates (reduces) the incoming signal strength to prevent stronger signals from overloading the scanner. 6:STEPS Your UBC3300XLT is programmed with default step sizes for each frequency range (see page 1). Steps are important if you are interested in using the VFO to tune off from a frequency programmed into memory or if you wish to program a frequency that the default step size will not accept.
UBC3300XLT OM 5/14/04 3:29 PM Page 21 2:TRUNK CHANNEL 1:FREQUENCY To use Trunk Tracking, you need to program a frequency for at least one channel. Also you can enter an alpha tag for each channel in this Menu. 2:STEPS You can assign a variety of step sizes to the channel. 3:TALK GROUP You can program IDs into the Scan List memory either during Trunk Scan or Search without going into the Menu. However, you can also use the Menu to program IDs.
UBC3300XLT OM 5/14/04 3:29 PM Page 22 7: ACTIVITY ID When activity ID is set to ON, your scanner receives any transmissions on the ID every 0.5 seconds while scanning. 8:I-CALL (MOTOROLA/EDACS) Most communications within a trunked system are group calls where one unit (such as a dispatcher) communicates with all the units within his/her group (all the patrol vehicles on the east side of town, for example). The units within this group comprise what is typically known as a talkgroup.
UBC3300XLT OM 5/14/04 3:29 PM Page 23 9:STATUS BIT (MOTOROLA) On Type 2 trunking systems there is a method by which specialized types of communications utilize unique talkgroup numbers. An emergency call will occur on a unique talkgroup from its primary assignment, for example. Because the UBC3300XLT defaults to Status-Bit ON mode, you never need to worry about missing these transmissions.
UBC3300XLT OM 5/14/04 3:29 PM Page 24 3:SYSTEM OPTION 1:DIMMER Allows you to change the brightness of the display. Also you can change the lighting length of time. 2:SCREEN MASK Screen Mask allows you to limit what appears on the display to the alpha tags that you have set for a channel along with a few function icons. Screen Mask removes the frequency, receiving mode tone data and signal strength bars.
UBC3300XLT OM 5/14/04 3:29 PM Page 25 1. CSQ - The default setting is CSQ (carrier squelch). In this mode the scanner will stop on any transmission on a programmed frequency (Squelch mode does not apply to trunking). 2. TONE SQ - In Tone Squelch mode, if you have set a subaudible tone (CTCSS or DCS) for a frequency, the scanner will only stop on that frequency if the transmission includes the prescribed tone. 3.
UBC3300XLT OM 5/14/04 3:29 PM Page 26 Programming Before the UBC3300XLT can begin conventional scanning, you must program a frequency into at least one channel. Repeat this procedure for each channel you want to program. Storing Frequencies into Channels in Menu Mode 1. Select frequencies you received from your dealer, from various sources on the internet, or from one of the guides listed on page 11. 2. Press MENU/BACK. 3. Select 2:SCAN OPTION / 1:CONVENTIONAL by rotating the VFO and pressing E. 4.
UBC3300XLT OM 5/14/04 3:29 PM Page 27 • If you enter a channel or frequency which is out of the scanner’s range, a beep will sound and ERROR appears on the display. C 010 512.0000 FM ERROR OUT OF CHANNEL • For each channel, you can also change the step size or the mode. (See page 92.) C 010 512.0000 FM ERROR OUT OF BAND Deleting a Stored Frequency To delete a stored frequency: a. Select a channel. b. Press 0. c. Then press E. 0000.
UBC3300XLT OM 5/14/04 3:29 PM Page 28 Transfer Frequencies You can transfer a frequency that has been stored in a channel to another channel. 1. Press HOLD/MAN. 2. Press TRANSFR, and the smallest empty channel number along with the frequency will flash on the display. 3. Press E and the frequency can be stored in this channel. 4. If you want to enter it into another channel, select another channel by rotating the VFO and pressing E.
UBC3300XLT OM 5/14/04 3:29 PM Page 29 3. Select the channel number by rotating the VFO and pressing E. You can also enter the channel number by using the keypad and then press E. 4. Select 1:FREQUENCY and ALPHA TAG by rotating the VFO and pressing E. C 001 855.0000 FM ALPHA TAG ¡ Note: You can only assign a text tag to the channel where the frequency is stored. 5. The cursor appears on the display. Rotate the VFO to change letters, and press HOLD/MAN or RSM to move right or left.
UBC3300XLT OM 5/14/04 3:29 PM Page 30 Programming Tips • Group similar services into a bank. For example, program police frequencies in channels 1 through 10 and fire/emergency into channels 51 through 60, and so on. • Put the frequency that you listen to the most or the most important frequency into a Priority channel. • To quickly program a series of channels, start with the lowest number channel.
UBC3300XLT OM 5/14/04 3:29 PM Page 31 Scanning 1. After programming frequencies, C 001 simply press SCAN to begin scanning. SCAN During scanning, when you rotate the Bank 1234567890 VFO, you can select the direction (↑ or ↓) you want to scan. 2. The bank indicators selected for scanning appear on the display, and the bank being currently monitored flashes. You can deselect banks from active scanning by entering their number on your keypad.
UBC3300XLT OM 5/14/04 3:29 PM Page 32 2. Press TRNSFR, and the smallest empty channel number flashes on the display. 3. Press E. CH/ FRQ HOLD/ MAN RSM SCAN AIR/STEP SEARCH MENU/BACK TRUNK L/O Note: • If you want to change the channel, rotate the VFO. REVERSE SELECT . E • If the frequency you want to store exists already, WARNING appears on the display and you will hear a beep. (See “Duplicate Frequency Alert” on page 27).
UBC3300XLT OM 5/14/04 3:29 PM Page 33 1:CONVENTIONAL by rotating the VFO and pressing E. 3. Select the channel number of the stored frequency to be delayed by rotating the VFO and pressing E. 4. Select 2:DELAY and press E. 5. Rotate the VFO to select 1:ON or 2:OFF and press E. 6. For Search mode, select 1:SERVICE OPTION / 2:CHAIN SEARCH/3:DELAY by rotating the VFO and pressing E, then set to 1:ON or 2:OFF the same way as the Scan mode setting.
UBC3300XLT OM 5/14/04 3:29 PM Page 34 Restoring a Locked-out Channel 1. Press HOLD/MAN. 2. Select a locked out channel. a. Enter the channel number using the keypad. b. Then press HOLD/MAN again. CH/ FRQ HOLD/ MAN RSM SCAN AIR/STEP SEARCH MENU/BACK TRUNK L/O 3. Press L/O to unlock the channel. The L/O icon disappears. REVERSE SELECT . E Restoring All Locked-out Channels You can restore all locked-out channels in a bank only when a bank is selected for scan.
UBC3300XLT OM 5/14/04 3:29 PM Page 35 Changing the Priority Channel You cannot eliminate the Priority Channel, but you can change it to any one of the 100 available channels in each bank. 1. Press HOLD/MAN. CH/ FRQ HOLD/ MAN 2. Select a new Priority Channel: a. Enter the channel number using the keypad. b. Then press HOLD/MAN again. 3. Press and hold PRI for 2 seconds to designate this channel as your new Priority Channel. Two beeps indicates that the Priority Channel has been changed.
UBC3300XLT OM 5/14/04 3:29 PM Page 36 Searching Setting a Search Range Note: First you must set the search ranges through the Menu screen prior to any searching. The UBC3300XLT can search up to 10 separate frequency ranges to help you discover new stations in your area. To set a Search Range, enter into the Menu mode. 1. Press MENU/BACK. 2. Select 1:SERVICE OPTION / 2:CHAIN SEARCH / 2:SEARCH RANGE - by rotating the VFO and pressing E. 3. Select a range number by rotating the VFO and pressing E. 4.
UBC3300XLT OM 5/14/04 3:29 PM Page 37 Caution: After you have entered the search range while still in the Menu mode, you can set your alpha tag (see page 28), change the step size of the search, change the mode or change the trunk set. Once the lower and upper parameters of your search are edited, the Menu screen backs up one level to allow you to modify the step size, receive mode, and alpha tag. Select 2:STEPS for your step size choices and then press E.
UBC3300XLT OM 5/14/04 3:29 PM Page 38 1. Press MENU/BACK. 2. Select 3:SYSTEM OPTION / SYSTEM OPTION 7:DATA SKIP by rotating the VFO 5:PC CONTROL 6:CLONE and pressing E. 3. Select 1:ON by rotating the VFO and pressing E. 7:DATA SKIP When Data Skip is active, your scanner may pause momentarily on an unwanted signal but will resume searching in 2 or 3 seconds. The Data Skip feature is active as well as Scan mode.
UBC3300XLT OM 5/14/04 3:29 PM Page 39 2. Press TRNSFR to store the frequency in the channel you selected. The smallest empty channel number flashes on the display. If necessary, you can also change the channel by scrolling the VFO. SRCH 12.5k 1240.0000 FM Range 1 C004 0000.0000 3. Press E. Note: • If the frequency you want to store exists already, WARNING appears on the display and you will hear a beep. (See “Duplicate Frequency Alert” on page 27.
UBC3300XLT OM 5/14/04 3:29 PM Page 40 C 001 1245.8500 FM 7. After the search has gone through the Bank 12--56---search range, press HOLD/MAN to AUTO STORE 6. Press SEARCH to start auto storing. stop this feature. STORE END appears on the display. You may want to let it run through the search range several times because during the first pass there may not have been any transmissions at that particular time on that frequency. Squelch (SQ) Mode The scanner can be set to the following SQ modes.
UBC3300XLT OM 5/14/04 3:29 PM Page 41 3. Rotate the VFO to select one type (1:CSQ, 2:TONE SQ, 3:TONE SEARCH) and press E. 4. To set Tone Lock mode, do the following first, then select 2:TONE SQ in step 3. 1) For Scan mode, select 2:SCAN OPTION / 1:CONVENTIONAL - select the channel number 3:TONE DATA - 1:CTCSS or 2:DCS by rotating the VFO and pressing E. With CTCSS or DCS, Tone Lock ON is set by pressing L/O.
UBC3300XLT OM 5/14/04 3:29 PM Page 42 Additional Menu Options for Searching Each of these additional menu options applies to all search ranges entered. If there is a range that you do not want an option to apply, then simply enter the range number on the numerical keypad. You will see the range number that you have selected disappears from the display. (For more information on these options refer to the "Menu Descriptions" section and "Additional Features" section.
UBC3300XLT OM 5/14/04 3:29 PM Page 43 Air Service Search The Air Service Search feature allows you to scroll through the preprogrammed services. 1. Press AIR/STEP. ––– OR ––– Another method is as follows: To set Air Service Search, enter into the Menu mode. 1. Press MENU/BACK. SERVICE OPTION 2. Select 1:SERVICE OPTION by 1:AIR 2:CHAIN SEARCH rotating the VFO and pressing E. 3. Select 1:AIR by rotating the VFO and pressing E.
UBC3300XLT OM 5/14/04 3:29 PM Page 44 To restore all skipped frequencies, press and hold L/O for 2 seconds. 44 SRVC 12.5k 118.
UBC3300XLT OM 5/14/04 3:29 PM Page 45 Programming and Receiving Trunked Systems There are three steps for programming a trunked system: 1. Program the Trunk Type – What type of system will the scanner be tracking, Motorola Type II, Type I, EDACS, LTR, etc. 2. Program the Trunked Frequencies – Within a trunked system, the frequencies are shared among all the users, called “Talk Groups”. • Within the bank you decide which channels to program the trunked frequencies. 3.
UBC3300XLT OM 5/14/04 3:29 PM Page 46 For Type 1 System, you must enter the block and fleet numbers. Please refer to “Programming a Fleet Map” on page 67 for instructions. STEP 1 is complete. No. 1 2 3 4 5 6 7 8 9 LCD display Icon TrunkingType Type 2 800 M Motorola Type 2 800 MHz Type 1 M Motorola Type 1 Type 2 900 M Motorola Type 2 900 MHz Type 2 UHF M Motorola Type 2 UHF Type 2 VHF M Motorola Type 2 VHF EDCS WIDE E EDACS Wideband 9600 baud EDCS NARROW E EDACS Narrowband 4800 baud EDCS SCT.
UBC3300XLT OM 5/14/04 3:29 PM Page 47 • If you enter a frequency which is C 010 out of the system’s trunking 0000.0000 range, a beep sounds and ERROR ERROR appears on the display. OUT OF BAND • If you enter a frequency which has been stored in another channel, you will hear a beep and the channel stored displays WARNING (Refer to “Duplicate Frequency Alert” on page 27). STEP 2 is complete.
UBC3300XLT OM 5/14/04 3:29 PM Page 48 4. Select 3:TALK GROUP by rotating the VFO and pressing E. 5. Select the ID location by rotating the VFO or using the keypad and then press E. You decide which location you want to place the Talk Group ID. (The first number represents the Scan List number and the second number represents the Memory Location number.) (Direct entry method example: enter "1-5" by M1-5 pressing 1, . (decimal key), 5.) -----6. Select 1:ID by rotating the VFO and pressing E.
UBC3300XLT OM 5/14/04 3:29 PM Page 49 To enter a LTR ID: For a LTR ID, the Area Code, Home Repeat number and ID make up the talk group ID. Please see page 64 for more information. 1. Enter the Area Code and then press . (decimal key) -----2. Enter the Home Repeater number and 0-02-120¡ ENTER ID then press (decimal key). L5-0 . 3. Enter the ID you want to store. 4. Press E. Note: To clear a stored ID while entering an ID, press 0 and E successively, and start over.
UBC3300XLT OM 5/14/04 3:29 PM Page 50 Setting the Squelch For trunked reception, a good setting for the SQUELCH control is in the center of the range with the color marker pointing up. See the illustration. If it is set too high (CCW) in some cases it could prevent your scanner from locking to the Control Channel reliably. If it is set too low (CW) it will slightly delay finding the Control Channel. The best setting is the same as for conventional reception, and is not critical.
UBC3300XLT OM 5/14/04 3:29 PM Page 51 ID Scan Mode 1. Press SCAN to begin scanning the lists you have programmed. If you haven't programmed more than 2 IDs, ERROR appears on the display. ID SCAN 867.9875 FM List 1234567890 2. To remove a Scan List from active scanning, press the number of the Scan List on your keypad. Hint: Press and hold RSM for 2 seconds, the scanner will move to the next trunking bank. The Scan List indicator turns Off, and the IDs in that list are not scanned.
UBC3300XLT OM 5/14/04 3:29 PM Page 52 ID Scan Hold Feature If you want to stop on a ID during ID scanning, press HOLD/MAN. M1-1:4128 867.8375 FM ID Tag If you want to resume scanning, press LIST Tag RSM. To directly access a specific channel: There are several ways to access a specific ID quickly. 0000.0000 C1000 Bank 10 1. Press HOLD/MAN. 2. By using the keypad or rotating the VFO, enter the ID location number (See page 47).
UBC3300XLT OM 5/14/04 3:29 PM Page 53 selected for a trunked system, press HOLD/MAN, and the radio will seek and acquire the trunked system control channel. ID Search Hold and Direct Entry ID Hold Mode Just like in Conventional Search, Hold lets you pause ID Search on an interesting transmission without storing the talkgroup into memory. If you hear an interesting ID during Search mode, and want to continue listening to it -• Press HOLD/MAN to stop the search.
UBC3300XLT OM 5/14/04 3:29 PM Page 54 talkgroups in the Utilities agency. You can do this with just a few key presses. To use ID BLOCKOUT just enter the Agency- part, or the Agency-Fleet part, of the talkgroup code and press L/O. For example, to Blockout Agency 4 in Trunk Search, press HOLD/MAN, 0, 4, . (decimal key), and then L/O. For other ways to use partial AFS entry, be sure to read the section "EDACS Reception". Review ID Lockout You can check all IDs already locked out. 1. Press MENU/BACK.
UBC3300XLT OM 5/14/04 3:29 PM Page 55 Reverse Key For Motorola and EDACS system; to change your display between the Scan List indicators and trunk bank display, press REVERSE. ID SCAN 867.9875 FM Bank 1234567890 BANK:10 MOTTYP2 ID SCAN 867.9875 FM List 1234567890 For LTR systems only, the talkgroup must be active in order to change the Scan List and bank indicators. If the talkgroup is not active, change the Scan List by using the Menu screen.
UBC3300XLT OM 5/14/04 3:29 PM Page 56 Setting Priority in Trunking Mode You can set priority in your trunking lists, just as you do in your conventional ones. You can set the priority by pressing and holding PRI for 2 seconds in ID Scan Hold mode. After you’ve set up your Scan List, press PRI to activate it. It’s very similar to conventional priority although there is no "interrupt" during the transmissions. Priorities are checked in between transmissions.
UBC3300XLT OM 5/14/04 3:29 PM Page 57 Moving between Scan List Memories There are a number of ways to step and move through your Scan List memories: 1. Press HOLD/MAN in the ID Scan mode and rotate the VFO to move to up or down. 2. Or, press HOLD/MAN in the ID Scan mode, next press 0-9 (scan list number), then press 0-9 (memory position).
UBC3300XLT OM 5/14/04 3:29 PM Page 58 You can hold any I-Call IDs. Because you can only hold on one ID, and there are two IDs involved in any I-Call communication (the transmitting and the receiving units), you might not hear the full conversation, but you probably will. ☞ In Search mode, when you hear an interesting I-Call, you can enter the instant shortcut . (decimal key) then RSM to enter I-Call Only mode. This blocks all talkgroup traffic and lets you hear just the I-Call.
UBC3300XLT OM 5/14/04 3:29 PM Page 59 After the scanner finishes checking a trunked system for activity, it will conventionally scan the other frequencies in the bank (remember, only trunking frequencies are programmed in Trunk mode). To scan a mix of trunking and conventional banks, select the banks you wish to be active, and then press SCAN. The scanner will instantly begin scanning. If you have not programmed a trunking bank with talkgroup ID’s, you will receive NO ID (----) message for that bank.
UBC3300XLT OM 5/14/04 3:29 PM Page 60 EDACS® Reception EDACS® Tracking TrunkTracker III now allows tracking of EDACS® trunked systems. Until now these widely used systems have been almost impossible to monitor with a conventional scanner. With your TrunkTracker III listening to EDACS(s) is remarkably easy, and perhaps even easier than conventional scanning. EDACS systems use 'Transmission Trunking', which means that each transmission is assigned a new frequency.
UBC3300XLT OM 5/14/04 3:29 PM Page 61 An EDACS® Trunked system This chart shows how talkgroups are organized within an EDACS system at the Agency level. The individual talkgroups cannot be shown at this scale because there are over 2000. However the chart can show the 16 Agencies in this example. The system is logical and easy to understand. EDACS systems are typically arranged in an outline structure. The system users are given blocks of talkgroups.
UBC3300XLT OM 5/14/04 3:29 PM Page 62 For example Sullivan, in decimal, uses channels from 384 to 511. This is not as easy to remember as Agency 03. But decimal is useful if you need to work from decimal talkgroup lists. To turn Emergency Alert ON/OFF, enter into the Menu mode. Select 2:SCAN OPTION / 2:TRUNK -select bank number-9:EMERGENCY ALT / 1:ON or 2:OFF by rotating the VFO and pressing E. Special EDACS® Features AFS Partial Entry Feature AFS is Uniden's method of encoding EDACS talkgroups.
UBC3300XLT OM 5/14/04 3:29 PM Page 63 EDACS systems often provide users with an 'Emergency' mode on their radios. Users in trouble can alert the dispatcher and other units and get priority access to the radio system. When a user activates Emergency mode, EMERGENCY will flash the display during the entire transmission. At the beginning of each transmission it will sound a distinctive emergency alert tone three times. To turn Emergency Alert ON/OFF, enter into the Menu mode.
UBC3300XLT OM 5/14/04 3:29 PM Page 64 LTR® Reception LTR® Tracking LTR® (Logic Trunked Radio) systems are trunking systems used primarily by business or private communications service providers, such as taxicabs, delivery trucks, and repair services. These systems encode all trunking information as digital subaudible data that accompanies each transmission. Users on an LTR system are assigned to specific talkgroups, which are identified by the radio as six digit numbers.
UBC3300XLT OM 5/14/04 3:29 PM Page 65 Motorola Reception Motorola Tracking There are really two types of Motorola trunking systems. These are usually referred to as Type I and Type II systems. Type I only occurs on some 800 MHz systems. All VHF, UHF and 900 MHz trunking systems use Type II. One important distinction between these two systems is the amount of data transmitted by each radio when its push-totalk button (PTT) is pressed.
UBC3300XLT OM 5/14/04 3:29 PM Page 66 systems usually accommodate fewer users than Type II systems. Even though there are many Type II systems, Type I systems are still in use. There are also Hybrid systems which are a combination of both Type I and Type II. Your scanner defaults to monitor Type II systems, but its possible to select a Preprogrammed Fleet Map or create a Custom Fleet Map for your area.
UBC3300XLT OM 5/14/04 3:29 PM Page 67 Note: You will now begin to see Type I Fleet-Subfleet IDs. For example, 100-12, 100-9, 000-12, 400-8, etc. See "User Defined Fleet Maps in the Appendix" for more information about Type I IDs. How do you know if the preset map is correct? You will have to listen to see if you're following complete conversations. If not, you should try another preset map.
UBC3300XLT OM 5/14/04 3:29 PM Page 68 Setting the Base, Spacing Frequencies and Offset Channel for Motorola VHF/UHF Trunked Systems To properly track Motorola VHF and UHF trunked systems you must enter what is known as the base, the spacing frequencies and offset channels for each system. To find these out, check www.bearcat1.com/free.htm and other web sites and frequency resources.
UBC3300XLT OM 5/14/04 3:29 PM Page 69 Note: • If the system is not tracking properly, you may need to try a new Base Frequency or Offset Channel or you may be missing frequencies from the system. • You can set up to three Base, Spacing and Offsets for Motorola VHF/UHF trunked systems. Toggling the Status Bit On Type II trunking systems there is a method by which specialized types of communications utilize unique talkgroup numbers.
UBC3300XLT OM 5/14/04 3:29 PM Page 70 PLAN 2: If the last three digits of frequencies are less than 869.0000 and end in one of the following three digits (125, 375, 625, or 875) and if ANY other frequencies end in (000, 250, 500, or 750) use Plan 2. PLAN 3: If the last three digits of ALL the frequencies in use end in one of the following three digits (000, 250, 500, or 750) use Plan 3. PLAN 4: If the last three digits of frequencies are less than 866.
UBC3300XLT OM 5/14/04 3:29 PM Page 71 Disconnect Tone Detect Option (End Code) When this function is disabled, the radio looks for squelch before returning to the Control Channel instead of waiting for the Disconnect Tone. Only in rare instances will you need to adjust the default settings. The condition to return to Control Channels depends on whether the signal is present or not. To set this function to ON / OFF, select 2:SCAN OPTION / 2:TRUNK - select bank number - / 0:END CODE.
UBC3300XLT OM 5/14/04 3:30 PM Page 72 Remote Interface You can communicate and program your UBC3300XLT in numerous ways with peripheral devices using the Remote Interface Cable port. This radio offers the following modes: ❖ PC Control Mode Program and control your scanner from a PC. ❖ Clone Mode Clone all the frequencies, trunking talkgroups, and fleet maps programmed into your scanner to another UBC3300XLT scanner.
UBC3300XLT OM 5/14/04 3:30 PM Page 73 Start Remote Mode and Change Transfer Speed: Through the Menu system, select 3:SYSTEM OPTION / 5:PC CONTROL by rotating the VFO and pressing E. To start Remote mode, choose from the transfer speed list except for 5:OFF. SPEED 3:9600 bps 4:19200 bps 5:OFF A unique feature of the UBC3300XLT is that all the front panel keys as well as the VFO on the radio remain operational in Remote mode.
UBC3300XLT OM 5/14/04 3:30 PM Page 74 To connect the Scanner to Scanner: Null Modem Adapter Pin connections Plug the smaller end of each of the (Optional) Remote Interface Cables into the remote ports in accordance with the direction of the marks which are on the right sides of each of the two scanners. Female DB9 1 2 3 4 5 6 7 8 9 Plug the other ends of the cables (DB-9 serial connector) together using a DB-9 to DB-9 null modem adapter, and a Gender Changer Cable available at most computer stores.
UBC3300XLT OM 5/14/04 3:30 PM Page 75 6. Press SCAN on both scanners. The data transfer begins from the Master Unit to the Slave Unit. CLONE == > MASTER UNIT During the data transfer, both scanners show the following displays. CLONE When the data transfer is complete, COMPLETE displays. CLONE == < SLAVE UNIT COMPLETE MASTER UNIT If the data transfer is not successful, the following error message will appear. CLONE ERROR MASTER UNIT Note: To clear ERROR, press . (decimal key).
UBC3300XLT OM 5/14/04 3:30 PM Page 76 Additional Features The following additional features are designed for you to customize your scanner. Once these features have been turned ON or OFF, they will remain as they are set until you reset them, even if you turn the scanner OFF and then ON again. Dimmer To change brightness of the display: 1. Press MENU/BACK. 2. Select 3:SYSTEM OPTION / 1:DIMMER / 1:DIMMER LIGHT by rotating the VFO and pressing E. 3.
UBC3300XLT OM 5/14/04 3:30 PM Page 77 Key Beep Option To choose key beep sound 1:ON or 2:OFF: 1. Press MENU/BACK. 2. Select 3:SYSTEM OPTION / 3:KEY BEEP by rotating the VFO and pressing E. 3. Select 1:ON or 2:OFF by rotating the VFO and pressing E. Screen Mask The trunk, frequency, receiving mode, and signal meter indications on the display are masked when this feature is activated (except while in Search mode). This feature reduces the amount of displayed information.
UBC3300XLT OM 5/14/04 3:30 PM Page 78 Mute On/Off To manually turn ON the Mute function, press and hold MUTE until MUTE ON is displayed. You will not hear any audio. To turn it OFF, press and hold MUTE again. Receiving Mode Selection You can also set the receiving mode, AM or FM etc., in Conventional mode or Chain Search mode. See MODE in "Menu Description" for details.
UBC3300XLT OM 5/14/04 3:30 PM Page 79 Care and Maintenance General Use • Turn the scanner OFF before disconnecting the power. • Always write down the programmed frequencies in the event of memory loss. • If memory is lost, simply reprogram each channel. The display shows 000.0000 in all channels when there has been a memory loss. • Always press each button firmly until you hear the entry tone for that key entry, unless you have turned 2:OFF the 3:KEY BEEP in the menu system.
UBC3300XLT OM 5/14/04 3:30 PM Page 80 Troubleshooting If your UBC3300XLT is not performing properly, try the following steps. Problem Suggestion Scanner won't work. 1. Check the connections at both ends of the AC Adapter. 2. Turn ON the wall switch of your room. You could be using an outlet controlled by the wall switch. 3. Move the AC Adapter to another wall outlet. 4. Check to see if Key Lock is ON (see page 76). Improper reception. 1. Check the antenna connection. 2. Move the scanner. 3.
UBC3300XLT OM 5/14/04 3:30 PM Problem When APCO P25 CARD NOT INSTALLED appears while you are using the unit.
UBC3300XLT OM 5/14/04 3:30 PM Page 82 Specifications Channel: Banks: Band Plan 1 (Initial setting) Frequency Range: 1000 10 (100 channels each) 25.0 - 29.995 MHz FM 30.0 - 79.9875 MHz FM 80.0 - 82.990 MHz FM 83.0 - 87.2875 MHz FM 87.3 - 87.950 MHz WFM 88.0 - 107.950 MHz WFM 108.0 - 136.9875 MHz AM 137.0 - 137.995 MHz FM 138.0 - 157.9875 MHz FM 158.0 - 160.590 MHz FM 160.6 - 162.5875 MHz FM 162.6 - 173.99 MHz FM 174.0 - 215.95 MHz WFM 216.0 - 224.995 MHz FM 225.0 - 399.950 MHz AM 400.0 - 405.
UBC3300XLT OM 5/14/04 3:30 PM Page 83 Glossary of Terms Alpha tag - This term refers to an alphanumeric text tag that you can enter to describe the individual frequencies that you have programmed. Rather than having to associate a specific frequency to the individuals that are using it, you can enter the actual name of the group. This will eliminate the need for memorizing the group’s frequency. Attenuator - This scanner comes with a feature to attenuate or reduce the signal strength.
UBC3300XLT OM 5/14/04 3:30 PM Page 84 used to restrict access to the repeater or receiver, or reduce interference where several stations with output frequencies in close proximity of each other make it difficult to hear the conversation you are interested in. With DCS squelching, you can eliminate the possibility of hearing unwanted conversations by selecting one of the 104 standard data burst subaudible tones.
UBC3300XLT OM 5/14/04 3:30 PM Page 85 Screen Mask - Screen Mask reduces the amount of information that appears on the display. Alpha tags that you have set for a channel along with a few function icons will appear only on the display. This mode is particularly useful in public safety vehicles where that are already overloaded with information. Screen Mask does not work in Search mode. Status Bit - This term refers to Motorola Type II systems.
UBC3300XLT OM 5/14/04 3:30 PM Page 86 Appendix Preset Fleet Maps Preset Map 1 Preset Map 2 Size Code SIZE CODE 11 SIZE CODE 11 SIZE CODE 11 SIZE CODE 11 SIZE CODE 11 SIZE CODE 11 SIZE CODE 11 SIZE CODE 11 Block 0 1 2 3 4 5 6 7 Block 0 1 2 3 4 5 6 7 Preset Map 3 Preset Map 4 Block Size Code 0 SIZE CODE 12 (SIZE CODE 12) 1 SIZE CODE 4 2 3 SIZE CODE 4 4 SIZE CODE 4 5 SIZE CODE 4 6 SIZE CODE 4 7 SIZE CODE 4 Size Code SIZE CODE 4 SIZE CODE 4 SIZE CODE 4 SIZE CODE 4 SIZE CODE 4 SIZE CODE 4 SIZE CODE 12
UBC3300XLT OM 5/14/04 3:30 PM Preset Map 9 Preset Map 10 Size Code SIZE CODE 4 SIZE CODE 4 SIZE CODE 0 SIZE CODE 0 SIZE CODE 0 SIZE CODE 0 SIZE CODE 0 SIZE CODE 0 Block 0 1 2 3 4 5 6 7 Preset Map 12 Size Code SIZE CODE 4 SIZE CODE 0 SIZE CODE 0 SIZE CODE 0 SIZE CODE 0 SIZE CODE 0 SIZE CODE 0 SIZE CODE 0 Block 0 1 2 3 4 5 6 7 Size Code SIZE CODE 0 SIZE CODE 0 SIZE CODE 0 SIZE CODE 0 SIZE CODE 0 SIZE CODE 0 SIZE CODE 0 SIZE CODE 4 Block 0 1 2 3 4 5 6 7 Preset Map 13 Preset Map 14 Size Code SIZE CO
UBC3300XLT OM 5/14/04 3:30 PM Page 88 User Defined Fleet Maps Type I Programming Information When a Type I system is designed, the address information for all the IDs are divided into 8 equal sized blocks. When you program your scanner to track a Type I system, you must select a size code for each of these blocks. When you have assigned a size code to all 8 blocks, you have defined the Fleet Map for the system you're tracking.
UBC3300XLT OM 5/14/04 3:30 PM Page 89 Finally, for most public safety systems there are some size codes which are more common. SIZE CODE 3 and SIZE CODE 4 are probably the most common, followed by SIZE CODE 10, SIZE CODE 11, and SIZE CODE 12.
UBC3300XLT OM 5/14/04 3:30 PM Page 90 REVERSE LIST Range 29.520 - 29.580 29.620 - 29.680 52.010 - 52.990 53.010 - 53.990 143.750 143.900 144.510 - 144.890 145.110 - 145.490 146.010 - 146.385 146.415 - 146.505 146.595 146.610 - 146.985 147.000 - 147.390 147.415 - 147.505 147.595 147.600 - 147.990 148.125 148.150 222.120 - 223.380 223.720 - 224.980 420.000 - 424.9875 425.000 - 429.9875 440.000 - 444.9875 Offset +0.1 MHz -0.1 MHz +1 MHz -1 MHz +4.375 MHz +4.25 MHz +0.6 MHz -0.6 MHz +0.
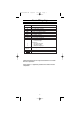
1 SERVICE OPTION AIR CHAIN SEARCH 1 2 1: ON/ 2:OFF 1: ON/ 2:OFF 1: CTCSS/ 2: DCS/ 3: OFF 1: ON/ 2:OFF SEARCH RANGE (RANGE NO. SELECT) DELAY ATTENUATOR TONE DATA AUTO STORE 2 3 4 5 6 1: ON/ 2:OFF CHAIN SEARCH 1 5 4 2:OFF 1:ON 1: AM/2: FM/3: WFM/4: NFM/5: AUTO 7: 25KHz/ 8: 50KHz/ 9: 100KHz/ 0: AUTO PLAN 4 PLAN 3 PLAN 2 PLAN 1 5/14/04 TRUNK ALPHA TAG MODE 4: 10KHz/ 5: 12.5KHz/ 6: 20KHz/ 1: 5KHz/ 2: 6.25KHz/ 3: 7.
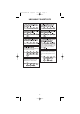
2 SCAN OPTION CONVENTIONAL (CHANNEL SELECT) TRUNK (BANK SELECT) 1 2 TRUNK TYPE TRUNK CHANNEL (CHANNEL SELECT) TALK GROUP (ID NO. SELECT ) 1 2 3 92 EDCS SCT.
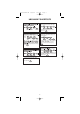
3 SYSTEM OPTION 1: ON/ 2:OFF 1: ON/ 2:OFF 1: 2400 bps / 2: 4800 bps / 3: 9600 bps/ 4: 19200 bps/ 5: OFF MASTER / SLAVE 1: ON/ 2:OFF 1: CSQ/ 2: TONE SQ/ 3: TONE SEARCH 1: ENABLE/ 2: DISABLE 1: ON/ 2: OFF KEY BEEP ENTER LOCK PC CONTROL CLONE DATA SKIP SQ MODE BANK TAG (SELECT BANK) P-25 CARD BATTERY SAVE 3 4 5 6 7 8 9 0 1: 15SECONDS/ 2: INFINITE 1: ON/ 2:OFF SCREEN MASK DIMMER TIME 2 1: HIGH/ 2: MEDIUM DIMMER LIGHT DIMMER 1 UBC3300XLT OM 5/14/04 3:30 PM 93 Page 93
UBC3300XLT OM 5/14/04 3:30 PM Page 94 Declaration of Conformity We: Uniden Corporation 2-12-7 Hatchobori Chuo-ku, Tokyo 104-8512 Japan declare, under our sole responsibility, that this equipment “Uniden Bearcat model UBC3300XLT” is in compliance with the essential requirements and other relevant provisions of the EMC, R&TTE and LVD Council Directives of the EU.
UBC3300XLT OM 5/14/04 3:30 PM Page 95 Memo 95
UBC3300XLT OM 2004 UBZZ01315AZ 5/14/04 3:30 PM Page 96