
Installation & Assembly

Package Contents:
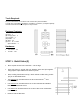
(A) Post… 4
(B) Canopy plate… 2
(C) Leg plate… 2
(D) Header… 8
(E) Slats… 30
(F) Trim… 10 + 2 extra
Spacer Blocks… 4
Hardware:
• 1 ½” Screw… 64
• ¾’ Nails… 120
Tools Required:
For your convenience we use Recex rust resistant zinc plated hardware.
You will need a #2 Philips or Robertson screwdriver, a hammer, (air stapler optional)
It would be beneficial to have a helper for step 3 below.
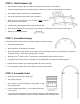
STEP 1. Build Sides (2)
• Place 2 posts across from each other – set on edge.
• Insert leg plate (C) (rough side out) between posts and join together
using top set of pre-drilled screw holes on posts.
• Now, working from bottom end up, attach 9 slats to sides using 2 nails
per join as described below.
• USE LENGTH OF SPACER BLOCK TO SET DISTANCE OF 1
ST
SLAT
FROM BOTTOM.
• USE LENGTH OF SPACER BLOCK TO ATTAIN UNIFORM PLACEMENT
BETWEEN REMAINING SLATS.
• USE WIDTH OF SPACER BLOCK TO ATTAIN 2 INCH SLAT OVERHANG
ON EACH SIDE.
• REPEAT FOR OTHER SIDE.