
Installation & Assembly
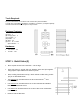

STEP 2. Build Headers (4)
• Set 2 headers on edge, approx 17-3/4 inches apart from each other - face side out.
• Use the canopy plate (B) as a 'measuring stick' to attain the 17-3/4 inch distance between headers.
• Join headers together with 3 slats as outlined below.
• Line up first slat with center mark on top of headers.
• Allow the slat to overhang face by 2 inches. (width of spacer
block can be used to set this)
• Nail slat into place on both headers using 2 nails per join.
• Next, use the length of the spacer block to set spacing for remaining 2 outer slats and nail into place.
• Repeat for remaining headers.
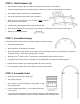
STEP 3. Assemble Canopy
Trim blocks will be used to join the 4 headers together to form the canopy.
• Set header upside down
• Place trim block on outside face of header.
• Keep trim block flush with bottom lip of header and leave enough overhang for trim block to be attached
to another header - attach block to header with 2 screws
• Now butt up a 2
nd
header to the 1
st
and attach to overhanging trim block using 2 screws.
• If possible have another person to help keep the joint tight while you fasten the headers together.
• Repeat above method to join remaining headers to form the canopy.
• Fit canopy plate (B) into each end of canopy and attach using screws.
STEP 4. Assemble Arbor
• Stand legs 4 feet apart from each other.
• Set canopy onto legs
• Join canopy to legs by attaching canopy plate to leg
plate using screws.
• Install remaining trim blocks - or for a different look they
can be left off.
• Your arbor can be attached to a fence, anchored to the ground with 3ft. metal or
wooden stakes or fitted with rebar post anchors available at your hardware store.