
Installation Guide

Install plastic guide Option:
Install plastic
guide
Remove
wheels
Adjustable Fit Sliding Patio Screen Door
Tools required:
Phillips-head screwdriver
Optional tools:
Slotted screwdriver
Tape measure
Level
Utility knife
Pencil
Safety glasses
Step stool
Putty knife
Scissors or Sheet metal snips
Drill and 3/32" drill bit
IMPORTANT: Replacement screen door t range Tools & Hardware Required:
Not intended to deter vandalism or burglary or limit
or prevent passage of children, pets, etc.
NOTICE
Be sure you have selected the proper replacement screen size
according to your patio door dimensions.
30" x 80" screens t most common 5' wide x 6'8" high doors
36" x 80" screens t most common 6' wide x 6'8" high doors
48" x 80" screens t most common 8' wide x 6'8" high doors
This screen is adjustable in height only.
Height Fit Range: 77-5/8" up to 80"
NOTE:
DO NOT ATTEMPT TO CUT OR MODIFY THE
REPLACEMENT SCREEN FRAME!
Hardware provided:
Complete Door Latch Assembly
Surface Mount Pull Handle
Screws
Plastic top guides
Bug strips (4)
Latch shims (3)
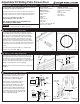
Loosen both top and both bottom expander channel
screws (Fig. 1). Fully retract both expanders (setting the
patio door to it's smallest possible height) and tighten
the expander screws. Determine which way the sliding
screen panel should slide. The handle side of the new
sliding screen panel should be the same as the sliding
glass door. The screen latch release should face toward
the inside of your home. Carefully remove the vertical bug
sweep from the non-handle side of the screen door. Set
aside.
To reverse which side the handle is on, cartwheel the
sliding screen panel 180°. (Fig. 2)
Sliding screen door orientation
1
Fig. 1 Fig. 2
09172018 MK1459
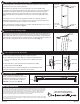
Place the top of the patio screen door into the top sill
track of the patio door. If the sill pocket is too deep for
the wheels to reach the surface without inserting the
door into the sill pocket and the door is too thick to t up
into the sill pocket, install the plastic top guides using a
Phillips head screwdriver, as shown. (Fig. 3)
Option: remove the wheels when plastic top guides are
installed.
Sliding screen door preparation
2
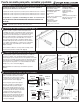
Outside home
BOTTOM OF PATIO DOORS
(FRAME SILL)
Inside home
Glass patio
panels
Sliding patio
screen door
LIFT
Install sliding patio screen door
3
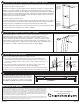
Place the top of the patio screen door into
the top sill track as far as it will go when
using wheels or until the plastic guides
are just inside the sill track. (Fig. 4)
Lift the bottom of the sliding screen door
into the bottom sill track of the patio
door. This may be a tight t. If so, slip a
putty knife under one wheel assembly,
compress the assembly, and lift that side
of the screen door into the track. Repeat
for the other wheel. Ensure that the wheel
rests on the guide rail in the patio door sill
track, if applicable. (Fig. 5)
Fig. 3
Center RailCenter Channel
Outside
home
Glass
patio door
Inside
home
TOP
Plastic
top guide
Sliding
patio screen
Center RailCenter Channel
Wheel
TOP
Sliding
patio screen
Glass
patio door
Outside
home
Inside
home
Fig. 4 Fig. 5