
Installation Guide
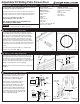

BUG STRIP
Flush with
Door Frame
Jamb
Flush with
Door Frame
Jamb
Handle
Edge
Adjustment
Screws
Adjustment
Screws
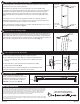
For most applications, the height of the door will require adjustment. This may require
adjusting the top, bottom, or both expanders.
Start with the top expander. Loosen a top expander screw using a Phillips-head
screwdriver. Use a at head screwdriver at the edge of the door as a lever to extend the
expander until the plastic guides are just inside the sill pocket or until the wheels are
pressing against the top of the sill pocket, which may or may not include a guide rail.
Tighten the expander screw. Repeat for the other top corner of the sliding patio screen
door.
If the top of the door is still not fully engaged in the patio door sill track, repeat this
adjustment at each bottom corner of the patio screen door to increase the height of the
screen door until it fully engages in the patio door top sill track.
Test to check if the door slides smoothly. If not, make small adjustments to each corner of
the bottom expander until satised. (Fig. 6)
Adjust sliding patio screen door height
4
Fig. 6
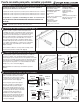
Press the bug sweep back into the door frame in the channel opposite the handle side. If
bug sweep is too long for the installed height of the patio screen door, carefully trim excess
with a utility knife. When the screen is closed, the bug sweep should t snugly against the
stationary glass panel of the patio door. If bug sweep is too wide, impeding the operation of
the screen door, carefully trim excess along the grooves provided. (Fig. 7)
Install and trim the bug sweep
5
Trim here
if needed
Fig. 7
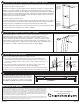
A. Place screen handle latch bar in uppermost “unlatched” position.
B. Place strike latch at frame jamb. Align top of strike latch slightly below latch
hook as shown in (Fig. 8). Mark screw hole locations. Drill pilot holes using
3/32" bit.
C. Attach strike latch to frame jamb and test latch engagement by sliding
handle latch bar downward. (Fig. 9)
If the strike latch will not catch the sliding patio door handle latch bar, add
shim(s) provided underneath the strike latch until it catches.
Latch alignment and adjustment
6
Fig. 9
UNLATCHED
LATCH HOOK
STRIKE LATCH
LATCHED
LATCH HOOK
STRIKE LATCH
Fig. 8
If space around each expander screw
allows, install the 4 bug strips provided in the
hardware bag by applying over adjustment
screw holes on the expanders at TOP and
BOTTOM of the patio door. (Fig. 10)
Install bug strips
7
Fig. 10
Your Unique Home Designs screen door is warranted against manufacturer defects for one year from the
purchase date. If the door breaks or structural defects occur, Unique Home Designs will, at our discretion,
repair or replace the door. Replacement items may vary in style due to changes in suppliers and product.
This limited warranty will not apply if the part has been misused, abused or altered. Cutting parts not
specied by the installation guide or parts drilled incorrectly are not included in this warranty. Screen
material is excluded from warranty coverage. Warranty is not transferable.
To make a claim under this Warranty, send a brief written description of the problem, a picture of the claim,
proof of purchase, and your contact information to: Unique Home Designs, 973 N. Colorado Street, Gilbert
AZ. 85233 Attn: Warranty Claims
Warranty Information
VIEW INSTALLATION VIDEOS
AND LATEST INFORMATION AT
Warranty Information
09172018 MK1459