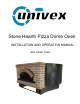
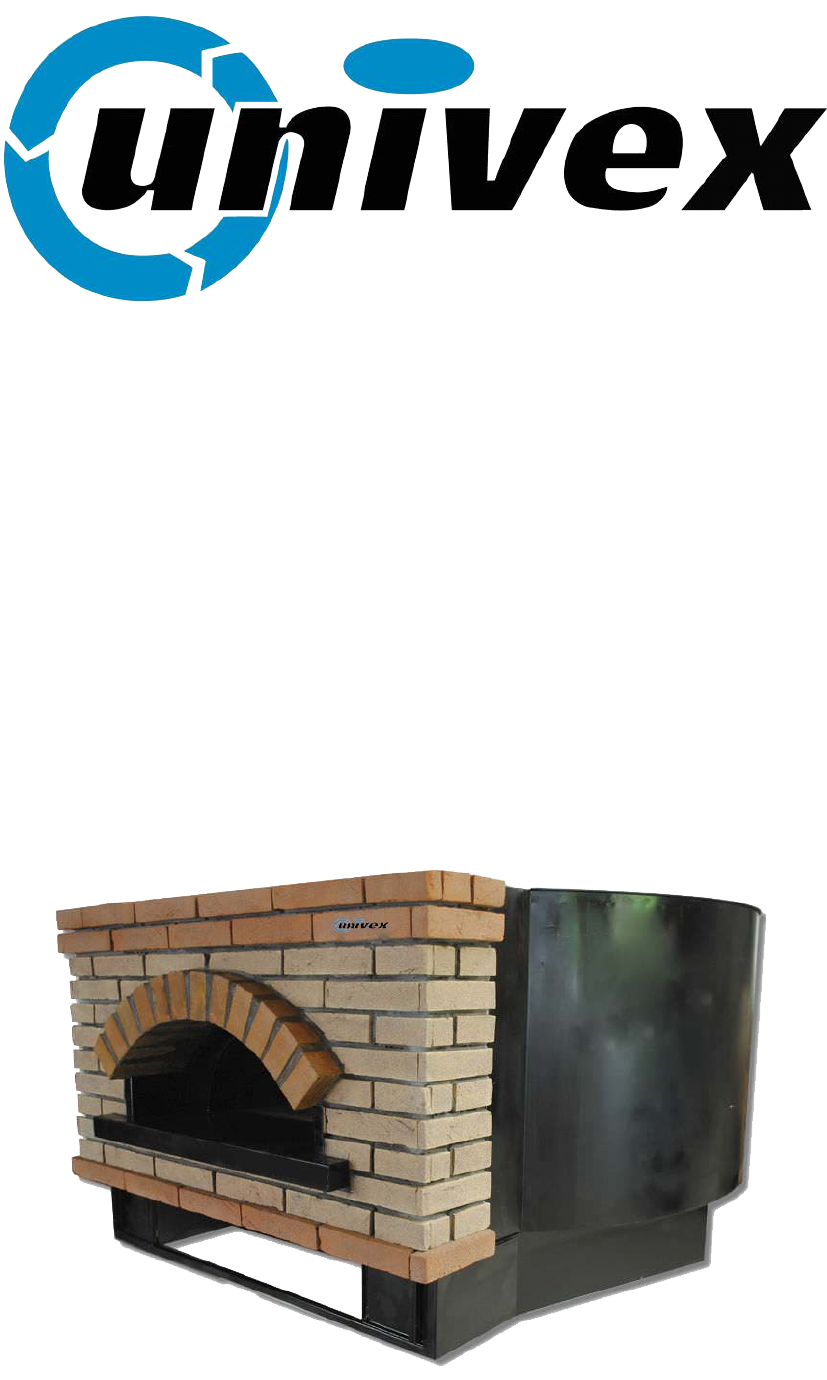
Stone Hearth Pizza Dome Oven INSTALLATION AND OPERATION MANUAL GAS-FIRED OVEN
CAUTION This oven MUST be seasoned before initial use The seasoning procedure takes 6 days, running the oven for at least 8 hours per day. 1. For the first 3 days, the oven should be set at a low temperature (flame of 1 1/2-2 inches) 2. For the last 3 days, the oven should be run at a higher temperature (full flame) This must be done to dry out internal components, thus preventing damage to the oven. Note: You may see water dripping from the oven during this process. This is normal.
Gas oven installation and operating instructions Please read this entire manual before installing the oven. Failure to follow these instructions may result in property damage, bodily injury or even death. Contact your local building or fire officials about restrictions and installation inspections in your area. FOR YOUR SAFETY Do not store or use gasoline or other flammable vapour or liquids in the vicinity of this or any other appliance.
General instructions: Installation clearances A fire may start if this oven is not properly installed. To reduce the risk of fire, follow these installation instructions. A major cause of oven-related fire is failure to keep the required clearances (air spaces) from combustible materials. It is of the utmost importance that this oven be installed only in accordance with these instructions. Please read this entire manual before you install the oven.
General instructions: Gas specifications GAS Univex gas ovens are equipped with a 3/4" NPT gas connection located at the front left or front right (depending on the model) of the oven. Have a licensed gas installer make the connection and test all fittings and pipe connections for leaks. Use approved gas leak detectors (Soap solutions or equivalent) over and around the fittings and pipe connections. DO NOT USE A FLAME TO TEST FOR LEAKS.
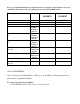
Factory specified individual burner manifold pressures equipped to burn Natural or LP gases and Hourly Natural gas or LP gases BTU input rates for Univex DOME models Burner Nominal rate Manifold pressure LP gas Manifold pressure Natural gas Ø main burner injectors LP gas Ø main burner injectors Propane gas Ø main burner injectors Natural gas Pilot burner injectors LP gas and Propane Pilot burner injectors Natural gas Air adjustment Natural gas Air adjustment LP gas and Propane DOME55 DOME47 BTU/hr i
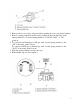
2. Remove the access cap by using a wrench, turning the access cap anticlockwise. 3. Remove spring retainer from the cap by pushing against the flat side of the spring retainer. Look at the spring retainer to locate the “NAT” or “LP” position. 4. To convert from Natural gas to LP gas, turn over the spring retainer so the “LP” is showing on the bottom. To convert from LP gas to Natural gas, turn over the spring retainer so the “NAT” is showing on the bottom. 5. Snap the spring retainer back into the cap. 6.
To convert the main gas burner 7. With a screwdriver, unscrew the screw which fixes the telescopic bushing, and completely insert the bushing into the Venturi burner. 8. With a wrench, remove the gas injector by turning it anticlockwise. Set gas orifice spud aside. 9. Gas orifice spuds are stamped with a number on the side. See the table on page 5.
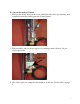
10.Place removed orifice spuds in plastic parts bag for future use and keep with literature package. 11.Install the correct injector. See the table on page 5. 12.Position the air bushing, according to the air adjustment displayed below, and fix the bushing by screwing the screw. See also the table on page 5.
To convert the pilot gas burner 13. Remove the access cap by using a wrench, turning the access cap anticlockwise. 14. With a slot screwdriver, remove the gas injector by turning it anticlockwise. Set gas orifice spud aside. 15. Install the correct injector. See the table on page 5.
General instructions: Gas specifications Univex recommends that the appliance’s individual shutoff valve (supplied by others) be left readily accessible. Univex also recommends that inspection and maintenance of the burner and gas piping connections of this appliance be performed at regularly scheduled intervals and only by professional gas appliance service agencies.
General instructions: Gas specifications Lighting and shut down instructions Turning the pizza oven on 1. Make sure main gas supply is on (valve parallel with gas line). 2. Remove the oven door. 3. Starting from the OFF position, push and turn the knob onto pilot position . Push the knob (piezoelectric power switch) and light the pilot flame by pressing the knob for several seconds. Release the knob and check the pilot flame is lit. If the flame is not lit, repeat the process. 4.
Certificate Number: 248684-2492187 Project Number: 2492187 Page Number: 23 CLEANING THE OVEN 1. As needed, use a floor brush to sweep stray food debris to the doorway, where it can be easily removed with a dough cutter or spatula. As needed, wipe the deck using a damp (not wet) cloth wrapped around the floor brush. NEVER PLACE ANYTHING IN OR ABOVE THE RADIANT FLAME Note: small "crazing" cracks will occur with normal heating and cooling. They will not affect the performance or durability of the oven.